Instructions for use WASHING MACHINE Contents GB English, 1 F Français,15 GB Installation, 2-3-4-5 AR , 29 Unpacking and levelling Connecting the electricity and water supplies The first wash cycle Technical data Description of the washing machine and starting a wash cycle, 6-7 Control panel Indicator lights Starting a wash cycle Wash cycles, 8 Table of wash cycles Personalisation, 9 AR6L 65 Setting the temperature Functions Detergents and laundry, 10 Detergent dispenser drawer Bleach cycle Prepa
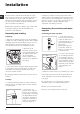
Installation GB This instruction manual should be kept in a safe place for future reference. If the washing machine is sold, transferred or moved, make sure that the instruction manual remains with the machine so that the new owner is able to familiarise himself/herself with its operation and features. Levelling the machine correctly will provide it with stability, help to avoid vibrations and excessive noise and prevent it from shifting while it is operating.
Connecting the drain hose 65 - 100 cm Connect the drain hose, without bending it, to a draining duct or a wall drain situated between 65 and 100 cm from the floor; alternatively, place it over the edge of a basin, sink or tub, fastening the duct supplied to the tap (see figure). The free end of the hose should not be underwater. We advise against the use of hose extensions; in case of absolute need, the extension must have the same diameter as the original hose and must not exceed 150 cm in length.
GB If a 13 amp plug (BS 1363) is used it must be fitted with a 13 amp fuse, either in the plug or adaptor or at the distribution board. If you are in any doubt the electrical supply to your machine, consult a qualified electrician before use.
GB Technical data Model AR6L 65 Dimensions width 59.5 cm height 85 cm depth 52,5 cm Capacity from 1 to 6 kg Electrical connections please refer to the technical data plate fixed to the machine Water connections maximum pressure 1 MPa (10 bar) minimum pressure 0.05 MPa (0.5 bar) drum capacity 46 litres Spin speed up to 600 rotations per minute Energy rated programmes according to regulation EN 60456 programme 7; temperature 60°C; using a load of 6 kg.
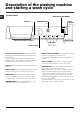
Description of the washing machine and starting a wash cycle Control panel GB WASH CYCLE PROGRESS ON/OFF button DOOR LOCKED TEMPERATURE knob indicator light START/PAUSE Detergent dispenser drawer FUNCTION WASH CYCLE knob Detergent dispenser drawer: used to dispense detergents and washing additives (see Detergents and laundry). There is a key which provides a summary of the available wash cycles inside the detergent dispenser drawer; this may be consulted at any time.
Indicator lights The indicator lights provide important information. This is what they can tell you: Wash cycle phase indicator lights Once the desired wash cycle has been selected and has begun, the indicator lights switch on one by one to indicate which phase of the cycle is currently in progress.
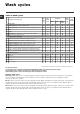
Wash cycles Table of wash cycles Wash cycles GB Detergents Max temp. (°C) Max. speed (rpm) Bleach Wash Fabric softener 7 Sanitizing cycle: Extremely soiled whites. 7 Sanitizing cycle (1): Heavily soiled whites and resistant colours. 90° 600 l l l 60° 600 - l 8 Shirts 40° 600 - l l Description of the wash cycle Max. load (kg) Cycle duration 6 165 l 6 137 l 2 70 Special cycles 9 Lingerie 30° 600 - l 1 70 10 Silk/Curtains: For garments in silk and viscose, lingerie.
Personalisation Setting the temperature GB Turn the TEMPERATURE knob to set the wash temperature (see Table of wash cycles). The temperature may be lowered, or even set to a cold wash ( ). The washing machine will automatically prevent you from selecting a temperature which is higher than the maximum value set for each wash cycle. Functions The various wash functions available with this washing machine will help to achieve the desired results, every time. To activate the functions: 1.
Detergents and laundry GB Detergent dispenser drawer Good washing results also depend on the correct dose of detergent: adding too much detergent will not necessarily result in a more efficient wash, and may in fact cause build up on the inside of your appliance and contribute to environmental pollution. Do not use hand washing detergents because these create too much foam. Open the detergent dispenser drawer and 4 pour in the detergent or washing additive, as follows.
Precautions and tips This washing machine was designed and constructed in accordance with international safety regulations. The following information is provided for safety reasons and must therefore be read carefully. Opening the porthole door manually General safety This appliance was designed for domestic use only. The washing machine must only be used by adults, in accordance with the instructions provided in this manual.
Care and maintenance GB Cutting off the water and electricity supplies Turn off the water tap after every wash cycle. This will limit wear on the hydraulic system inside the washing machine and help to prevent leaks. Unplug the washing machine when cleaning it and during all maintenance work. Cleaning the washing machine The outer parts and rubber components of the appliance can be cleaned using a soft cloth soaked in lukewarm soapy water. Do not use solvents or abrasives.
Troubleshooting Your washing machine could fail to work. Before contacting the Technical Assistance Centre (see Assistance), make sure that the problem cannot be not solved easily using the following list. GB Problem: Possible causes / Solutions: The washing machine does not switch on. The appliance is not plugged into the socket fully, or is not making contact. There is no power in the house. The wash cycle does not start. The washing machine door is not closed properly.
Service Before calling for Assistance: Check whether you can solve the problem alone (see Troubleshooting); Restart the programme to check whether the problem has been solved; If this is not the case, contact an authorised Technical Assistance Centre using the telephone number provided on the guarantee certificate. GB Always request the assistance of authorised technicians. Have the following information to hand: the type of problem; the appliance model (Mod.); the serial number (S/N).
Mode demploi LAVE-LINGE Sommaire FR Français FR Installation, 16-17-18-19 Déballage et mise à niveau Raccordements eau et électricité Premier cycle de lavage Caractéristiques techniques Description du lave-linge et démarrage dun programme, 20-21 Bandeau de commandes Voyants Démarrage dun programme Programmes, 22 Tableau des programmes Personnalisations, 23 AR6L 65 Sélection de la température Fonctions Produits lessiviels et linge, 24 Tiroir à produits lessiviels Cycle blanchissage Triage du ling
Installation FR Conserver ce mode demploi pour pouvoir le consulter à tout moment. En cas de vente, de cession ou de déménagement, veiller à ce quil suive toujours le lave-linge pour que son nouveau propriétaire soit informé sur son mode de fonctionnement et puisse profiter des conseils correspondants. Une bonne mise à niveau garantit la stabilité de lappareil et évite quil y ait des vibrations, du bruit et des déplacements en cours de fonctionnement.
Raccordement du tuyau de vidange 65 - 100 cm Raccordez le tuyau d'évacuation, sans le plier, à un conduit d'évacuation ou à une évacuation murale placés à une distance du sol comprise entre 65 et 100 cm; ou bien accrochez-le à un évier ou à une baignoire, dans ce cas, fixez le support en plastique fourni avec l'appareil au robinet (voir figure). L'extrémité libre du tuyau d'évacuation ne doit pas être plongée dans l'eau.
FR En cas d'utilisation d'une fiche de 13 ampères (BS 1363), installez un fusible de 13 ampères dans la fiche ou sur l'adaptateur ou sur la carte de distribution. En cas de doute sur l'alimentation électrique de votre électroménager, faites appel à un électricien qualifié avant de le mettre en service.
FR Caractéristiques techniques Modèle AR6L 65 Dimensions largeur 59,5 cm hauteur 85 cm profondeur 52,5 cm Capacité de 1 à 6 kg Raccordements électriques Voir la plaque signalétique appliquée sur la machine Raccordements hydrauliques pression maximale 1 MPa (10 bar) pression minimale 0,05 MPa (0,5 bar) capacité du tambour 46 litres Vitesse d'essorage jusqu'à 600 tours minute Programmes de contrôle selon la norme EN 60456 programme 7; température 60°C; effectué avec une charge de 6 kg.
Description du lave-linge et démarrage dun programme FR Bandeau de commandes Voyants DÉROULEMENT CYCLE Touche MARCHE/ Bouton TEMPÉRATURE ARRÊT Voyant HUBLOT VERROUILLÉ Touche avec voyant Tiroir à produits lessiviels Touches avec voyants FONCTION MARCHE/ PAUSE Bouton PROGRAMMES Tiroir à produits lessiviels: pour charger les produits lessiviels et les additifs (voir Produits lessiviels et linge). Une légende des programmes est consultable à tout moment à l'intérieur du tiroir.
Voyants Les voyants fournissent des informations importantes. Voilà ce quils signalent: Voyants phase en cours Une fois que le cycle de lavage sélectionné a démarré, les voyants sallument progressivement pour indiquer son stade davancement: Voyant hublot verrouillé Le voyant allumé indique que le hublot est verrouillé pour empêcher toute ouverture accidentelle. Pour éviter dendommager lappareil, attendre que le voyant cesse de clignoter avant douvrir la porte.
Programmes Tableau des programmes Programmes FR Description du Programme Temp. maxi. (°C) Vitesse Produits lessiviels Charge maxi Durée maxi (tours cycle Assou(Kg) minute) Javel Lavage plissant Programmes Spécial 7 Anti-bactérien: blancs extrêmement sales. 7 Anti-bactérien (1): blancs et couleurs résistantes très sales.
Personnalisations Sélection de la température FR Tourner le bouton TEMPÉRATURE pour sélectionner la température de lavage (voir Tableau des programmes). La température peut être abaissée jusquau lavage à froid ( ). La machine interdira automatiquement toute sélection dune température supérieure à la température maximale prévue pour chaque programme. Fonctions Les différentes fonctions de lavage prévues par le lave-linge permettent dobtenir la propreté et le blanc souhaités.
Produits lessiviels et linge FR Tiroir à produits lessiviels Linge ou vêtements particuliers Un bon résultat de lavage dépend aussi dun bon dosage de produit lessiviel: un excès de lessive ne lave pas mieux, il incruste lintérieur du lave-linge et pollue lenvironnement. Chemises: sélectionner le programme 8 approprié au lavage de chemises de couleurs et textiles différents. Il en prend le plus grand soin en réduisant le froissage.
Précautions et conseils Ce lave-linge a été conçu et fabriqué conformément aux normes internationales de sécurité. Ces consignes sont fournies pour des raisons de sécurité, il faut les lire attentivement. Ouverture manuelle du hublot Sécurité générale Cet appareil est conçu pour un usage domestique. Ce lave-linge ne doit être utilisé que par des adultes en suivant les instructions reportées dans ce mode demploi.
Entretien et soin FR Coupure de larrivée deau et du courant Fermer le robinet de leau après chaque lavage. Cela réduit lusure de linstallation hydraulique du lave-linge et évite tout danger de fuites. Nettoyage de la pompe Le lave-linge est équipé dune pompe autonettoyante qui nexige aucune opération dentretien. Il peut toutefois arriver que de menus objets (pièces de monnaie, boutons) tombent dans la préchambre qui protège la pompe, placée en bas de cette dernière.
Anomalies et remèdes Il peut arriver que le lave-linge ne fonctionne pas bien. Avant dappeler le Service de dépannage (voir Assistance), contrôler sil ne sagit pas par hasard dun problème facile à résoudre à laide de la liste suivante. FR Anomalies: Causes / Solutions possibles: Le lave-linge ne sallume pas. La fiche nest pas branchée dans la prise de courant ou mal branchée. Il y a une panne de courant. Le cycle de lavage ne démarre pas. Le hublot nest pas bien fermé.
Assistance Avant dappeler le service après-vente: Vérifier si on ne peut pas résoudre lanomalie par ses propres moyens (voir Anomalies et Remèdes); Remettre le programme en marche pour contrôler si linconvénient a disparu; Autrement, contacter le Centre dAssistance technique agréé au numéro de téléphone indiqué sur le certificat de garantie. FR Ne jamais sadresser à des techniciens non agréés. Communiquer: le type de panne; le modèle de lappareil (Mod.); son numéro de série (S/N).
تعليمات االستخدام ماكينة غسيل المحتويات AR AR التركيب30-31- 32-33 ، إفراغ المحتويات وتحديد المستوى وصل إمدادات الكهرباء والماء دورة الغسيل األولى بيانات تقنية وصف ماكينة الغسيل وتشغيل دورة الغسيل34-35 ، لوحة التحكم المصابيح المؤشرة تشغيل دورة الغسيل دورات الغسيل36 ، جدول دورات الغسيل التخصيصات37 ، ضبط درجة الحرارة AR6L 65 الوظائف مواد التنظيف والغسيل38 ، درج وعاء مواد التنظيف دورة التبييض تحضير الغسيل مالبس تتطلب عناية خاصة نظام
التركيب AR ! يجب االحتفاظ بدليل التعليمات هذا في مكان آمن لمراجعته في المستقبل .إذا تم بيع الجهاز ،إرساله أو نقله ،تأكد من أن دليل التعليمات قد أرفق بماكينة الغسيل بحيث يتمكن مالكوها الجدد من التعرف على عملها وخصائصها. تحديد مستوى الجهاز لديك بشكل صحيح سيمنحه االستقرار وتجنّب كل االرتجاجات ،الضجيج والتحرك أثناء العمل .إذا تم وضعها في خزانة أو على بساط متجعد ،قم بمعايرة األرجل بشكل يوفر فسحة تهوئة كافية تحت الماكينة.
وصل خرطوم تصريف الماء 65 - 100 cm وصل خرطوم تصريف الماء، من دون ثنيه ،بأنبوب تصريف أو بتصريف جداري على ارتفاع يتراوح بين 65وحتى 100سم عن األرض؛ أو قم بتثبيته على طرف الحوض ،البالوعة أو المغسلة، مع تثبيت األنبوب المز ّود بالحنفية .على الطرف الحر من الخرطوم أال يكون تحت الماء. ! نحن ال ننصح باستخدام إطاالت الخرطوم؛ إذا كان ذلك ضروريا جدا ،فعلى اإلطاالت أن تكون بنفس قطر الخرطوم األصلي على أال يتعدى طوله 150سم.
AR في حال يتم استخدام قابس 13أمبير ( )BS 1363يجب باء يتالءم مع مصهر 13أمبير ،إما في القابس أو المكيف أو في لوحة التوزيع. إذا كان لديك أي شك بخصوص التزويد الكهربائي للماكينة لديك ،قم باستشارة أخصائي كهرباء مؤهل قبل االستخدام.
AR البيانات التقنية الطراز AR6L 65 األبعاد العرض 59.5سم االرتفاع 85سم العمق 52.5سم السعة من 1وحتى 6كغم التوصيالت الكهربائية الرجاء راجع لوحة البيانات التقنية الملصقة على الماكينة تويالت الماء الحد األقصى للضغط 1 MPa( 10بار) الحد األدنى للضغط 0.05 MPa( 0.
وصف ماكينة الغسيل وتشغيل دورة الغسيل AR لوحة التحكم المصابيح المؤشرة لعملية دورة الغسيل مصباح مؤشر درحة الحرارة إغالق الباب زر تشغيل/إيقاف تشغيل درج وعاء مواد التنظيف زر مع مصباح مؤشر بدء/إيقاف مؤقت أزرارمع مصابيح مؤشرة للوظيفة مفتاح دورة الغسيل درج وعاء مواد التنظيف :يتم استخدامه لتوزيع مواد التنظيف ومضافات الغسيل (انظر "مواد التظيف والغسيل"). هناك مفتاح يشكل مجمال لدورات الغسيل المتوفرة داخل درج وعاء مواد التنظيف؛ يمكن االستعانه به دائما.
المصابيح المؤشرة توفر المصابيح المؤشرة معلومات هامة. هذا ما يمكنها أن تخبرك به: المصابيح المؤشرة لمرحلة دورة الغسيل فور اختيار دورة الغسيل المرغوب بها وبدءها ،تضيئ المصابيح المؤشرة واحد تول الآخر للإشارة لمرحلة الدوران التي تعمل حاليا. المصباح المؤشر إلغالق الباب: إذا كان هذا المصباح المؤشر مشغال ،فيكون باب الجهاز مغلقا لتحاشي فتحه عن غير قصد؛ لتحاشي أية أعطال ،انتظر حتى يطفئ المصباح المؤشر قبل أن تفتح باب الجهاز.
دورات الغسيل دورات الغسيل AR جدول دورات الغسيل درجة حرارة قصوى (مئوي) وصف دورة الغسيل سرعة قصوى (دورة في التبييض الدقيقة) مواد التنظيف غسيل المادة المطرية ّ حمل أقصى مدة الدورة (كغم) دورات خاصة 7دورة التعقيم :الغسيل األبيض المتسخ جدا. 90° 600 l l l 6 165 7دورة التعقيم ( :)1المالبس البيضاء المتسخة جدا واأللوان الثابتة.
التخصيصات ضبط درجة الحرارة AR أدر مفتاح درجة الحرارة لضبط درجة حرارة الغسيل (انظر جدول دورات الغسيل). يمكن خفض درجة الحرارة أو حتى إعدادها للغسيل البارد( ). ستمنعك ماكينة الغسيل أوتوماتيكيا من اختيار درجة حرارة أعلى من القيمة القصوى المحددة لكل دورة غسيل. الوظائف وظائف الغسيل المتنوعة المتوفرة في ماكينة الغسيل هذه ستساعدك في الحصول على النتائج المرادة ،في كل مرة. لتشغيل الوظائف: .1اضغط الزر المالئم للوظيفة المرغوبة؛ .
مواد التنظيف والغسيل AR درج وعاء مواد التنظيف تعتمد نتائج الغسيل الجيدة أيضا على كمية مواد التنظيف :إن إضافة مواد تنظيف أكثر مما يجب ال يزيد فاعلية الغسيل بالضرورة ،يمكن أن يؤدي إلى انسداد في األجزاء الداخلية من الجهاز لديك وحتى يمكن أن يلوث البيئة. ! ال تستخدم المواد المعدة للغسيل باليد ألنها يمكن أن تطلق رغوة فائضة. افتح درج وعاء مواد التنظيف واسكب مواد التنظيف أو 4 مضافات الغسيل ،كما يلي.
وسائل حذر ونصائح ! تم تصميم ماكينة الغسيل وتصنيعه طبقا لمواصفات األمان العالمية. يتم تزويد التحذيرات التالية ألسباب وقائية ويجب قراءتها بعناية. الوقاية العامة فتح باب الفتحة تدريجيا في حال ليس باالمكان فتح باب الفتحة جراء انقطاع التيار الكهربائي، وإذا رغبت في إزالة الغسيل ،تصرف على النحو التالي: • تم تصميم هذا الجهاز لالستخدام المنزلي فقط. • يجب استخدام ماكينة الغسيل من قبل البالغين فقط ،بموجب التعليمات المزودة في هذا الدليل.
العناية والصيانة AR قطع إمداد الماء والكهرباء ّ المضخة تنظيف • قم بإقفال حنفية الماء بعد كل دورة غسيل .سيحدد هذا من تآكل النظام الهيدروليكي داخل ماكينة الغسيل ويساعد على منع التسربات. ماكينة الغسيل مزودة بمضخة للتنظيف الذاتي ،حيث ال تحتاج إلى أية عناية في أي وقت .في بعض األحيان ،يمكن للقطع الصغيرة (مثل القطع النقدية أو األزرار) أن تسقط داخل الحجرة األولية التي تحمي المضخة ،والموجودة في جزئها األسفل.
استكشاف المشاكل وحلها ن لماكينة الغسيل أن تفشل في العمل فجأة .قبل االتصال بمركز المساعدة التقنية (أنظر "الخدمة") تأكد من أن المشكلة ال يمكن حلها بسهولة باستخدام الجدول التالي. المشكلة: األسباب المحتملة /الحلول: ال يمكن تشغيل ماكينة الغسيل. • الجهاز غير موصل بالمقبس الكهربائي بشكل كامل ،أو أنه لا يحدث تماس. • يوجد انقطاع كهرباء في البيت. AR دورة الغسيل ال تبدأ بالعمل. • • • • • باب ماكينة الغسيل غير مقفل بشكل صحيح.
الخدمة قبل استدعاء المساعدة: AR • افحص فيما إذا كان بإمكانك حل المشكلة بنفسك (انظر "اكتشاف المشاكل واصالحها); • أعد تشغيل البرنامج للفحص فيما إذا تم حل المشكلة؛ • إذا لم يكن األمر كذلك ،اتصل بمركز مساعدة تقني معتمد بواسطة رقم الهاتف ! اطلب دائما مساعدة فنّي مؤهل. الرجاء خذ بعين االعتبار المعلومات التالية: • نوع المشكلة؛ • طراز الجهاز ().Mod؛ • الرقم التسلسلي (.
AR 43
195068195.