Manual de instrucciones LAVASECADORA Sumario ES Español,1 GB English,13 ES Instalación, 2-3 Desembalaje y nivelación Conexiones hidráulicas y eléctricas Primer ciclo de lavado Datos técnicos Descripción de la lavasecadora y comienzo de un programa, 4-5 Panel de control Pilotos Poner en marcha un programa Programas, 6 Tabla de programas Personalizaciones, 7 ARM7F 125 Seleccionar la temperatura Seleccione el secado Funciones Detergentes y ropa, 8 Contenedor de detergentes Ciclo de blanqueo Prepara
Instalación ES Es importante conservar este manual para poder consultarlo en cualquier momento. En caso de venta, de cesión o de traslado, verifique que permanezca junto con la lavasecadora para informar al nuevo propietario sobre el funcionamiento y brindar las correspondientes advertencias. Una cuidadosa nivelación brinda estabilidad a la máquina y evita vibraciones, ruidos y desplazamientos durante el funcionamiento.
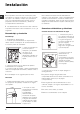
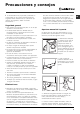
Conexión del tubo de descarga 65 - 100 cm Conecte el tubo de descarga, sin plegarlo, a una tubería de descarga o a una descarga de pared colocadas a una altura del piso entre 65 y 100 cm; o apóyelo en el borde de un lavamanos o de una bañera, uniendo la guía suministrada con el aparato, al grifo (ver la figura). El extremo libre del tubo de descarga no debe permanecer sumergido en el agua.
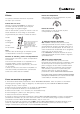
Descripción de la lavasecadora y comienzo de un programa ES Panel de control PANTALLA TEMPERATURA Botón y piloto de Contenedor de detergentes Botón SECADO Mando de PROGRAMAS Contenedor de detergentes: para cargar detergentes y aditivos (ver Detergentes y ropa). Botón y piloto de ENCENDIDO/APAGADO: para encender y apagar la máquina. El piloto iluminado indica que la máquina está encendida. Mando de PROGRAMAS: para elegir los programas. Durante el funcionamiento del programa el mando no se mueve.
Pilotos Los pilotos suministran información importante. He aquí lo que nos dicen: Pilotos fase en curso Girando el mando PROGRAMAS, los pilotos se iluminarán indicando las fases que la máquina realizará según el programa elegido. Una vez seleccionado y puesto en marcha el ciclo de lavado deseado, las luces testigo se encenderán progresivamente para indicar su estado de avance: Pilotos de temperatura Seleccionando un valor de temperatura, el piloto correspondiente se iluminará.
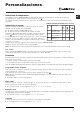
Programas Tabla de programas Programas ES Descripción del Programa Detergentes Carga Temp. Velocidad Duración máx. max. máx. Secado BlanquSuavi- (Kg.) del ciclo (°C) (r.p.m.) Lavado eador zante 90° 1200 l l l l 6 Ciclo Desinfectante (1): blancos y colores resistentes muy sucios. 7 Ciclo Buenas Noches: colores delicados poco sucios. 60° 1200 l - l l 7 40° 800 - l l 4 8 Baby cycle: colores delicados muy sucios. 9 Seda/Cortinas: para prendas de seda, viscosa, lencería.
Personalizaciones Seleccionar la temperatura ES Presionando el botón TEMPERATURA se selecciona la temperatura de lavado (ver la Tabla de programas). La temperatura se puede disminuir hasta el lavado en frío ( ). La máquina impedirá automáticamente seleccionar una temperatura mayor que la máxima prevista para cada programa.
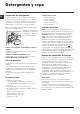
Detergentes y ropa ES Contenedor de detergentes El buen resultado del lavado depende también de la correcta dosificación del detergente: si se excede la cantidad, no se lava de manera más eficaz, sino que se contribuye a encostrar las partes internas de la lavasecadora y a contaminar el medio ambiente. No use detergentes para el lavado a mano porque producen demasiada espuma.
Precauciones y consejos La lavasecadora fue proyectada y fabricada en conformidad con las normas internacionales de seguridad. Estas advertencias se suministran por razones de seguridad y deben ser leídas atentamente. Seguridad general Este aparato ha sido fabricado para un uso de tipo doméstico exclusivamente. La lavasecadora debe ser utilizada sólo por personas adultas y siguiendo las instrucciones contenidas en este manual.
Mantenimiento y cuidados ES Interrumpir el agua y la corriente eléctrica Limpiar la bomba Cierre el grifo de agua después de cada lavado. De este modo se limita el desgaste de la instalación hidráulica de la lavasecadora y se elimina el peligro de pérdidas. La lavasecadora posee una bomba autolimpiante que no necesita mantenimiento. Pero puede suceder que objetos pequeños (monedas, botones) caigan en la precámara que protege la bomba, situada en la parte inferior de la misma.
Anomalías y soluciones Puede suceder que la lavasecadora no funcione. Antes de llamar al Servicio de Asistencia Técnica (ver Asistencia),controle que no se trate de un problema de fácil solución utilizando la siguiente lista. ES Anomalías: Posibles causas / Solución: La lavasecadora no se enciende. El enchufe no está introducido en la toma de corriente, o no hace contacto. En la casa no hay corriente. El ciclo de lavado no comienza. La puerta no está correctamente cerrada.
Asistencia Antes de llamar al Servicio de Asistencia Técnica: Verifique si la anomalía la puede resolver Ud. solo (ver Anomalías y soluciones); Vuelva a poner en marcha el programa para controlar si el inconveniente fue resuelto; Si no es así, llame al Servicio de Asistencia técnica autorizado, al número de teléfono indicado en el certificado de garantía. ES No recurra nunca a técnicos no autorizados. Comunique: el tipo de anomalía; el modelo de la máquina (Mod.
Instructions for use WASHER-DRYER Contents GB English GB Installation, 14-15 Unpacking and levelling Connecting the electricity and water supplies The first wash cycle Technical data Description of the washer-dryer and starting a wash cycle, 16-17 Control panel Indicator lights Starting a wash cycle Wash cycles, 18 Table of wash cycles Personalisation, 19 ARM7F 125 Setting the temperature Setting the drying cycle Functions Detergents and laundry, 20 Detergent dispenser drawer Bleach cycle Preparing
Installation GB This instruction manual should be kept in a safe place for future reference. If the washer-dryer is sold, transferred or moved, make sure that the instruction manual remains with the machine so that the new owner is able to familiarise himself/herself with its operation and features. Levelling the machine correctly will provide it with stability, help to avoid vibrations and excessive noise and prevent it from shifting while it is operating.
Do not use extension cords or multiple sockets. Connecting the drain hose 65 - 100 cm Connect the drain hose, without bending it, to a drainage duct or a wall drain located at a height between 65 and 100 cm from the floor; GB The cable should not be bent or compressed. The power supply cable must only be replaced by authorised technicians. Warning! The company shall not be held responsible in the event that these regulations are not respected.
Description of the washer-dryer and starting a wash cycle GB Control panel WASH CYCLE PROGRESS indicator lights DISPLAY ON/OFF button with indicator light DOOR LOCKED TEMPERATURE button Detergent dispenser drawer DRYING button WASH CYCLE indicator light START/PAUSE FUNCTION buttons with indicator lights button with indicator light knob CHILD LOCK button with indicator light Detergent dispenser drawer: used to dispense detergents and washing additives (see Detergents and laundry).
Indicator lights The indicator lights provide important information. This is what they can tell you: Wash cycle phase indicator lights As the WASH CYCLE knob is rotated, the indicator lights illuminate, indicating the stages which will be performed by the machine in accordance with the selected wash cycle. Once the desired wash cycle has been selected and has begun, the indicator lights switch on one by one to indicate which phase of the cycle is currently in progress.
Wash cycles Table of wash cycles Wash cycles GB Description of the wash cycle Detergents Max. Max. Max. Cycle temp. speed Drying load duration Fabric (°C) (rpm) (kg) Bleach Wash softener Special cycles 6 Sanitizing cycle: Extremely soiled whites. 6 Sanitizing cycle (1): Heavily soiled whites and resistant colours. 90° 1200 l 60° 1200 l - l l 7 7 Goodnigt cycle: Lightly soiled delicate colours. 8 Baby cycle: Heavily soiled delicate colours.
Personalisation Setting the temperature GB By pressing the TEMPERATURE button to set the wash temperature (see Table of wash cycles). The temperature may be lowered, or even set to a cold wash ( ). The washer-dryer will automatically prevent you from selecting a temperature which is higher than the maximum value set for each wash cycle. Setting the drying cycle Table of Drying times (guideline values) Fabric Load type Max.
Detergents and laundry GB Detergent dispenser drawer Good washing results also depend on the correct dose of detergent: adding too much detergent will not necessarily result in a more efficient wash, and may in fact cause build up on the inside of your appliance and contribute to environmental pollution. Do not use hand washing detergents because these create too much foam. Open the detergent dispenser drawer and 3 pour in the detergent or washing additive, as follows.
Precautions and tips This washer-dryer was designed and constructed in accordance with international safety regulations. The following information is provided for safety reasons and must therefore be read carefully. General safety This appliance was designed for domestic use only. The washer-dryer must only be used by adults, in accordance with the instructions provided in this manual. Do not touch the machine when barefoot or with wet or damp hands or feet.
Care and maintenance GB Cutting off the water and electricity supplies Turn off the water tap after every wash cycle. This will limit wear on the hydraulic system inside the washer-dryer and help to prevent leaks. Unplug the washer-dryer when cleaning it and during all maintenance work. Cleaning the washer-dryer The outer parts and rubber components of the appliance can be cleaned using a soft cloth soaked in lukewarm soapy water. Do not use solvents or abrasives.
Troubleshooting Your washer-dryer could fail to work. Before contacting the Technical Assistance Centre (see Assistance), make sure that the problem cannot be not solved easily using the following list. Problem: Possible causes / Solutions: The washer-dryer does not switch on. The appliance is not plugged into the socket fully, or is not making contact. There is no power in the house. The wash cycle does not start. The washer-dryer door is not closed properly.
Service 195067742.01 01/2008 - Xerox Business Services Before calling for Assistance: Check whether you can solve the problem alone (see Troubleshooting); Restart the programme to check whether the problem has been solved; If this is not the case, contact an authorised Technical Assistance Centre using the telephone number provided on the guarantee certificate. GB Always request the assistance of authorised technicians.