Istruzioni per l’uso LAVABIANCHERIA Sommario I Italiano,1 GB English,15 DE Deutsch,43 FR Français,29 I Installazione, 2-3-4-5 Disimballo e livellamento Collegamenti idraulici ed elettrici Primo ciclo di lavaggio Dati tecnici Istruzioni per l’installatore Descrizione della lavabiancheria e avviare un programma, 6-7 Pannello di controllo Spie Avviare un programma Programmi, 8 Tabella dei programmi AWM 108 Personalizzazioni, 9 Impostare la temperatura Impostare la centrifuga Funzioni Detersivi e bian
Installazione I ! È importante conservare questo libretto per poterlo consultare in ogni momento. In caso di vendita, di cessione o di trasloco, assicurarsi che resti insieme alla lavabiancheria per informare il nuovo proprietario sul funzionamento e sui relativi avvertimenti. ! Leggere attentamente le istruzioni: ci sono importanti informazioni sull’installazione, sull’uso e sulla sicurezza. Disimballo e livellamento Disimballo 1. Disimballare la lavabiancheria. 2.
Collegamento del tubo di scarico 65 - 100 cm Collegare il tubo di scarico, senza piegarlo, a una conduttura di scarico o a uno scarico a muro posti tra 65 e 100 cm da terra; ! Non usare prolunghe e multiple. I ! Il cavo non deve subire piegature o compressioni. ! Il cavo di alimentazione deve essere sostituito solo da tecnici autorizzati. Attenzione! L’azienda declina ogni responsabilità qualora queste norme non vengano rispettate.
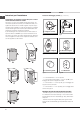
I Istruzioni per l’installatore Accessori montaggio portina (Fig. 1-2-3-4-5). Applicazione del pannello in legno alla porta e inserimento della macchina nei mobili: Nel caso in cui, dopo il montaggio del pannello in legno, sia necessario spedire la macchina per l’installazione finale, consigliamo di lasciarla nel suo imballo originale.
Uso della maschera di foratura. - Per tracciare le posizioni dei fori sul lato sinistro del pannello, allinerare la maschera di foratura al lato superiore e sinistro del pannello facendo riferimento alle linee tracciate alle estremità. - Per tracciare le posizioni dei fori sul lato destro del pannello, allinerare la maschera di foratura al lato superiore e destro del pannello.
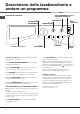
Descrizione della lavabiancheria e avviare un programma I Pannello di controllo SPIE AVANZAMENTO CICLO/ PARTENZA RITARDATA Manopola CENTRIFUGA Tasto ACCENSIONE/ SPEGNIMENTO Cassetto dei detersivi TEMPERATURA Manopola PROGRAMMI Cassetto dei detersivi: per caricare detersivi e additivi (vedi “Detersivi e biancheria”). Tasto ACCENSIONE/SPEGNIMENTO: per accendere e spegnere la lavabiancheria. Manopola PROGRAMMI: per impostare i programmi. Durante il programma la manopola resterà ferma.
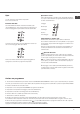
Spie Le spie forniscono informazioni importanti.
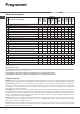
Programmi Durata ciclo Acqua totale lt Consumo energia kWh Umidità residua % Carico max. (Kg) Ammorbidente Detersivi Lavaggio Descrizione del Programma Temp. Velocità max. max. (giri al (°C) minuto) Candeggina I Programmi Tabella dei programmi Programmi Speciali 6 Sanitary: Bianchi estremamente sporchi. 90° 1000 7 - - - 190 6 Sanitary (1-2): Bianchi e colorati resistenti molto sporchi.
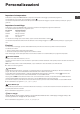
Personalizzazioni Impostare la temperatura I Ruotando la manopola TEMPERATURA si imposta la temperatura di lavaggio (vedi Tabella programmi). La temperatura si può ridurre sino al lavaggio a freddo ( ). La macchina impedirà automaticamente di impostare una temperatura maggiore a quella massima prevista per ogni programma. Impostare la centrifuga Ruotando la manopola CENTRIFUGA si imposta la velocità di centrifuga del programma selezionato.
Detersivi e biancheria I Cassetto dei detersivi Il buon risultato del lavaggio dipende anche dal corretto dosaggio del detersivo: eccedendo non si lava in modo più efficace e si contribuisce a incrostare le parti interne della lavabiancheria e a inquinare l’ambiente. ! Usare detersivi in polvere per capi in cotone bianchi e per il prelavaggio e per lavaggi con temperatura superiore a 60°C. ! Seguire le indicazioni riportate sulla confezione di detersivo.
Precauzioni e consigli ! La lavabiancheria è stata progettata e costruita in conformità alle norme internazionali di sicurezza. Queste avvertenze sono fornite per ragioni di sicurezza e devono essere lette attentamente. Sicurezza generale • Questo apparecchio è stato concepito esclusiva- mente per un uso di tipo domestico.
Manutenzione e cura I Escludere acqua e corrente elettrica • Chiudere il rubinetto dell’acqua dopo ogni lavaggio. Si limita così l’usura dell’impianto idraulico della lavabiancheria e si elimina il pericolo di perdite. • Staccare la spina della corrente quando si pulisce la lavabiancheria e durante i lavori di manutenzione. Per accedere alla precamera: 1.
Anomalie e rimedi Può accadere che la lavabiancheria non funzioni. Prima di telefonare all’Assistenza (vedi “Assistenza”), controllare che non si tratti di un problema facilmente risolvibile aiutandosi con il seguente elenco. Anomalie: Possibili cause / Soluzione: La lavabiancheria non si accende. • La spina non è inserita nella presa della corrente, o non abbastanza da fare contatto. • In casa non c’è corrente. Il ciclo di lavaggio non inizia.
Assistenza I Prima di contattare l’Assistenza: • Verificare se l’anomalia può essere risolta da soli (vedi “Anomalie e rimedi”). • Riavviare il programma per controllare se l’inconveniente è stato ovviato; • In caso negativo, contattare il Numero Unico 199.199.199*. ! Non ricorrere mai a tecnici non autorizzati. Comunicare: • il tipo di anomalia; • il modello della macchina (Mod.); • il numero di serie (S/N).
Instructions for use WASHING MACHINE Contents GB English GB Installation, 16-17-18-19 Unpacking and levelling Connecting the electricity and water supplies The first wash cycle Technical data Instructions for the fitter Description of the washing machine and starting a wash cycle, 20-21 Control panel Indicator lights Starting a wash cycle Wash cycles, 22 Table of wash cycles AWM 108 Personalisation, 23 Setting the temperature Setting the spin speed Functions Detergents and laundry, 24 Detergent dispe
Installation GB ! This instruction manual should be kept in a safe place for future reference. If the washing machine is sold, transferred or moved, make sure that the instruction manual remains with the machine so that the new owner is able to familiarise himself/herself with its operation and features.
! Do not use extension cords or multiple sockets. Connecting the drain hose 65 - 100 cm Connect the drain hose, without bending it, to a drainage duct or a wall drain located at a height between 65 and 100 cm from the floor; GB ! The cable should not be bent or compressed. ! The power supply cable must only be replaced by authorised technicians. Warning! The company shall not be held responsible in the event that these regulations are not respected.
GB Instructions for the fitter Door Mounting Accessories (Fig. 1-2-3-4-5). Mounting the wooden panel onto the door and inserting the machine into cabinets: In the case where the machine must be shipped for final installation after the wooden panel has been mounted, we suggest leaving it in its original packaging. The packaging was designed to make it possible to mount the wooden panel onto the machine without removing it completely (see figures below).
Using the Drilling Template. - To trace the positions of the holes on the left-hand side of the panel, align the drilling template to the top left side of the panel using the lines traced on the extremities as a reference. - To trace the positions of the holes on the right-hand side of the panel, align the drilling template to the top right side of the panel. - Use an appropriately sized router to mill the holes for the two hinges, the rubber plug and the magnet.
Description of the washing machine and starting a wash cycle GB Control panel WASH CYCLE PROGRESS/ DELAY TIMER indicator lights SPIN SPEED knob knob WASH CYCLE Detergent dispenser drawer Detergent dispenser drawer: used to dispense detergents and washing additives (see “Detergents and laundry”). ON/OFF button: switches the washing machine on and off. WASH CYCLE knob: programmes the wash cycles. During the wash cycle, the knob does not move.
Indicator lights The indicator lights provide important information. This is what they can tell you: Delayed start If the DELAY TIMER function has been activated (see “Personalisation”), after the wash cycle has been started the indicator light corresponding to the selected delay period will begin to flash: Wash cycle phase indicator lights Once the desired wash cycle has been selected and has begun, the indicator lights switch on one by one to indicate which phase of the cycle is currently in progress.
Wash cycles Cycle duration 6 Sanitizing cycle: Extremely soiled whites. 90° 1000 7 - - - 190 6 Sanitizing cycle (1-2): Heavily soiled whites and resistant colours. 60° 1000 - 7 62 1,316 58 195 6 Sanitizing cycle (2): Lightly soiled whites and resistant colours. 40° 1000 - 7 62 1,003 72 190 Description of the wash cycle Max Max. Fabric temp. speed Ble(°C) (rpm) ach Wash softener Max.
Personalisation Setting the temperature GB Turn the TEMPERATURE knob to set the wash temperature (see Table of wash cycles). The temperature may be lowered, or even set to a cold wash ( ). The washing machine will automatically prevent you from selecting a temperature which is higher than the maximum value set for each wash cycle. Setting the spin speed Turn the SPIN SPEED knob to set the spin speed for the selected wash cycle.
Detergents and laundry GB Detergent dispenser drawer Good washing results also depend on the correct dose of detergent: adding too much detergent will not necessarily result in a more efficient wash, and may in fact cause build up on the inside of your appliance and contribute to environmental pollution. ! Use powder detergent for white cotton garments, for pre-washing, and for washing at temperatures over 60°C. ! Follow the instructions given on the detergent packaging.
Precautions and tips ! This washing machine was designed and constructed in accordance with international safety regulations. The following information is provided for safety reasons and must therefore be read carefully. General safety • This appliance was designed for domestic use only.
Care and maintenance GB Cutting off the water and electricity supplies To access the pre-chamber: 1. unscrew the lid by rotating it anti-clockwise (see figure): a little water may trickle out. This is perfectly normal; • Turn off the water tap after every wash cycle. This will limit wear on the hydraulic system inside the washing machine and help to prevent leaks. • Unplug the washing machine when cleaning it and during all maintenance work.
Troubleshooting Your washing machine could fail to work. Before contacting the Technical Assistance Centre (see “Assistance”), make sure that the problem cannot be not solved easily using the following list. GB Problem: Possible causes / Solutions: The washing machine does not switch on. • The appliance is not plugged into the socket fully, or is not making contact. • There is no power in the house. The wash cycle does not start. • • • • • The washing machine door is not closed properly.
Service GB Before calling for Assistance: • Check whether you can solve the problem alone (see “Troubleshooting”); • Restart the programme to check whether the problem has been solved; • If this is not the case, contact an authorised Technical Assistance Centre using the telephone number provided on the guarantee certificate. ! Always request the assistance of authorised technicians. Have the following information to hand: • the type of problem; • the appliance model (Mod.); • the serial number (S/N).
Mode d’emploi LAVE-LINGE Sommaire FR Français FR Installation, 30-31-32-33 Déballage et mise à niveau Raccordements eau et électricité Premier cycle de lavage Caractéristiques techniques Instructions pour l’installateur Description du lave-linge et démarrage d’un programme, 34-35 Bandeau de commandes Voyants Démarrage d’un programme Programmes, 36 Tableau des programmes AWM 108 Personnalisations, 37 Sélection de la température Sélection de l’essorage Fonctions Produits lessiviels et linge, 38 Tiroir
Installation FR ! Conserver ce mode d’emploi pour pouvoir le consulter à tout moment. En cas de vente, de cession ou de déménagement, veiller à ce qu’il suive toujours le lave-linge pour que son nouveau propriétaire soit informé sur son mode de fonctionnement et puisse profiter des conseils correspondants. ! Lire attentivement les instructions: elles fournissent des conseils importants sur l’installation, l’utilisation et la sécurité de l’appareil. Déballage et mise à niveau Déballage 1.
Raccordement du tuyau de vidange 65 - 100 cm Raccorder le tuyau d’évacuation, sans le plier, à un conduit d’évacuation ou à une évacuation murale placés à une distance du sol comprise entre 65 et 100 cm; ! N’utiliser ni rallonges ni prises multiples. FR ! Le câble ne doit être ni plié ni trop écrasé. ! Le câble d’alimentation ne doit être remplacé que par des techniciens agréés. Attention! Nous déclinons toute responsabilité en cas de non-respect des normes énumérées ci-dessus.
FR Instructions pour l’installateur Accessoires montage porte (Fig.1-2-3-4-5). Application du panneau d’habillage en bois sur la porte et montage du machine à laver à l’intérieur des éléments: Au cas où, après le montage du panneau en bois, il faudrait expédier la machine pour son installation finale, nous vous conseillons de la laisser dans son emballage d’origine.
Utilisation du gabarit de forage. - Pour marquer l’emplacement des trous sur le côté du panneau, alignez le gabarit de perçage avec le côté supérieur gauche du panneau en vous servant des lignes tracées aux extrémités. - Pour marquer l’emplacement des trous sur le côté droit du panneau, alignez le gabarit de perçage avec le côté supérieur droit du panneau. - Réalisez à l’aide d’une fraise appropriée les quatre emplacements où devront trouver place les deux charnières, la cheville en caoutchouc et l’aimant.
Description du lave-linge et démarrage d’un programme FR Bandeau de commandes Voyants DÉROULEMENT CYCLE/DÉPART DIFFÉRÉ Bouton ESSORAGE Touche MARCHE/ ARRÊT Tiroir à produits lessiviels Touche MARCHE/ARRÊT: pour allumer ou éteindre le lave-linge. Bouton PROGRAMMES: pour sélectionner les programmes. Pendant le programme, le bouton ne tournera pas. Touches avec voyants FONCTION: pour sélectionner les fonctions disponibles. Le voyant correspondant à la fonction sélectionnée restera allumé.
Voyants Les voyants fournissent des informations importantes.
Programmes Assouplissan Durée cycle Lavage Eau totale lt Javel Consommation d’énergie kWh Temp. maxi. (°C) Humidité résiduelle % Description du Programme Produits lessiviels Vitesse maxi (tours minute) Charge maxi (Kg) Tableau des programmes Programmes FR Programmes Spécial 6 Anti-bactérien: blancs extrêmement sales. 90° 1000 7 - - - 190 6 Anti-bactérien (1-2): blancs et couleurs résistantes très sales.
Personnalisations Sélection de la température Tourner le bouton TEMPÉRATURE pour sélectionner la température de lavage (voir Tableau des programmes). La température peut être abaissée jusqu’au lavage à froid ( ). La machine interdira automatiquement toute sélection d’une température supérieure à la température maximale prévue pour chaque programme. Sélection de l’essorage Tourner le bouton ESSORAGE pour sélectionner la vitesse d’essorage du programme sélectionné.
Produits lessiviels et linge FR Tiroir à produits lessiviels Un bon résultat de lavage dépend aussi d’un bon dosage de produit lessiviel: un excès de lessive ne lave pas mieux, il incruste l’intérieur du lave-linge et pollue l’environnement. ! Utiliser des lessives en poudre pour du linge en coton blanc et en cas de prélavage et de lavages à une température supérieure à 60°C. ! Respecter les indications figurant sur le paquet de lessive.
Précautions et conseils ! Ce lave-linge a été conçu et fabriqué conformément aux normes internationales de sécurité. Ces consignes sont fournies pour des raisons de sécurité, il faut les lire attentivement. Sécurité générale Ouverture manuelle du hublot A défaut de pouvoir ouvrir la porte hublot à cause d’une panne de courant pour étendre le linge, procéder comme suit: 1. débrancher la fiche de la prise de courant. • Cet appareil est conçu pour un usage domestique.
Entretien et soin FR Coupure de l’arrivée d’eau et du courant • Fermer le robinet de l’eau après chaque lavage. Cela réduit l’usure de l’installation hydraulique du lave-linge et évite tout danger de fuites. • Débrancher la fiche de la prise de courant lors de tout nettoyage du lave-linge et pendant tous les travaux d’entretien. Nettoyage du lave-linge Pour nettoyer l’extérieur et les parties en caoutchouc, utiliser un chiffon imbibé d’eau tiède et de savon. N’utiliser ni solvants ni abrasifs.
Anomalies et remèdes Il peut arriver que le lave-linge ne fonctionne pas bien. Avant d’appeler le Service de dépannage (voir “Assistance”), contrôler s’il ne s’agit pas par hasard d’un problème facile à résoudre à l’aide de la liste suivante. Anomalies: Causes / Solutions possibles: Le lave-linge ne s’allume pas. • La fiche n’est pas branchée dans la prise de courant ou mal branchée. • Il y a une panne de courant. Le cycle de lavage ne démarre pas. • • • • • Le hublot n’est pas bien fermé.
Assistance FR Avant d’appeler le service après-vente: • Vérifier si on ne peut pas résoudre l’anomalie par ses propres moyens (voir “Anomalies et Remèdes”); • Remettre le programme en marche pour contrôler si l’inconvénient a disparu; • Autrement, contacter le Centre d’Assistance technique agréé au numéro de téléphone indiqué sur le certificat de garantie. ! Ne jamais s’adresser à des techniciens non agréés. Communiquer: • le type de panne; • le modèle de l’appareil (Mod.); • son numéro de série (S/N).
Bedienungsanleitungen WASCHVOLLAUTOMAT INHALTSVERZEICHNIS DE Deutsch DE Installation 44-45-46-47 Auspacken und Aufstellen Wasser- und Elektroanschlüsse Erster Waschgang Technische Daten Anleitungen für den Installateur Beschreibung des Waschvollautomaten und Starten eines Waschprogramms 48-49 Bedienblende Kontrollleuchten Starten eines Waschprogramms Waschprogramme, 50 Programmtabelle AWM 108 Personalisierungen 51 Temperatureinstellung Schleudereinstellung Funktionen Waschmittel und Wäsche 52 Waschmi
Installation DE ! Es ist äußerst wichtig, diese Bedienungsanleitung sorgfältig aufzubewahren, um sie jederzeit zu Rate ziehen zu können. Sorgen Sie dafür, dass sie im Falle eines Umzugs oder einer Übergabe an einen anderen Benutzer das Gerät stets begleitet, damit auch der neue Inhaber die Möglichkeit hat, diese zu Rate zu ziehen. ! Lesen Sie die Hinweise bitte aufmerksam durch, sie liefern wichtige Informationen hinsichtlich der Installation, des Gebrauchs und der Sicherheit.
Anschluss des Ablaufschlauches 65 - 100 cm Schließen Sie den Ablaufschlauch ohne ihn dabei abzuknicken an einen geeigneten Abfluss an. Die Mindestablaufhöhe beträgt 65 - 100 cm (gemessen vom Boden), oder hängen Sie diesen mittels des Schlauchhalters gesichert in ein Becken oder Wanne ein; Befestigen Sie diesen mittels des mitgelieferten Schlauchhalters z.B. an einen Wasserhahn (siehe Abbildung). Das freie Ablaufschlauchende darf nicht unter Wasser positioniert werden.
DE Anleitungen für den Installateur Montagezubehör für die Tür (Abb. 1-2-3-4-5). Montage des Holzpaneels auf die Tür und Einfügen der maschine in die Möbel: Falls nach der Montage des Holzpaneels eine Versendung zur End-Installation der Maschine notwendig ist, empfehlen wir, die Maschine in ihrer ursprünglichen Verpackung zu belassen.
Gebrauch der Bohrschablone. a) Zur Positionsmarkierung der Bohrungen auf der linken Seite des Paneels, legen Sie die Bohrmaske oben links am Paneel an und halten Sie sich an die an den Enden markierten Linien. b) Zur Positionsmarkierung der Bohrungen auf der rechten Seite des Paneels, legen Sie die Bohrmaske oben rechts am Paneel an. c) Mit einem Fräser von entsprechender Größe die vier Sitze fräsen, die die zwei Scharniere, den Gummidübel und den Magnet aufnehmen sollen.
Beschreibung des Waschvollautomaten und Starten eines Waschprogramms DE Bedienblende Kontrollleuchten PROGRAMMABLAUF/ STARTZEITVORWAHL Wählschalter SCHLEUDERN Taste EIN/AUS Wählschalter PROGRAMME Waschmittelschublade: für Waschmittel und Zusätze (siehe „Waschmittel und Wäsche“). Taste EIN/AUS: Zum Ein- und Ausschalten Ihres Waschvollautomaten. Wählschalter PROGRAMME: Zur Wahl der Waschprogramme. Während des Programmablaufs bleibt der Schalter feststehend.
Kontrollleuchten Die Kontrollleuchten liefern wichtige Hinweise. Sie signalisieren: Startzeitvorwahl Wurde die Funktion „Startzeitvorwahl” (siehe „Personalisierungen“) aktiviert, und das Programm in Gang gesetzt, schaltet die Kontrollleuchte, die der eingestellten Zeitverschiebung entspricht, auf Blinklicht: Laufende Programmphase Wurde das Waschprogramm gewählt und gestartet, leuchten die Kontrollleuchten nach und nach auf, und zeigen so den jeweiligen Programmstand an.
Waschprogramme Programmdauer Bleich- Hauptwä- Weichmittel sche spüler Wasser gesamt lt Waschmittel Energieverbrauch kWh Max. SchleuderGeschwindigkeit (U/min) Restfeuchtigkeit % Beschreibung des Programms Max. Temperatur (°C) Max. Beladungsmenge (kg) DE Waschprogramme Programmtabelle - - 190 Spezialprogramme 6 Hygiene zyklus: stark verschmutzte Weißwäsche. 90° 1000 7 - 6 Hygiene zyklus (1-2): stark verschmutzte Weiß- und farbechte Buntwäsche.
Personalisierungen Temperatureinstellung Drehen Sie den Wählschalter „TEMPERATUREN“, um die Waschtemperatur einzustellen (siehe Programmtabelle). Die Temperatur kann bis auf Kaltwäsche ( ) herabgesetzt werden. Der Waschvollautomat verhindert automatisch die Einstellung einer höheren Schleuderstufe, sollte diese die für das jeweilige Programm vorgeschriebene Höchstgeschwindigkeit übersteigen.
Waschmittel und Wäsche DE Waschmittel und Wäsche Ein gutes Waschergebnis hängt auch von einer korrekten Waschmitteldosierung ab: Eine zu hohe Dosierung bedeutet nicht unbedingt reinere Wäsche, sie trägt nur dazu bei, die Maschineninnenteile zu verkrusten und die Umwelt zu belasten. ! Waschmittel in Pulverform für Baumwollweißwäsche, für die Vorwäsche und für Waschprogramme bei Temperaturen über 60°C verwenden. ! Bitte befolgen Sie den auf der Waschmittelverpackung angegebenen Anweisungen.
Vorsichtsmaßregeln und Hinweise ! Der Waschvollautomat wurde nach den strengsten internationalen Sicherheitsvorschriften entworfen und gebaut. Nachstehende Hinweise werden aus Sicherheitsgründen geliefert und sollten aufmerksam gelesen werden. Allgemeine Sicherheit • Dieses Gerät wurde ausschließlich für den Einsatz im privaten Haushalt konzipiert.
Reinigung und Pflege DE Abstellen der Wasser- und Stromversorgung • Drehen Sie den Wasserhahn nach jedem Waschvorgang zu. Hierdurch wird der Verschleiß der Wasseranlage verringert und Wasserlecks vorgebeugt. Zugang zur Vorkammer: 1. Drehen Sie den Deckel gegen den Uhrzeigersinn ab (siehe Abbildung): es ist ganz normal, wenn etwas Wasser austritt; • Ziehen Sie den Netzstecker aus der Steckdose, bevor Sie Ihren Waschvollautomaten reinigen.
Störungen und Abhilfe Bei Funktionsstörung: Bevor Sie sich an den Technischen Kundendienst wenden (siehe „Kundendienst“), vergewissern Sie sich zuerst, ob es sich nicht um eine Kleinigkeit handelt, die Sie selbst beheben können. Ziehen Sie hierzu nachstehendes Verzeichnis zu Rate. DE Störungen: Mögliche Ursachen / Lösungen: Der Waschvollautomat schaltet sich nicht ein. • Der Stecker steckt nicht in der Steckdose, oder nicht so, dass der Kontakt hergestellt wird. • Der Strom ist ausgefallen.
Kundendienst 195093872.01 01/2012 - Xerox Fabriano DE Bevor Sie sich an den Kundendienst wenden: • Sollten einige Kontrollen vorab selbst durchgeführt werden (siehe „Störungen und Abhilfe“); • Starten Sie daraufhin das Programm erneut, um sicherzustellen, dass die Störung auch wirklich behoben wurde; • Ist dies nicht der Fall, dann kontaktieren Sie den autorisierten Kundendienst unter der auf dem Garantieschein befindlichen Telefonnummer.