
Instruction for Use


GB
17
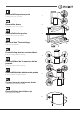
TEMPERATURE Indicatorlight*:toidentifythecoldestareain
therefrigerator.
1. Check that OK appears clearlyon the indicator light (see
diagram).
2. Iftheword“OK”doesnotappearitmeansthatthetemperature
istoohigh:adjusttheREFRIGERATOROPERATIONknobtoa
higherposition(colder)andwaitapproximately10hoursuntil
thetemperaturehasbeenstabilised.
3. Checktheindicatorlightagain:ifnecessary,readjustitfollowing
theinitialprocess.Iflargequantitiesoffoodhavebeenadded
oriftherefrigerator door has been opened frequently, it is
normalfortheindicatornottoshowOK.Waitatleast10hours
beforeadjustingtheREFRIGERATOROPERATIONknobtoa
highersetting.
FRESH BOX
*
Thisisthenewboxtokeepmeat,fishandcheesefresh.
When
positionedinthe“lower”partofthefridgecompartment,itisideal
formeatandfish;whenmovedtothe“top”partofthefridge,it
isperfectforcheese.
Itcanbetakenoutofthefridgewhenitis
notneeded.
Operation and maintenance of the water
dispenser.
Whenfirstused,orafterprolongedperiodsofinactivity,washthetank
withwater.Thewaterdispensersuppliescoldwaterwithouthavingto
opentherefrigeratordooreachtime.
Thisalsoallowsforreducingtheproduct’senergyconsumption.Tofillthe
tank,lifttheflaporremovethecover(seepicture)thenpourinthewater
withacarafeorothersuitablecontainer.Avoidfillingthetankcompletely.
1
7
2
4
5
6
4
3
5
6
8
9
Always exclusively use drinkable natural mineral water: any
other liquid may hamper the device’s correct operation.
Towithdraw water with the refrigerator door closed, press the
dispenseractuatorwithasuitablecontainer(glass,carafe,etc.).
Releasetheactuatoroncethedesiredquantityhasbeendispensed.
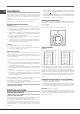
Thewatertankshouldbecleanedregularlyunderrunningwater;do
notusedetergents.Tocleanthetank,removethetankcoverand
upperledges;subsequently,removethetankbypullingitoutwards
whilepressingtheappropriatebutton(seepicture).
The tank must be replaced back into its housing as soon as
possible so as to avoid excessive heating of the refrigerator.
1
7
2
4
5
6
4
3
5
6
8
9
Formorethoroughcleaning,itisadvisabletounscrewthevalve
fromthetank(seepicture)andcleanitunderrunningwater.
! Be careful not to pull the transparent mobile element of the valve.
1
7
2
4
5
6
4
3
5
6
8
9
Oncecleaning operations have been completed, screw the
valvebackonwhileensuringthattheinternalsealadherestothe
endpartofthetankbushing;subsequently,putthetank-valve
assemblyback into the appropriatecylindrical housing of the
door,whilemakingsurethattheupperhookontherearwallof
thetankisproperlyinsertedintheappropriatecompartmenton
theinnerwallofthedoor.Putthepreviouslyremovedledgesand
tankcoverbackinplace.
! Make sure that the tank has been properly inserted in the
door (see picture).
1
7
2
4
5
6
4
3
5
6
8
9
! The presence of water drops on the tank walls is a normal
occurrence during the product’s operation.
! Dry any drops present on the outer walls of the product.
! To empty completely the Water Tank, please disassembly
it as shown on the picture, spill the water, clean with a soft
textile and assembly in the product.
! If the water drops remain on the external door surface
after use, clean it with a soft cleaning textile.
* Varies by number and/or position, available only on certain
models.