Gebruiksaanwijzing WASAUTOMAAT Inhoud NL Nederlands,1 GB English,15 FR Français,29 NL Installatie, 2-3 Uitpakken en waterpas zetten Hydraulische en elektrische aansluitingen Eerste wascyclus Technische gegevens Onderhoud en verzorging, 4 Afsluiten van water en stroom Reinigen van de wasautomaat Reinigen van het wasmiddelbakje Onderhoud van deur en trommel Reinigen van de pomp Controle van de buis van de watertoevoer Voorzorgsmaatregelen en advies, 5 BWE 71483 Algemene veiligheid Afvalverwijdering Ha
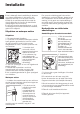
Installatie NL ! Het is belangrijk deze handleiding te bewaren voor latere raadpleging. In het geval u het apparaat verkoopt, of u verhuist, moet het boekje bij de wasautomaat blijven zodat de nieuwe gebruiker de functies en betreffende raadgevingen kan doornemen. ! Lees de instructies aandachtig door: u vindt er belangrijke informatie betreffende installatie, gebruik en veiligheid. Uitpakken en waterpas zetten Uitpakken 1. De wasautomaat uitpakken. 2.
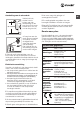
Aansluiting van de afvoerbuis 65 - 100 cm Verbind de buis, zonder hem te buigen, aan een afvoerleiding of aan een afvoer in de muur tussen de 65 en 100 cm van de grond af; ! Het snoer mag niet gebogen of samengedrukt worden. NL ! De voedingskabel mag alleen door een bevoegde installateur worden vervangen. Belangrijk! De fabrikant kan niet aansprakelijk worden gesteld wanneer deze normen niet worden nageleefd.
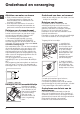
Onderhoud en verzorging NL Afsluiten van water en stroom • Sluit na iedere wasbeurt de kraan af. Hiermee beperkt u slijtage van de waterinstallatie van de wasmachine en voorkomt u lekkage. • Sluit altijd eerst de stroom af voordat u de wasautomaat gaat schoonmaken en gedurende onderhoudswerkzaamheden. Reinigen van de wasautomaat • De buitenkant en de rubberen onderdelen kunnen met een spons en een lauw sopje worden schoongemaakt. Gebruik nooit schuurmiddelen of oplosmiddelen.
Voorzorgsmaatregelen en advies ! De wasmachine is ontworpen en geproduceerd volgens de internationale veiligheidsnormen. Deze aanwijzingen zijn voor uw eigen veiligheid geschreven en moeten aandachtig worden doorgenomen. Algemene veiligheid • Dit apparaat is uitsluitend ontworpen voor huishoudelijk niet-professioneel gebruik.
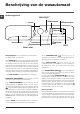
Beschrijving van de wasautomaat NL Bedieningspaneel Knop en controlelampje START/PAUSE Knop Knop ON/OFF Knop TOETSBLOKKERING TEMPERATUUR DISPLAY Knop DRAAIKNOP Knop PROGRAMMA’S CENTRIFUGE Wasmiddelbakje UITGESTELDE START Knoppen OPTIE Knop PUSH & WASH Wasmiddelbakje: voor wasmiddelen en wasversterkers (zie “Wasmiddelen en wasgoed”). Knop ON/OFF : druk even op de toets om de wasautomaat aan of uit te zetten.
Display B NL A C C (zie “Wasopties”) Het display is nodig om de wasautomaat te programmeren en geeft meerdere soorten informatie. In de sectie A verschijnt de duur van de beschikbare programma’s en, als de cyclus is gestart, de resterende tijd tot het einde ervan. Indien een UITGESTELDE START is geselecteerd verschijnt de resterende tijd tot aan de start van het geselecteerde wasprogramma.
Het uitvoeren van een wascyclus NL Snelle programmering 1. HET WASGOED INLADEN. Open de deur. Laad het wasgoed in en zorg ervoor nooit de laadhoeveelheid te overschrijden aangegeven in de programmatabel op de volgende bladzijde. 2. WASMIDDEL DOSEREN.Trek het bakje naar buiten en doe het wasmiddel in de speciale bakjes, zoals aangegeven in “Wasmiddelen en wasgoed”. 3. SLUIT DE DEUR. 4. Druk op de toets “PUSH & WASH” om het wasprogramma te starten. Traditionele programmering 1. DE WASAUTOMAAT AANZETTEN.
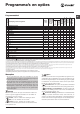
Programma’s en opties 9 10 Eco katoen 60°C (1): zeer vuil wit en kleurecht bont wasgoed. Eco katoen 40°C (2): niet zo vuile witte en bonte fijne was. Wit katoen: zeer vuil wit en kleurecht bont wasgoed. Speciaal Duur cyclus Synthetisch (4): Niet zo vuile kleurvaste bonte was. Gemengd Totaal water lt 7 8 9 Energieverbruik kWh Katoen (3): Niet zo vuile witte en bonte was.
NL Push & Wash Met deze functie kunt u een wascyclus starten terwijl de wasautomaat uit is, zonder dat u daarvoor op de toets ON/OFF hoeft te drukken of, nadien als u de wasautomaat aanzet, zonder dat u andere toetsen en/of knoppen in hoeft te drukken (als u dit niet doet zal het programma Push & Wash worden uitgeschakeld). Om de Push & Wash cyclus te starten houdt u de knop 2 seconden lang ingedrukt. Het controlelampje geeft aan dat de cyclus is gestart.
Wasmiddelen en wasgoed Wasmiddelbakje Een goed wasresultaat hangt ook af van de juiste dosis wasmiddel: te veel wasmiddel maakt het wassen niet beter. Het wasmiddel blijft aan de binnenzijde van de wasautomaat zitten en zorgt voor het vervuilen van het milieu. ! Gebruik nooit wasmiddelen voor handwas aangezien die te veel schuim vormen. ! Gebruik waspoeder voor witte katoenen was, voor de voorwas en voor het wassen op temperaturen van meer dan 60°C. ! Volg de aanwijzingen op de wasmiddelverpakking.
NL Balanceersysteem van de lading Om overmatige trillingen te vermijden verdeelt de automaat de lading voor het centrifugeren op een gelijkmatige manier. Dit gebeurt door de trommel te laten draaien op een snelheid die iets hoger ligt dan de wassnelheid. Als na herhaaldelijke pogingen de lading nog steeds niet goed is gebalanceerd, zal de wasautomaat de centrifuge op een lagere snelheid uitvoeren dan die voorzien was.
Storingen en oplossingen Het kan gebeuren dat de wasautomaat niet werkt. Voor u contact opneemt met de Servicedienst (zie “Service”) moet u controleren of het niet een storing betreft die u zelf makkelijk kunt verhelpen met behulp van de volgende lijst. NL Storingen: Mogelijke oorzaken / Oplossing: De wasautomaat gaat niet aan. • De stekker zit niet in het stopcontact of niet ver genoeg om contact te maken. • Het hele huis zit zonder stroom. De wascyclus start niet.
Service NL Voordat u de Servicedienst inschakelt: • Controleer eerst of u het probleem zelf kunt oplossen (zie “Storingen en oplossingen”). • Start het programma opnieuw om te controleren of de storing is verholpen; • Neem indien dit niet helpt contact op met de servicedienst. ! Wendt u nooit tot een niet erkende installateur. Comunicare: • het type storing; • het model wasautomaat (Mod.); • het serienummer (S/N).
Instructions for use WASHING MACHINE Contents GB English GB Installation, 16-17 Unpacking and levelling Connecting the electricity and water supplies The first wash cycle Technical data Care and maintenance, 18 Cutting off the water and electricity supplies Cleaning the washing machine Cleaning the detergent dispenser drawer Caring for the door and drum of your appliance Cleaning the pump Checking the water inlet hose Precautions and tips, 19 General safety Disposal Opening the porthole door manually B
Installation GB ! This instruction manual should be kept in a safe place for future reference. If the washing machine is sold, transferred or moved, make sure that the instruction manual remains with the machine so that the new owner is able to familiarise himself/ herself with its operation and features. ! Read these instructions carefully: they contain vital information relating to the safe installation and operation of the appliance. Unpacking and levelling Unpacking 1.
Connecting the drain hose 65 - 100 cm Connect the drain hose, without bending it, to a drainage duct or a wall drain located at a height between 65 and 100 cm from the floor; alternatively, rest it on the side of a washbasin or bathtub, fastening the duct supplied to the tap (see figure). The free end of the hose should not be underwater. ! Do not use extension cords or multiple sockets. ! The cable should not be bent or compressed.
Care and maintenance GB Cutting off the water and electricity supplies • Turn off the water tap after every wash cycle. This will limit wear on the hydraulic system inside the washing machine and help to prevent leaks. • Unplug the washing machine when cleaning it and during all maintenance work. Cleaning the washing machine • The outer parts and rubber components of the appliance can be cleaned using a soft cloth soaked in lukewarm soapy water. Do not use solvents or abrasives.
Precautions and tips ! This washing machine was designed and constructed in accordance with international safety regulations. The following information is provided for safety reasons and must therefore be read carefully. General safety • This appliance was designed for domestic use only.
Description of the washing machine GB Control panel START/PAUSE button and indicator light ON/OFF button TEMPERATURE button CHILD LOCK button DISPLAY WASH CYCLE Detergent dispenser drawer SELECTOR KNOB PUSH & WASH SPIN button DELAYED START button OPTION buttons button Detergent dispenser drawer: used to dispense detergents and washing additives (see “Detergents and laundry”). ON/OFF button: press this briefly to switch the machine on or off.
Display GB B A C C (see “Wash options”) The display is useful when programming the machine and provides a great deal of information. The duration of the available wash cycles and the remaining time of a running cycle appear in section A; if the DELAYED START option has been set, the countdown to the start of the selected wash cycle will appear.
Running a wash cycle GB Rapid programming 1. LOAD THE LAUNDRY. Open the porthole door. Load the laundry, making sure you do not exceed the maximum load value indicated in the table of programmes and wash cycles on the following page. 2. ADD THE DETERGENT. Pull out the detergent dispenser drawer and pour the detergent into the relevant compartments as described in “Detergents and laundry”. 3. CLOSE THE DOOR. 4. Press the “PUSH & WASH” button to start the wash programme. Traditional programming 1.
Wash cycles and options Total water lt Cycle duration Residual dampness % Energy consumption kWh Max. speed (rpm) Max. load (kg) 5 Max. temp. (°C) Fabric softener 1 2 3 4 Detergents Wash Wash cycles Table of wash cycles 30° 30° 30° 30° 1200 1000 1000 0 3,5 3,5 3,5 1 - - - ** ** ** ** 30° 800 3,5 70 0,16 33 30’ 40° (Max.60°) 40° (Max.
GB Push & Wash This function allows for starting a wash cycle even when the machine is switched off without having to press the ON/OFF button in advance, or after switching on the machine, without having activated any button and/or selector (otherwise, the Push & Wash function will be deactivated). To start the Push & Wash cycle press and hold the relative button for 2 seconds. The lit indicator light indicates that the cycle has started.
Detergents and laundry Detergent dispenser drawer Successful washing results also depend on the correct dose of detergent: adding too much detergent will not necessarily result in a more efficient wash, and may in fact cause build up on the inside of your appliance and contribute to environmental pollution. ! Do not use hand washing detergents because these create too much foam. ! Use powder detergent for white cotton garments, for prewashing, and for washing at temperatures over 60°C.
GB Load balancing system Before every spin cycle, to avoid excessive vibrations before every spin and to distribute the load in a uniform manner, the drum rotates continuously at a speed which is slightly greater than the washing rotation speed. If, after several attempts, the load is not balanced correctly, the machine spins at a reduced spin speed. If the load is excessively unbalanced, the washing machine performs the distribution process instead of spinning.
Troubleshooting Your washing machine could occasionally fail to work. Before contacting the Technical Assistance Service (see “ Service”), make sure that the problem cannot be solved easily using the following list. GB Problem: Possible causes / Solutions: The washing machine does not switch on. • The appliance is not plugged into the socket fully, or not enough to make contact. • There is no power in the house. The wash cycle does not start.
Service GB Before contacting the Technical Assistance Service: • Check whether you can solve the problem alone (see “Troubleshooting”). • Restart the wash cycle to check whether the problem has been solved. • If this is not the case, contact an authorised Technical Assistance Centre. ! Always request the assistance of authorised technicians. Have the following information to hand: • the type of problem; • the appliance model (Mod.); • the serial number (S/N).
Mode d’emploi LAVE-LINGE Sommaire FR Français FR Installation, 30-31 Déballage et mise à niveau Raccordements eau et électricité Premier cycle de lavage Caractéristiques techniques Entretien et soin, 32 Coupure de l’arrivée d’eau et du courant Nettoyage du lave-linge Nettoyage du tiroir à produits lessiviels Entretien du hublot et du tambour Nettoyage de la pompe Contrôle du tuyau d’arrivée de l’eau Précautions et conseils, 33 Sécurité générale Mise au rebut Ouverture manuelle de la porte hublot BWE 71
Installation FR ! Conserver ce mode d’emploi pour pouvoir le consulter à tout moment. En cas de vente, de cession ou de déménagement, veiller à ce qu’il suive toujours le lave-linge pour que son nouveau propriétaire soit informé sur son mode de optionnement et puisse profiter des conseils correspondants. ! Lire attentivement les instructions: elles fournissent des conseils importants sur l’installation, l’utilisation et la sécurité de l’appareil. Déballage et mise à niveau Déballage 1.
Raccordement du tuyau de vidange 65 - 100 cm ! N’utiliser ni rallonges ni prises multiples. FR Raccorder le tuyau d’évacuation, sans le plier, à un conduit d’évacuation ou à une évacuation murale placés à une distance du sol comprise entre 65 et 100 cm ; ! Le câble ne doit être ni plié ni trop écrasé. ou bien l’accrocher à un évier ou à une baignoire, dans ce cas, fixer le support en plastique fourni avec l’appareil au robinet (voir figure).
Entretien et soin FR Coupure de l’arrivée d’eau et du courant • Fermer le robinet de l’eau après chaque lavage. Cela réduit l’usure de l’installation hydraulique du lave-linge et évite tout danger de fuites. • Débrancher la fiche de la prise de courant lors de tout nettoyage du lave-linge et pendant tous les travaux d’entretien. Nettoyage du lave-linge • Pour nettoyer l’extérieur et les parties en caoutchouc, utiliser un chiffon imbibé d’eau tiède et de savon. N’utiliser ni solvants ni abrasifs.
Précautions et conseils ! Ce lave-linge a été conçu et fabriqué conformément aux normes internationales de sécurité. Ces consignes sont fournies pour des raisons de sécurité, il faut les lire attentivement. Sécurité générale • Cet appareil est conçu pour un usage domestique.
Description du lave-linge FR Bandeau de commandes Touche et voyant MARCHE/PAUSE Touche VERROU Touche ENFANT TEMPÉRATURE Touche ON/OFF ECRAN Touche Tiroir à produits lessiviels BOUTON PROGRAMMES Touche Touche ESSORAGE Touches DÉPART DIFFÉRÉ OPTION PUSH & WASH Tiroir à produits lessiviels : pour charger les produits lessiviels et les additifs (voir “Produits lessiviels et linge”). Touche ON/OFF : appuyer brièvement sur la touche pour allumer ou éteindre l’appareil.
Ecran B FR A C C (voir “Options de lavage”) L’écran est utile pour programmer la machine et fournit de multiples renseignements. La section A affiche la durée des différents programmes disponibles et, une fois le cycle lancé, le temps restant jusqu’à la fin du programme ; si un DÉPART DIFFÉRÉ a été sélectionné, le temps restant avant le démarrage du programme sélectionné est affiché.
Comment faire un cycle de lavage FR Programmation rapide 1. CHARGER LE LINGE. Ouvrir la porte hublot. Charger le linge en faisant attention à ne pas dépasser la quantité indiquée dans le tableau des programmes de la page suivante. 2. DOSER LE PRODUIT LESSIVIEL. Sortir le tiroir et placer le produit lessiviel dans les bacs correspondants comme indiqué au paragraphe “Produits lessiviels et linge”. 3. FERMER LE HUBLOT. 4. Appuyer sur la touche « PUSH & WASH » pour lancer le programme de lavage.
Programmes et options Durée cycle 30° 30° 30° 30° 1200 1000 1000 0 3,5 3,5 3,5 1 - - - ** ** ** ** 30° 800 3,5 70 0,16 33 30’ 40° (Max.60°) 40° (Max.60°) 40° 1400 7 75 0,97 75 220’ 1000 3,5 46 0,68 55 120’ 1400 7 - - - ** Eco Coton 60°C (1): blancs et couleurs résistantes très sales. 60° 1400 7 Eco Coton 40°C (2): blancs et couleurs résistantes peu sales. 40° 60° (Max.
FR Push & Wash Cette fonction permet de lancer un cycle de lavage même si la machine est éteinte sans qu’il faille préalablement appuyer sur la touche ON/OFF ou, après allumage de la machine, sans avoir besoin d’activer aucune autre touche et/ou bouton (autrement le programme Push & Wash sera désactivé). Pour lancer le cycle Push & Wash appuyer 2 secondes de suite sur la touche. L’allumage du voyant signale que le cycle est lancé.
Produits lessiviels et linge Tiroir à produits lessiviels Un bon résultat de lavage dépend aussi d’un bon dosage de produit lessiviel : un excès de lessive ne lave pas mieux, il incruste l’intérieur du lave-linge et pollue l’environnement. ! Ne pas utiliser de lessives pour lavage à la main, elles moussent trop. ! Utiliser des lessives en poudre pour du linge en coton blanc et en cas de prélavage et de lavages à une température supérieure à 60°C.
FR Système d’équilibrage de la charge Avant tout essorage, pour éviter toute vibration excessive et répartir le linge de façon uniforme, le lave-linge fait tourner le tambour à une vitesse légèrement supérieure à la vitesse de lavage. Si au bout de plusieurs tentatives, la charge n’est toujours pas correctement équilibrée, l’appareil procède à un essorage à une vitesse inférieure à la vitesse normalement prévue.
Anomalies et remèdes Il peut arriver que le lave-linge ne fonctionne pas bien. Avant d’appeler le Service de dépannage (voir “Assistance”), contrôler s’il ne s’agit pas par hasard d’un problème facile à résoudre à l’aide de la liste suivante. Anomalies : Causes / Solutions possibles : Le lave-linge ne s’allume pas. • La fiche n fest pas branchée dans la prise de courant ou mal branchée. • Il y a une coupure de courant. Le cycle de lavage ne démarre pas.
Assistance FR Avant d’appeler le service d’Assistance technique : • Vérifier s’il est possible de résoudre l’anomalie par ses propres moyens (voir “Anomalies et Remèdes”); • Remettre le programme en marche pour contrôler si l’inconvénient a disparu ; • Si ce n’est pas le cas, contacter un Centre de dépannage. ! Ne jamais s’adresser à des techniciens non agréés. Communiquer : • le type de panne ; • le modèle de l’appareil (Mod.) ; • le numéro de série (S/N).
FR 43
195148365.00 07/2016 FR Indesit Company Spa Viale Aristide Merloni, 47 60044 Fabriano (AN) Italy www.indesit.