Instructions for use WASHER DRYER Contents GB English,1 GB Installation, 2-3-4-5 Unpacking and levelling Connecting the electricity and water supplies The first wash cycle Technical data Instructions for the fitter Description of the washer-dryer and starting a wash cycle, 6-7 Control panel Indicator lights Starting a wash cycle Wash cycles, 8 Table of wash cycles CAWD 125 Personalisation, 9 Setting the temperature Setting the drying cycle Functions Detergents and laundry, 10 Detergent dispenser dra
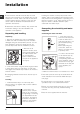
Installation GB This instruction manual should be kept in a safe place for future reference. If the washer-dryer is sold, transferred or moved, make sure that the instruction manual remains with the machine so that the new owner is able to familiarise himself/herself with its operation and features. Levelling the machine correctly will provide it with stability, help to avoid vibrations and excessive noise and prevent it from shifting while it is operating.
Connecting the drain hose 65 - 100 cm Connect the drain hose, without bending it, to a drainage duct or a wall drain located at a height between 65 and 100 cm from the floor; Avoid using any extension cord or multiple socket outlet. GB The cable should not be bent or compressed.
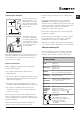
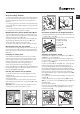
GB Instructions for the fitter Door Mounting Accessories (Fig. 1-2-3-4-5). Mounting the wooden panel onto the door and inserting the machine into cabinets: In the case where the machine must be shipped for final installation after the wooden panel has been mounted, we suggest leaving it in its original packaging. The packaging was designed to make it possible to mount the wooden panel onto the machine without removing it completely (see figures below).
Using the Drilling Template. - To trace the positions of the holes on the left-hand side of the panel, align the drilling template to the top left side of the panel using the lines traced on the extremities as a reference. - To trace the positions of the holes on the right-hand side of the panel, align the drilling template to the top right side of the panel. - Use an appropriately sized router to mill the holes for the two hinges, the rubber plug and the magnet.
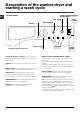
Description of the washer-dryer and starting a wash cycle Control panel GB WASH CYCLE PROGRESS/ DELAY TIMER indicator lights SPIN SPEED knob ON/OFF button Detergent dispenser drawer: used to dispense detergents and washing additives (see Detergents and laundry). ON/OFF button: switches the washer-dryer on and off. WASH CYCLE knob: programmes the wash cycles. During the wash cycle, the knob does not move. FUNCTION buttons with indicator light: used to select the available functions.
Indicator lights The indicator lights provide important information. This is what they can tell you: Delayed start If the DELAY TIMER function has been activated (see Personalisation), after the wash cycle has been started the indicator light corresponding to the selected delay period will begin to flash: Wash cycle phase indicator lights Once the desired wash cycle has been selected and has begun, the indicator lights switch on one by one to indicate which phase of the cycle is currently in progress.
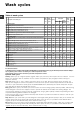
Wash cycles Table of wash cycles Wash cycles GB Max. temp. (°C) Description of the wash cycle Max. speed (rpm) Detergents Drying Fabric Bleach Wash softener Max. load (kg) Cycle duration Specials cycles 6 Sanitary: Extremely soiled whites. 6 Sanitary: Heavily soiled whites and resistant colours. 90° 1200 l l l l 7,5 170 60° 1200 l - l l 7,5 153 l - l l l l 4 290 - 2 118 7 Night cycle: Lightly soiled delicate colours. 8 Baby cycle: Heavily soiled delicate colours.
Personalisation Setting the temperature GB Turn the TEMPERATURE knob to set the wash temperature (see Table of wash cycles). The temperature may be lowered, or even set to a cold wash ( ). The washer-dryer will automatically prevent you from selecting a temperature which is higher than the maximum value set for each wash cycle. Setting the drying cycle Table of Drying times Fabric type (guideline values) Load type Max.
Detergents and laundry GB Detergent dispenser drawer Good washing results also depend on the correct dose of detergent: adding too much detergent will not necessarily result in a more efficient wash, and may in fact cause build up on the inside of your appliance and contribute to environmental pollution. Do not use hand washing detergents because these create too much foam. Open the detergent dispenser drawer and 3 pour in the detergent or washing additive, as follows.
Precautions and tips This washer-dryer was designed and constructed in accordance with international safety regulations. The following information is provided for safety reasons and must therefore be read carefully. General safety This appliance was designed for domestic use only. The washer-dryer must only be used by adults, in accordance with the instructions provided in this manual. Do not touch the machine when barefoot or with wet or damp hands or feet.
GB Disposal Disposing of the packaging materials: observe local regulations so that the packaging may be re-used. The European Directive 2002/96/EC on Waste Electrical and Electronic Equipment, requires that old household electrical appliances must not be disposed of in the normal unsorted municipal waste stream. Old appliances must be collected separately in order to optimise the recovery and recycling of the materials they contain and reduce the impact on human health and the environment.
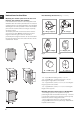
Care and maintenance Cutting off the water and electricity supplies Turn off the water tap after every wash cycle. This will limit wear on the hydraulic system inside the washer-dryer and help to prevent leaks. Unplug the washer-dryer when cleaning it and during all maintenance work. To access the pre-chamber: GB 1. unscrew the lid by rotating it anti-clockwise (see figure): a little water may trickle out.
Troubleshooting GB Your washer-dryer could fail to work. Before contacting the Technical Assistance Centre (see Assistance), make sure that the problem cannot be not solved easily using the following list. Problem: Possible causes / Solutions: The washer-dryer does not switch on. The appliance is not plugged into the socket fully, or is not making contact. There is no power in the house. The wash cycle does not start. The washer-dryer door is not closed properly.
Service Before calling for Assistance: Check whether you can solve the problem alone (see Troubleshooting); Restart the programme to check whether the problem has been solved; If this is not the case, contact an authorised Technical Assistance Centre using the telephone number provided on the guarantee certificate. GB Always request the assistance of authorised technicians. Have the following information to hand: the type of problem; the appliance model (Mod.); the serial number (S/N).
195072434.