Dalla cucina a carbone dei tempi che furono alla cottura digitale dei nostri giorni, Scholtès ha saputo conservare in 80 anni di storia quello spirito di cose “fatte a mano” che rimane il suo tratto caratterizzante e il suo punto di forza. Ogni prodotto Scholtès è la riuscita combinazione di una estetica improntata alla massima eleganza e di un contenuto tecnologico indiscutibile, fatto di prestazioni e innovazione.
Indice Avvertenze .............................................................................................................................. 4 Istruzioni per l'installazione ............................................................................................... 5-6 Il piano di cottura .............................................................................................................. 7-10 Manutenzione ordinaria e pulizia della cucina ....................................................
Avvertenze Per garantire l’efficienza e la sicurezza di questo elettrodomestico: • rivolgetevi esclusivamente a centri di assistenza tecnica autorizzati • richiedete sempre l’utilizzo di parti di ricambio originali 1 Questo apparecchio è stato concepito per un uso di tipo non professionale all'interno di abitazione.
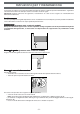
Istruzioni per l'installazione Le istruzioni che seguono sono rivolte all’installatore qualificato affinché compia le operazioni di installazione, regolazione e manutenzione tecnica nel modo più corretto e secondo le norme in vigore. Importante: qualsiasi intervento di regolazione, manutenzione etc. deve essere eseguito con l’elettrodomestico elettricamente disinserito.
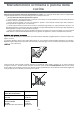
Istruzioni per l'installazione 230V 1N~ H07RN-F 3x4 CEI-UNEL 35364 N L 1 3 5 2 4 Fig. A P N L3 L2 L1 Fig. B 400V 2N~ H05RR-F 4x2.5 CEI-UNEL 35363 N L2 L1 1 3 5 2 4 Fig. C 400V 3N~ H05RR-F 5x2.5 CEI-UNEL 35363 N L3 L2 L1 1 3 5 2 4 Fig.
Il piano di cottura CI 86 I Potenza (in W) ID 1800 – B 3000 I 1200 W – 600 W se* I 1200 I 1800 W 6600 I = zona di cottura a induzione semplice ID = zona di cottura a induzione doppia B = booster: la zona di cottura può essere sovralimentata a 3000 W * = la potenza massima è limitata a 600 W finché è attivo il booster nella zona di cottura posteriore relativa Posizione zona cottura Posteriore dx Anteriore dx Posteriore sx Anteriore sx Potenza totale Pannello di contr ollo controllo Spie ZONA DI COTTURA PRO
Il piano di cottura Prima dell'uso, togliere tassativamente le pellicole in plastica poste ai lati dell'apparecchio. La colla applicata sulle guarnizioni lascia alcune tracce di grasso sul vetro. Prima di utilizzare l’apparecchio, si raccomanda di eliminarle con un prodotto specifico per la manutenzione non abrasivo. Durante le prime ore di funzionamento è possibile avvertire un odore di gomma, che comunque scomparirà presto.
Il piano di cottura Consigli pratici per luso dellapparecchio ! Adoperare recipienti di cottura il cui materiale di fabbricazione sia compatibile con il principio dell’induzione (materiale ferromagnetico). Si raccomanda l’uso di pentole in: ghisa, acciaio smaltato o inox speciale per induzione. Per sincerarsi della compatibilità di un recipiente è sufficiente fare una prova con una calamita.
Il piano di cottura Segnale acustico Alcune anomalie, quali: • un oggetto (pentola, posata, ecc.) posto per oltre 10 secondi sull’area dei comandi, • un versamento sull’area dei comandi, • una pressione esercitata a lungo su un tasto, possono provocare l’emissione di un segnale acustico. Rimuovere la causa del malfunzionamento per interrompere il segnale acustico. In queste situazioni i comandi si bloccano automaticamente: per sbloccarli premere il tasto [icona chiave], le impostazioni vengono mantenute.
Manutenzione ordinaria e pulizia della cucina Prima di ogni operazione disinserire elettricamente la cucina.
Manutenzione ordinaria e pulizia della cucina Sostituzione della lampada del ffor or no • Prima di effettuare qualsiasi operazione, disinserire elettricamente il forno, staccando la spina o agendo sull’interruttore utilizzato per il collegamento del forno all’impianto elettrico. • Servendosi di un oggetto stretto e piatto (cacciavite, manico di cucchiaio, ecc.), togliere il coperchio in vetro.
Il cruscotto Ora Contaminati Tempo di cottura STOP Ora di fine cottura Spia di riscaldamento Indicatore di porta bloccata A B Ripiano consigliato Manopola di selezione funzioni di cottura (temperature prestabilite) Regolazione temperatura e tempo di cottura La manopola A consente di regolare l’ora, la temperatura, il contaminuti, la durata e/o la fine di cottura o di pirolisi. Tramite la manopola B è possibile selezionare le funzioni di cottura.
Le cotture Création esentazione Presentazione 1. Pr Per ciascuna cottura, il forno gestisce unicamente i parametri essenziali per la riuscita di tutte le ricette, dalle più semplici alle più sofisticate: temperatura, fonte di calore, tasso d’umidità e circolazione forzata dell’aria sono valori che vengono controllati automaticamente. Questo capitolo è stato realizzato con la preziosa collaborazione del nostro esperto culinario.
Le cotture Création 3. Avvio di una cottur a cottura • ruotare la manopola B fino alla funzione desiderata; • in base alla modalità di cottura scelta, viene visualizzata la temperatura consigliata e il ripiano del forno al quale posizionare il cibo; • Durante il preriscaldamento il simbolo tale fase. lampeggia (solo con alcune funzioni) e diventa fisso al termine di 4. Modifica della temper atur a tempera tura È possibile modificare la temperatura in qualsiasi momento.
La programmazione 1. Pr ogrammazione di una dur ata di cottur a con inizio immedia to Pro dura cottura immediato È possibile impostare una durata di cottura in modo tale che il forno entri in funzione immediatamente e si interrompa automaticamente allo scadere del tempo programmato. Selezionare una modalità di cottura, se necessario modificare la temperatura, ed effettuare le seguenti regolazioni: 1. Ruotare la manopola A per illuminare il simbolo ; 2.
La programmazione ogrammazione di una dur ata di cottur a con inizio ritar da to 2. Pr Pro dura cottura ritarda dato È possibile programmare il forno in modo tale che la pietanza sia pronta per un orario stabilito: il programmatore stabilisce automaticamente l’ora di inizio cottura e il forno si spegne al momento desiderato.
Le cotture Succès esentazione Presentazione 1. Pr Il programma Succès comprende tutte le cotture automatiche realizzate e impostate dal nostro chef. Tutte le funzioni Succès sono completamente automatiche: la temperatura e la durata di cottura sono prestabilite e non possono essere modificate tramite il sistema C.O.P.® (Cottura Ottimale Programmata) che garantisce automaticamente un risultato perfetto.
Le cotture Succès a Succès cottura 3. Avvio di una cottur I valori di Durata e Temperatura sono prestabiliti (non modificabili). • ruotare la manopola B fino alla funzione desiderata; • Selezionata la cottura Succés desiderata sul display appare la scritta "AUTO" lampeggiante per circa 10 secondi. • In seguito il display mostra il tempo rimanente per la fine della cottura. Spe gnimento del ffor or no Spegnimento orno Una serie di segnali acustici indicano la fine della cottura.
Gli accessori Il forno dispone di 5 livelli di posizionamento delle pietanze (ripiani da 1 a 5, numerati dal basso verso l’alto) in funzione della cottura da realizzare. Per ottenere risultati di cottura ottimali il display visualizza il ripiano consigliato. La leccar da leccarda Viene utilizzata: • come piano di appoggio per qualsiasi recipiente di cottura su un solo livello e a bagno-maria sul 2° ripiano; • come piano di appoggio per gli alimenti (torte, crostate, bignè, ecc.
Tabelle di abbinamento piatti/funzioni di cottura Le seguenti tabelle forniscono utili informazioni per la scelta della funzione di cottura adatta alla pietanza da infornare. La durata di cottura deve essere stabilita in base alla ricetta da eseguire in quanto dipende dalla quantità e dal volume della pietanza.
Tabelle di abbinamento piatti/funzioni di cottura PIETANZE DOLCI DI PASTICCERIA Biscotti (senza lievito) Plum-cake e quattro quarti (con lievito chimico) Crostate alla frutta (pasta frolla o pasta sfoglia, con o senza flan) Torte al formaggio bianco Crostate in pasta lievitata Cottura di basi per crostate (pasta sablée) Pasticci (pasta sfoglia o pasta frolla) bigné Pasta sfoglia Piccoli dolci di pasticceria (lievito naturale) Dolci di pasticceria grandi (lievito naturale) PASTICCINI Pasta da biscotti Pa
Pirolisi 1. Utili accor gimenti prima di una pir olisi accorgimenti pirolisi • Eliminare lo sporco accumulato in eccesso e gli scolamenti più consistenti, per evitare che si producano fiamme o che si sprigioni fumo. • Estrarre tutti gli accessori dal forno prima di eseguire un’operazione di pirolisi. Sotto l’effetto di una temperatura particolarmente elevata, essi possono subire una deformazione e un cambiamento del colore. • Non lasciare strofinacci sulla maniglia del forno.
COSA FARE SE … ... dal ffor or no si sprigiona molto fumo: orno • verificare che sia stata selezionata la funzione idonea rispetto al tipo di cottura desiderata; • verificare che la temperatura visualizzata (se modificata dall’utente) non sia troppo elevata; • ispezionare lo stato di sporcizia del forno e valutare l’eventualità di una pulizia: i residui alimentari, carbonizzando, possono sprigionare fumo e odori acri. ...
From the charcoal stoves of long ago to modern-day digital cooking, Scholtès has preserved that particular "hand-made" spirit which has been its star asset and strength for over 80 years. Every Scholtès appliance is a successful blend of highly stylish aesthetic appeal and unquestionable technological contents, offering high performance levels and the utmost innovation.
Table of contents Important .............................................................................................................................. 27 Installation instructions .................................................................................................. 28-29 Hob ................................................................................................................................... 30-33 Routine maintenance and cleaning ................................................
Important To maintain the EFFICIENCY and SAFETY of this appliance, we recommend: • call only the Service Centers authorized by the manufacturer • always use original Spare Parts 1 This appliance is intended for non-professional use within the home. 2 Before using the appliance, carefully read the instructions contained in this manual, as they provide important information for ensuring safe installation, use and maintenance. Keep this manual as a reference guide.
Installation instructions The following instructions should be carried out by a qualified technician to ensure that the appliance is installed, adjusted and technically serviced correctly in compliance with current regulations. Important: any adjustment, maintenance, etc. must be carried out after the appliance has been disconnected from the electricity supply.
Installation instructions 230V 1N~ H07RN-F 3x4 CEI-UNEL 35364 N L 1 3 5 2 4 Fig. A P N L3 L2 L1 Fig. B 400V 2N~ H05RR-F 4x2.5 CEI-UNEL 35363 N L2 L1 1 3 5 2 4 Fig. C 400V 3N~ H05RR-F 5x2.5 CEI-UNEL 35363 N L3 L2 L1 1 3 5 2 4 Fig. D Connecting the supply cable to the electricity mains Find a plug that is suitable for the load indicated on the data plate and fit it onto the cable.
Hob Cooking zone position Back Right Front Right Back Left Front Left Total power CI 86 I Power (W) ID 1800 – B 3000 I 1200 W – 600 W if* I 1200 I 1800 W 6600 I = single induction cooking zone ID = double induction cooking zone B = booster: the power of the cooking zone may be boosted to 3000W * = the maximum power is limited to 600 W until the booster is activated for the appropriate rear cooking zone.
Hob Before operating the product, remove all plastic film from the sides of the appliance. ! The glue applied on the gaskets leaves traces of grease on the glass. Before using the appliance, we recommend you remove these with a special non-abrasive cleaning product. During the first few hours of use there may be a smell of rubber which will disappear very quickly. ! A few seconds after the hob is connected to the electricity supply, a buzzer will sound. The hob may now be switched on.
Hob Practical advice on using the appliance ! Use cookware made from materials that are compatible with the induction principle (ferromagnetic material). We especially recommend pans made from: cast iron, coated steel or special stainless steel adapted for induction. Use a magnet to test the compatibility of the cookware.
Hob Buzzer Can also indicate several irregularities: • An object (a pan, cutlery, etc.) has been placed on the control panel for more than 10 seconds. • Something has been spilt on the control panel. • A button has been pressed for too long. All of the above situations may cause the buzzer to sound. Remove the cause of the malfunction to stop the buzzer. The control panel locks automatically in the above situations. to unlock it press the button [key icon], the settings will have been maintained.
Routine maintenance and cleaning Disconnect the cooker from the electricity supply before cleaning or carrying out any maintenance operation. To maximise the lifespan of the appliance, it should be cleaned regularly and according to the following instructions: • Do not use steam cleaners on the appliance. • The enamel-coated parts and the self-cleaning panels (if present) should be washed in warm water. Do not use abrasive powders or corrosive substances as they could ruin these parts of the cooker.
Routine maintenance and cleaning Changing the o v en light b ulb ov bulb • Before carrying out any type of operation, disconnect the oven from the electrical supply by pulling out the plug or using the switch connecting the oven to the electricity mains. • Using a narrow, thin object (screwdriver, spoon handle, etc.), remove the glass cover.
Control panel Time Timer Cooking time STOP Cooking end time Heat indicator light Door locked indicator A B Recommended shelf Cooking mode selector knob (pre-set temperatures) Cooking time and temperature control Knob A enables you to adjust the time, temperature, timer, cooking time and/or cooking end time or pyrolysis time and/or pyrolysis end time. Cooking modes can be selected using knob B. Setting the time When the appliance is connected to the electricity supply, "0.
Cooking with Création roduction 1. IThen t oven controls all essential aspects of each cooking programme and makes it easier for you to create the perfect dish, from the simplest recipe to the most sophisticated culinary delights: the temperature, heat source, humidity and fan assisted operation are all controlled automatically. This chapter was written with the help of our very own culinary expert. We invite you to follow his advice so you can benefit from his experience and perfect your cooking skills.
Cooking with Création 3. Star ting a cooking pr o g r amme pro • • Turn knob B to the required cooking mode. Depending on the cooking mode selected, the recommended temperature and oven shelf height are displayed. • During the pre-heating stage, the oven is ready. symbol flashes (only in certain cooking modes) and remains lit when the the temperature 4. Adjusting You can adjust the temperature at any time. • • • • Turn knob A until the temperature flashes on the display.
Programming 1. Pr o g r amming a cooking time with instant star t A cooking programme can be set so that the oven starts immediately and switches off automatically when the set period of time has ended. Select a cooking mode, if necessary adjust the temperature, and follow the instructions below: 1. Turn knob A so that the symbol lights up. 2. Press knob A to begin adjusting the cooking time: 2:00(1) will flash on the display. 3.
Programming o g r amming cooking with a dela y ed star t delay 2. Pr The oven can be programmed so that the dish is ready at a given time: the programmer sets the cooking start time automatically and the oven switches off at the required time. For example It is 9:00 a.m. and you want the dish to be ready at 12:30, knowing that cooking should last 1 hour and 15 minutes: then the cooking time and cooking end time should be set. The oven will automatically calculate that cooking should start at 11:15 a.m.
Cooking with Succès ntroduction 1. IThe Succès function encompasses all the automatic cooking programmes devised and set by our chef. All Succès programmes are completely automatic: the temperature and cooking time are pre-set values, guaranteeing a perfect result every time - automatically. These values cannot be adjusted using the C.O.P.® (Programmed Optimal Cooking) system.
Cooking with Succès 3. Star ting a Succès cooking pr o g r amme pro The cooking time and temperature are pre-set (non-adjustable). • Turn knob B to the required cooking mode. • Once the required Succès mode has been selected, "AUTO" appears on the display and flashes for 10 seconds. • After this, the display shows the time remaining until the cooking end time. T ur ning the o v en of f ov A sequence of buzzers sounds to indicate the cooking end time.
The accessories Your oven is fitted with 5 different oven rack heights (from 1 to 5, from the bottom up) depending on the dish and cooking mode selected. For perfect results every time, the display indicates the recommended oven rack. T he o v en tr a y ov It is used: • as a dish support for all dishes when cooking on one rack only and in Bain-Marie cooking on rack 2; • as a baking tray (for cakes, tarts, choux pastry, etc.
Cooking mode/dish combination tables STARTERS DISHES EXAMPLES COOKING MODE TEMPERATURE SUPPORTS quiche lorraine, leek tart, etc. Tarts 220 °C cake tin on the oven tray pizzas, focaccia Brioches 220 °C on the oven tray olive loaf, tuna loaf, etc. filo cheese pastries, salmon pithiviers, … Tarts Cakes (or multi-level) Cakes (or multi-level) 220 °C 160 °C 200 °C Terrines fish, meat, vegetable terrines, foie gras, etc.
Cooking mode/dish combination tables DESSERT S MINI CUP CAKES PASTRIES DISHES FRUIT COOKING MODE TEMPERATURE SUPPORTS cakes (or multi-level) 200 °C cake tin on the oven tray cakes (or multi-level) 160 °C cake tin on the oven tray Tarts 220 °C cake tin on the oven tray Tarts Brioches 200 °C 180 °C Tarts 180 °C Tarts 220 °C cake tin on the oven tray cake tin on the oven tray cake tin on the oven tray (dry beans on the pastry base) cake tin on the oven tray cakes (or multi-level) 190
Pyrolysis 1. Useful tips bef or e star ting the p yr ol ysis c y c le befor pyr yrol cy • Remove the toughest grease and burnt-on food in order to avoid the creation of flames or smoke during the process. • Remove all oven accessories before running a pyrolysis cycle. Extremely high temperatures may cause these accessories to become warped or discoloured. • Do not leave tea towels on the oven handle.
TROUBLESHOOTING ... y our o v en rreleases eleases a lot of smok e: your ov smoke: • check whether you selected the correct cooking mode for the cooking required; • check whether the temperature displayed (if you have adjusted it) is too high; • check the degree of soil of the oven, and whether it needs to be cleaned: food residue encrusted onto the enamel coating inside the oven becomes charred and creates both smoke and pungent smells. ...