
Instruction for Use


- 28 -
Installation instructions
The following instructions should be carried out by a qualified technician to ensure that the appliance is installed, adjusted
and technically serviced correctly in compliance with current regulations.
Important: any adjustment, maintenance, etc. must be carried out after the appliance has been disconnected from the
electricity supply.
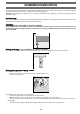
PositioningPositioning
PositioningPositioning
Positioning
The cooker has been manufactured with type X degree protection against overheating and it is therefore possible to install
it next to kitchen cabinets that are not taller than the worktop.
LeLe
LeLe
Le
vv
vv
v
elling elling
elling elling
elling (only available in certain models)
Inside the lower part of the appliance there are 4 adjustable feet with screws, which can be fitted to make it easier
to stand the appliance upright if the floor is a little uneven. The appliance MUST be placed so that it stands level and
does not wobble.
Fitting the leFitting the le
Fitting the leFitting the le
Fitting the le
gs gs
gs gs
gs (only available in certain models)
A set of legs is provided and these should be fitted into the slots on the underside of the base of the cooker.
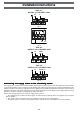
Fitting the power supply cableFitting the power supply cable
Fitting the power supply cableFitting the power supply cable
Fitting the power supply cable
To open the terminal board:
• Insert a screwdriver into the side tabs of the terminal board cover.
• Pull the cover to open it.
To install the cable, follow the instructions below:
• Loosen the cable clamp screw and the wire contact screws.
Note: the jumpers are pre-set at the Factory for 230 V single-phase connection (fig. A).
• To carry out the electrical connections as shown in fig. C and fig. D, use the two jumpers inside the box (fig. B -
labelled "P").
• Secure the power supply cable by fastening the cable clamp screw then put the cover back on.