
Instruction for Use


7
GB
Start-up and use
Using the hob
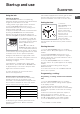
Lighting the burners
For each BURNER knob there is a complete ring
showing the strength of the flame for the relevant burner.
To light one of the burners on the hob:
1. Bring a flame or gas lighter close to the burner.
2. Press the BURNER knob and turn it in an
anticlockwise direction so that it is pointing to the
maximum flame setting E.
3. Adjust the intensity of the flame to the desired level
by turning the BURNER knob in an anticlockwise
direction. This may be the minimum setting C, the
maximum setting E or any position in between the two.
If the appliance is fitted with
an electronic lighting device*
(
see figure
), press the ignition
button, marked with the
symbol
1
, then hold the
BURNER knob down and turn
it in an anticlockwise direction,
towards the maximum flame setting, until the burner
is lit.The burner may be extinguished when the knob
is released. If this occurs, repeat the operation,
holding the knob down for a longer period of time.
! If the flame is accidentally extinguished, switch off
the burner and wait for at least 1 minute before
attempting to relight it.
If the appliance is equipped with a flame failure
safety device*, press and hold the BURNER knob
for approximately 2-3 seconds to keep the flame
alight and to activate the device.
To switch the burner off, turn the knob until it
reaches the stop position •.
Practical advice on using the burners
For the burners to work in the most efficient way
possible and to save on the amount of gas
consumed, it is recommended that only pans that
have a lid and a flat base are used. They should
also be suited to the size of the burner:
To identify the type of burner, please refer to the
diagrams contained in the “Burner and nozzle
specifications”.
*
Only available in certain models.
! For models equipped with a reducer grid, the latter
must be used only for the auxiliary burner, when
pans with a diameter of less than 12 cm are used.
Setting the time*
1. Press the
PROGRAMMER knob
and turn it in a
clockwise direction to
set the correct time.
! The clock can only be
set if the oven is
connected to the
electricity mains. In the
event of a power
failure, the PROGRAMMER will stop: the correct
time will need to be reset once the power has been
restored.
Starting the oven*
1. Turn the PROGRAMMER knob in a clockwise
direction until the “!” symbol appears in the display
window.
2. Pull the PROGRAMMER knob and turn it in a
clockwise direction until the red pointer is aligned
with the current time. A click will indicate the end of
the programming phase.
3. Turn the PROGRAMMER knob in a clockwise
direction until the “9” symbol appears in the display
window.
4. Select the desired cooking mode using the
SELECTOR knob.
5. To switch the oven off, turn the SELECTOR knob
back to the "0" position.
Programming cooking*
Programming a cooking duration with immediate
start
1. Turn the PROGRAMMER knob in a clockwise
direction until the desired cooking duration appears
in the display window.
2. Select the desired cooking mode using the
SELECTOR knob. The oven switches on immediately
and remains in operation for the entire set cooking
duration.
3. When the selected time period has elapsed, a
buzzer will sound. To silence it, turn the
PROGRAMMER knob in a clockwise direction until
the “!” symbol appears in the display window.
4. Turn the SELECTOR knob to the "0" position.
Burner øooareDiameter(cm)
as(R) 24-26
Semias(S) 16-20
Auiliar(A) 10-14
TripleCron(TC) 24-26