Operating Instructions COOKER AND OVEN Contents GB English,1 HU Magyar, 14 Installation, 2-5 Positioning and levelling Mounting a Power Supply Cable Electrical connection Gas connection Adapting to different types of gas Table of burner and nozzle specifications Table of characteristics Description of the appliance, 6 Overall view Control panel Start-up and use, 7-11 CX67SP6 HU/HA CX67SP6 X HU/HA Using the hob Using the oven Cooking modes Practical cooking advice Planning cooking with the electronic
Installation GB Before operating your new appliance please read this instruction booklet carefully. It contains important information concerning the safe installation and operation of the appliance. Please keep these operating instructions for future reference. Make sure that the instructions are kept with the appliance if it is sold, given away or moved.
If the cooker is installed underneath a wall cabinet, there must Min. 600 mm. be a minimum distance of 420 mm between this cabinet and the top of the hob. This distance should be increased to 700 mm if the wall cabinets are flammable (see figure). 420 mm. Min. min. 650 mm. with hood min. 700 mm. without hood 420 mm. Min. HOOD Do not position blinds behind the cooker or less than 200 mm away from its sides.
GB Once the connection has been performed, make sure that the hose: Does not come into contact with any parts that reach temperatures of over 50°C. Is not subject to any pulling or twisting forces and that it is not kinked or bent. Does not come into contact with blades, sharp corners or moving parts and that it is not compressed. Is easy to inspect along its whole length so that its condition may be checked. Is shorter than 1500 mm.
Table of burner and nozzle specifications Table 1 GB Liquid Gas Burner Diameter (mm) Thermal Power kW (p.c.s.*) By-Pass 1/100 Nozzle 1/100 Natural Gas Flow* g/h Nozzle 1/100 Flow* l/h Nominal Reduced (mm) (mm) *** ** (mm) 55 1.00 0.4 30 50 73 71 79 95 Triple Ring (TC) 130 3.25 1.
Description of the appliance GB Overall view Glass cover Gas burner Hob grid Containment surface for spills GUIDE RAILS for the sliding racks position 5 position 4 position 3 position 2 position 1 Control panel GRILL rack DRIPPING PAN rack Adjustable foot Adjustable foot Control panel THERMOSTAT indicator light THERMOSTAT knob Electronic cooking programmer OVEN OPERATION indicator light SELECTOR knob TIMER button Hob BURNER control knobs COOKING END TIME button COOKING TIME button WARNING! The
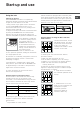
Start-up and use Using the hob Lighting the burners For each BURNER knob there is a complete ring showing the strength of the flame for the relevant burner. To light one of the burners on the hob: 1. Bring a flame or gas lighter close to the burner. 2. Press the BURNER knob and turn it in an anticlockwise direction so that it is pointing to the maximum flame setting E. 3. Adjust the intensity of the flame to the desired level by turning the BURNER knob in an anticlockwise direction.
triple burner or with the grill plate provided with the appliance. GB Practical tips for the use of the grill plate The instructions that follow are valid for the use of the grill plate that is supplied with the appliance. The preheating should be carried out with the command knobs for the three burners in the maximum position E. To carry out cooking, use the position indicated in the table below.
Cooking modes A temperature value can be set for all cooking modes between 60°C and Max, except for the following modes GRILL (recommended: set only to MAX power level) GRATIN (recommended: do not exceed 200°C). X TRADITIONAL OVEN mode Both the top and bottom heating elements will come on. When using this traditional cooking mode, it is best to use one cooking rack only. If more than one rack is used, the heat will be distributed in an uneven manner.
GB If the pizza has a lot of toppings, we recommend adding the mozzarella cheese on top of the pizza halfway through the cooking process. Planning cooking with the electronic programmer* Setting the clock After the appliance has been connected to the power supply, or after a blackout, the display will automatically reset to 0:00 and begin to blink. To set the time: 1. Press the COOKING TIME button $ and the COOKING END TIME % simultaneously. 2.
Oven cooking advice table Cooking modes Foods Duck Traditional Roast veal or beef Pork roast Oven Biscuits (short pastry) Tarts Tarts Fruit cakes Plum cake Sponge cake Baking Stuffed pancakes (on 2 racks) Small cakes (on 2 racks) Mode Cheese puffs (on 2 racks) Cream puffs (on 3 racks) Biscuits (on 3 racks) Meringues (on 3 racks) Frozen food Pizza Courgette and prawn pie Country style spinach pie Turnovers Lasagne Golden Rolls Fast cooking Chicken morsels Pre-cooked food Golden chicken wings Fresh Food Bis
Precautions and tips GB This appliance has been designed and manufactured in compliance with international safety standards. The following warnings are provided for safety reasons and must be read carefully. General safety The appliance was designed for domestic use inside the home and is not intended for commercial or industrial use. The appliance must not be installed outdoors, even in covered areas. It is extremely dangerous to leave the appliance exposed to rain and storms.
Care and maintenance Switching the appliance off Inspecting the oven seals Disconnect your appliance from the electricity supply before carrying out any work on it. Cleaning the appliance Check the door seals around the oven regularly. If the seals are damaged, please contact your nearest Authorised After-sales Service Centre. We recommend that the oven is not used until the seals have been replaced. Never use steam cleaners or pressure cleaners on the appliance.
Használati útmutató TÛZHELY ÉS SÜTÕ Tartalomjegyzék HU GB English,1 HU Magyar, 14 Beszerelés, 15-18 Elhelyezés és vízszintezés Az elektromos kábel beszerelése Elektromos csatlakoztatás Gázbekötés Átállítás más gáztípusra A gázégõk és a fúvókák jellemzõ adatai Adattáblázat A készülék leírása, 19 A készülék áttekintése Kezelõpanel Bekapcsolás és használat, 20-24 CX67SP6 HU/HA CX67SP6 HU/HA A fõzõlap használata A sütõ használata Program Praktikus sütési tanácsok A sütés megtervezése az elektronikus p
Beszerelés A készülék használata elõtt olvassa el alaposan a jelen kézikönyvben található figyelmeztetéseket, mivel azok a készülék biztonságos üzembe helyezésére és használatára vonatkozó fontos utasításokat tartalmaznak. Amennyiben hosszú ideig használja a készüléket, tanácsos kinyitni az ablakot, illetve megnövelni a ventilátorok sebességét. Õrizze meg a készülék használati útmutatóját, hogy a késõbbiekben is föllapozhassa.
HU 420 mm. 420 mm. Min. 600 mm. Min. Min. min. 650 mm. with hood min. 700 mm. without hood HOOD Amennyiben a tûzhelyet fali bútor alá szereli be, a fali bútorok és a munkalap között legalább 420 mm távolságot kell hagyni. Ez a távolság akár 700 mm is lehet, ha a fali bútor gyúlékony (lásd az ábrát); Ne tegyen függönyt a tûzhely mögé, illetve a tûzhely 200 mm-es körzetébe; az esetleges kürtõket a használati útmutató utasításainak megfelelõen kell kialakítani.
A bekötés elvégeztével bizonyosodjon meg arról, hogy a csõ: egyik pontja se érintkezik olyan elemmel, melynek a hõmérséklete 50°C fölé emelkedhet; nincs kitéve húzásnak és csavarásnak, valamint, hogy nincsen megtörve, illetve nincs benne szûkület; nem érintkezik vágófelülettel, éles szélekkel, mozgó elemekkel és nincs összenyomva; állapotának ellenõrzése végett a teljes nyomvonalában jól hozzáférhetõ; hossza nem haladja meg az 1500 mm-t; a két végén, az érvényben lévõ nemzeti szabványoknak megfe
HU A gázégõk és a fúvókák jellemzõ adatai 1. táblázat (Magyarországra) Gázégõ Triplakoronás (TC) G 20 G 25.1 G 30 Átmérõ (mm) Gyújtóláng, 1/100 (mm) Hõteljesítmény, kW csökkentett Fúvóka, 1/100 (mm) Hõteljesítmény, kW névleges Térfogatáram* l/h Fúvóka, 1/100 (mm) Hõteljesítmény, kW Térfogatáram* l/h Fúvóka, 1/100 (mm) Hõteljesítmény, kW névleges Térfogatáram* g/h 130 63 1.70 133 3.60 343 133 3.10 295 91 3.30 240 41 0.80 88 1.60 152 88 1.25 117 60 1.30 95 30 0.
A készülék leírása A készülék áttekintése HU Kezelõpanel FIGYELEM! Ha felmelegedik, az üvegtető széttörhet.Mielőtt lehajtaná, kapcsolja ki az összes égőfejet, illetve az esetleges elektromos * Csak néhány modellnél. főzőlapokat.
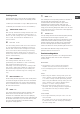
Bekapcsolás és használat HU A fõzõlap használata Az égõfej meggyújtása Minden ÉGÕFEJ kezelõgombja mellett körben jelölve van a gombhoz tartozó égõfej lángjának erõssége. A fõzõlap tetszõleges gázégõjének meggyújtása: 1. Közelítsen egy gyufát vagy gázgyújtót a gázégõhöz. 2. nyomja be, és ezzel egyidejûleg csavarja a GÁZÉGÕ kezelõgombját az óramutató járásával ellentétesen a nagy láng szimbólumra E; 3.
hármas égõfej a készülék kiegészítõ roston sütõ lemezével. Hasznos tanácsok a roston sütõ lemez használatához A következõ utasítások a készülék kiegészítõjeként adott roston sütõ lemezé használatával kapcsolatosak. a kezelõgombok segítségével végezze el az elõmelegítést a gázégõk legnagyobb fokozatra kapcsolásával E; A fõzéshez az alábbi táblázatban szereplõ pozíciókat használjuk.
HU Program A hõmérsékletet minden programnál 60°C és a MAX jelzés közé lehet beállítani, kivéve: d GRILLEZÉS program GRATINÍROZÁS (javasoljuk, hogy ne használjon 200 °C-nál magasabb hõmérsékletet) Bekapcsol a felsõ középsõ fûtõszál. A grillezés magasabb és közvetlen hõmérséklete olyan ételekhez javasolt, melyek magasabb felületi hõmérsékletet igényelnek (borjú- és marhasült, filé, rostélyos). A program ideális kis méretû ételek grillezéséhez.
nehéz ropogós pizzát készíteni. Sok feltétet tartalmazó pizzáknál javasoljuk, hogy a mozzarellát a sütés felénél tegye a tésztára. A sütés megtervezése az elektronikus programozóval* Az óra beállítása Miután a készüléket csatlakoztatták a hálózatra, vagy áramkimaradás volt, a kijelzõn a 0.00 villog. Az óra beállításához: 1. Nyomja meg egyidejûleg a SÜTÉSI IDÕ $ és a SÜTÉS VÉGE % gombot. 2. A * és a ) gombbal 4 másodpercen belül beállíthatja a pontos idõt.
HU Sütési táblázat Program Hagyományos sütés Süteménysütés Gyors sütés Légkeveréses üzemmód Pizzasütés Grillezés Gratinírozás 24 Étel Kacsa Borjú- és marhasült Disznósült (Omlós) kekszek Linzerek Linzerek Gyümölcstorta Gyümölcsös sütemény Piskóta Töltött palacsinták (2 szinten) Kis kekszek (2 szinten) Sajtos-sós aprósütemény (2 szinten) Fánk (3 szinten) Keksz (3 szinten) Habcsók (3 szinten) Mélyhûtött Pizza Cukkinivel és rákkal töltött palacsintatészta Falusi spenóttorta Töltött táska Lasagne Ara
Óvintézkedések és tanácsok A készülék a nemzetközi biztonsági szabványokkal összhangban lett tervezve és gyártva. E figyelmeztetéseket biztonsági megfontolásból közöljük, kérjük, olvassa el figyelmesen. A készülék tisztítását vagy karbantartását azután kezdje el, hogy kihúzta a csatlakozódugót az elektromos hálózatból. Általános biztonsági tájékoztató Ha a készülék elromlana, ne próbálja meg saját maga megjavítani.
Karbantartás és ápolás HU Áramtalanítás A sütõ tömítéseinek ellenõrzése Minden mûvelet elõtt áramtalanítsa a készüléket. Rendszeresen ellenõrizze a sütõajtó körüli tömítések állapotát. Ha sérülést vesz észre, forduljon a legközelebbi hivatalos szakszervizhez. Javasoljuk, hogy ne használja a sütõt, amíg a tömítést ki nem cserélik.
HU 27
04/2010- 195069702.