Dishwasher Instructions for installation and use D 61
D 61 Dishwasher Installation and use
Safety Is a Good Habit to Get Into NOTICE Carefully read the instructions contained in this manual, as they provide important information which is essential to safe and proper installation, use and maintenance of the appliance. - If the appliance is not operating properly or maintenance must be performed, disconnect the appliance from the power supply. 5.Keep detergents out of the reach of children, who must also be kept away from the dishwasher when it is open. 6.
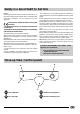
Close-up View (Interior) E G F H J I K L Upper Rack Bottom Sprayer Arm Top Sprayer Arm Salt Container Cap Rack Height Adjustor Washing Filter Lower Rack Detergent and Rinse Aid Dispenser Technical characteristics Width cm. 60 Depth cm. 60 Height cm.
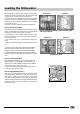
Salt ...... Salt The hardness of the water varies from place to place. If hard water is used in the dishwasher, deposits will form on the dishes and utensils. The appliance is equipped with a special softener that uses a salt specifically designed to eliminate lime and minerals from the water. Loading the Salt into the Softener Always use salt intended for use with dishwashers. The salt container is located beneath the lower rack and should be filled as follows: 1.
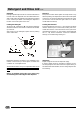
Detergent and Rinse Aid .... Detergent Detergent specifically intended for use with dishwashers must be used. The dispenser must be refilled before the start of each wash cycle following the instructions provided in the "Wash Cycle Table." The detergent dispenser is located on the inside panel of the door. Rinse Aid This product makes dishes sparkle and helps them to dry without spotting.
Loading the Dishwasher Before placing the dishes in the dishwasher, remove the larger food particles to prevent the filter from becoming clogged, which results in reduced performance. If the pots and pans have baked-on food that is extremely hard to remove, we recommend that they be allowed to soak before they are washed. This will eliminate the need for extra wash cycles. Pull out the racks to facilitate loading the dishwasher.
Turning on the Appliance Starting a wash cycle.... 1. Make sure that the plug for the appliance is inserted into the wall socket. 2. Make sure that the water supply is turned on to full pressure. 3. Load the dishwasher (see the section entitled, "Loading the Dishwasher"). 4. Pour in the detergent (see the section entitled, "Salt, Detergent and Rinse Aid"). 5.
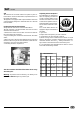
Wash Cycle Table Cycle 1) Heavy Duty 2) Normal Wash (IEC-EN 50242) Cycle Selection Information Very dirty dishes, pots and pans (not to be used with delicate items). Normally dirty dishes, pots and pans. Standard daily cycle. Detergent for Pre-wash + Wash Rinse Aid Pre-wash with hot water Pre-wash with cold water Extended wash at 65°C. Rinse with hot water at 70°C. Drying. 8+22 gr. * 2 pre-washes with cold water. Extended wash a 65°C. Rinse with hot water at 70°C. Drying. 8+22 gr.
Energy Saving Tips - It is important to try and run the dishwasher when it is fully loaded in order to save on energy. In order to prevent odors from forming and food from caking onto the dishes, you can run the hold cycle. - Choose the right wash cycle: the choice of cycle depends on the type of dishware, cookware and utensils being washed and how dirty they are.
Cleaning and Special Maintenance Filter Assembly For best performance and results, the filter assembly must be cleaned frequently. The filter efficiently removes food particles from the wash water, allowing it to be recirculated during the cycle. For this reason, it is a good idea to remove the larger food particles trapped in the filter after each wash cycle by rinsing the "A" semicircular filter and cup under running water. To remove the filter assembly, pull on the cup handle in the upward direction.
Installation Positioning the Appliance Position the appliance in the desired location. The back should rest against the wall behind it, and the sides, along the adjacent cabinets or wall. The dishwasher is equipped with water supply and drain hoses that can be positioned to the right or the left to facilitate proper installation. This dishwasher model can be built-in under the one worktop, and it therefore comes provided with an assembly kit complete with an instructions sheet.
Electrical Connection Electrical Connection If your appliance is supplied with a 13 amp. fused plug it can be plugged into a 13 amp socket for immediate use. Before using the appliance please read the instruction below. WARNING: THIS APPLIANCE MUST BE EARTHED. THE FOLLOWING OPERATIONS SHOULD BE CARRIED OUT BY A QUALIFIED ELECTRICIAN. Replacing the fuse: When replacing a faulty fuse, a 13 amp ASTA approved fuse to BS 1362 should always be used, and the fuse cover re-fitted.
Merloni Elettrodomestici 09/00 - 195027676.00 - Xerox Business Services - DocuTech Viale Aristide Merloni 47 60044 Fabriano Italy Tel +39 0732 6611 Fax +39 0732 662501 www.merloni.