Operating instructions DISHWASHER GB Contents Product Fiche, 2 English,1 Precautions, advice, 3-4 General safety Disposal Saving energy and respecting the environment Installation, 5-6 Positioning and levelling Connecting the water and electricity supplies Advice regarding the first wash cycle Technical data Electrical connection, 7 Description of the appliance, 8 DIFP 18B1 Overall view Control panel Loading the racks, 9-10 Lower rack Cutlery basket Upper rack Adjusting upper rack Unsuitable croc
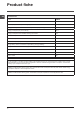
Product fiche GB Product Fiche Brand INDESIT Model DIFP 18B1 Rated capacity in standard place settings (1) 13 Energy efficiency class on a scale from A+++ (low consumption) to D (high consumption) A+ Energy consumption per year in kWh (2) 295.0 Energy consumption of the standard cleaning cycle in kWh 1,04 Power consumption of the off-mode in W 0.5 Power consumption of the left-on mode in W 5.0 Water consumption per year in litres (3) 3080.
Precautions and advice This appliance was designed and manufactured in compliance with international safety standards The following information has been provided for safety reasons and should therefore be read carefully. Keep this instruction manual in a safe place for future reference. If the appliance is sold, given away or moved, please ensure the manual is kept with the machine. Please read these instructions carefully: they contain important information on installation, use and safety.
GB Phosphate-free and chlorine-free detergents containing enzymes • We strongly recommend that you use detergents that do not contain phosphates or chlorine, as these products are harmful to the environment. • Enzymes provide a particularly effective action at temperatures around 50°C. As a result detergents containing enzymes can be used in conjunction with low-temperature wash cycles in order to achieve the same results as a normal 65°C wash cycle.
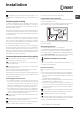
Installation If the appliance must be moved at any time, keep it in an upright position; if absolutely necessary, it may be tilted onto its back. Positioning and levelling 1. Remove the appliance from all packaging and check that it has not been damaged during transportation. If it has been damaged, contact the retailer and do not proceed any further with the installation process. The hose should not be bent or compressed.
GB Anti-condensation strip* After installing the dishwasher, open the door and stick the adhesive transparent strip under the wooden shelf in order to protect it from any condensation which may form. Advice regarding the first wash cycle After the installation, remove the stoppers from the racks and the retaining elastic elements from the upper rack, if any.
Electrical Connection Electrical Connection If your appliance is supplied with a 13 amp. fused plug it can be plugged into a 13 amp socket for immediate use. Before using the appliance please read the instruction below. WARNING: THIS APPLIANCE MUST BE EARTHED. THE FOLLOWING OPERATIONS SHOULD BE CARRIED OUT BY A QUALIFIED ELECTRICIAN. Replacing the fuse: When replacing a faulty fuse, a 13 amp ASTA approved fuse to BS 1362 should always be used, and the fuse cover re-fitted.
Description of the appliance GB Overall view 1. 2. 3. 4. 5. 6. 7. 8. 9. 10. 11.
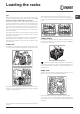
Loading the racks Tips Before loading the racks, remove all food residues from the crockery and empty liquids from glasses and containers. No preventive rinsing is needed under running water. Arrange the crockery so that it is held in place firmly and does not tip over; and arrange the containers with the openings facing downwards and the concave/convex parts placed obliquely, thus allowing the water to reach every surface and flow freely.
GB Tip-up compartments with adjustable position The side tip-up compartments can be positioned at three different heights to optimize the arrangement of crockery inside the rack. Wine glasses can be placed safely in the tip-up compartments by inserting the stem of each glass into the corresponding slots.
Start-up and use Starting the dishwasher 1. Turn the water tap on. 2. Open the door and press ON-OFF button. 3. Measure out the detergent. (see adjacent information). 4. Load the racks (see Loading the racks). 5. Select the wash cycle in accordance with the type of crockery and its soil level (see table of wash cycles) by pressing the P button. 6. Select the wash options*. (see Special wash cycles and options). 7. Start the wash cycle by shutting the door. 8.
Wash cycles GB Wash-cycle data is measured under laboratory conditions according to European Standard EN 50242. Based on the different conditions of use, the wash-cycle duration and data can change. The number and type of wash cycles and options may vary depending on the dishwasher model. Drying Options Wash Cycle Duration Water Consumption (l/cycle) Energy Consumption (kWh/cycle) 1. Eco Yes Delayed start 03:10’ 11 0,04 2. Intensive Yes Delayed start 02:30’ 16,5 1,65 3.
Special wash cycles and Options Notes: Optimum performance levels when using the “Sixty” and “Rapid” cycles can be achieved by respecting the specified number of place settings. GB To reduce consumption, only run the dishwasher when it is full. Note for Test Laboratories: for information on comparative EN testing conditions, please send an email to the following address: assistenza_en_lvs@indesitcompany.
Rinse aid and refined salt GB Only use products which have been specifically designed for dishwashers. Do not use table/industrial salt or washing-up liquid. Follow the instructions given on the packaging. If using a multi-functional product it is not necessary to add any rinse aid. However, we recommend that you add salt, especially if you live in an area where the water is hard or very hard. (Follow the instructions given on the packaging).
Care and maintenance Shutting off the water and electricity supplies • Turn off the water tap after every wash cycle to avoid leaks. • Always unplug the appliance when cleaning it and when performing maintenance work. Cleaning the dishwasher • The external surfaces of the machine and the control panel can be cleaned using a non-abrasive cloth which has been dampened with water. Do not use solvents or abrasive products.
Troubleshooting GB Whenever the appliance fails to work, check for a solution from the following list before calling for Assistance. Problem: Possible causes / Solutions: The dishwasher does not start or cannot be controlled. • Switch off the appliance by pressing the ON/OFF button, switch it back on after approximately one minute and reset the program. • The appliance has not been plugged in properly. • The dishwasher door has not been shut properly. The door won’t close. • The lock was released.
Guarantee Guarantee GB 12 months Parts and Labour Guarantee Your appliance has the benefit of our manufacturer’s guarantee, which covers the cost of breakdown repairs for twelve months from the date of purchase. This gives you the reassurance that if, within that time, your appliance is proven to be defective because of either workmanship or materials, we will, at our discretion, either repair or replace the appliance at no cost to you.
After Sales Service After Sales Service GB No one is better placed to care for your Indesit appliance during the course of its working life than us – the manufacturer. Essential Contact Information Indesit Service We are the largest service team in the UK and Ireland offering you access to 400 skilled telephone advisors and 1000 fully qualified engineers on call to ensure you receive fast, reliable, local service. UK: 08448 224 224 Republic of Ireland: 0818 313 413 www.indesitservice.co.
GB 19
195115227.