Operating instructions EN English, 1 DISHWASHER Contents Installation, 2-3-4 Positioning and levelling Connecting the water and electricity supplies Advice regarding the first wash cycle Technical data Electrical connection Description of the appliance, 5 Overall view Control panel Loading the racks, 6 DIS 04 Lower rack Cutlery basket Upper rack Start-up and use, 7 Starting the dishwasher Measuring out the detergent Wash options Wash cycles, 8 Table of wash cycles Rinse aid and refined salt, 9 M
Installation EN Keep this instruction manual in a safe place for future reference. If the appliance is sold, given away or moved, please ensure the manual is kept with the machine, so that the new owner may benefit from the advice contained within it. Please read this instruction manual carefully: it contains important information regarding the safe installation, use and maintenance of the appliance.
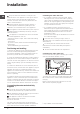
Anti-flooding protection Anti-condensation strip* Some models are also equipped with the supplementary safety device New Acqua Stop*, which guarantees antiflooding protection even in the event of a supply hose rupture. Advice regarding the first wash cycle To ensure floods do not occur, the dishwasher: - is provided with a special system which blocks the water supply in the event of anomalies or leaks from inside the appliance.
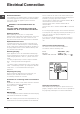
Electrical Connection EN Electrical Connection If your appliance is supplied with a 13 amp. fused plug it can be plugged into a 13 amp socket for immediate use. Before using the appliance please read the instruction below. WARNING: THIS APPLIANCE MUST BE EARTHED. THE FOLLOWING OPERATIONS SHOULD BE CARRIED OUT BY A QUALIFIED ELECTRICIAN. Replacing the fuse: When replacing a faulty fuse, a 13 amp ASTA approved fuse to BS 1362 should always be used, and the fuse cover re-fitted.
Description of the appliance Overall view EN 1. 2. 3. 4. 5. 6. 7. 8. 9. 10. 11. 12. Upper rack Upper sprayer arm Tip-up compartments Rack height adjuster Lower rack Lower sprayer arm Cutlery basket Washing filter Salt dispenser Detergent and rinse aid dispensers Data plate Control Panel*** Control panel ON/OFF indicator light Select wash cycle button Wash cycle indicator lights ON/OFF/RESET button ***Only in completely built-in models. * Only available in selected models.
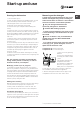
Loading the racks EN Before loading the racks, remove all food residues from the crockery and empty liquids from glasses and cups. Arrange the crockery so that it is held in place firmly and does not tip over. After loading the appliance, check that the sprayer arms can rotate freely. Adjusting the height of the upper rack Lower rack Never lift or lower the rack on one side only. In order to make it easier to arrange the crockery, the upper rack may be moved to a higher or lower level.
Start-up and use Starting the dishwasher 1. Turn the water tap on. 2. Open the door and press the ON/OFF button: you will hear a short beep and the ON/OFF and wash cycle indicator lights switch on for a few seconds. 3. Measure out the detergent (see below). 4. Load the racks (see chapter entitled Loading the racks). 5.
Wash cycles EN If the crockery is only lightly soiled or if it has been rinsed with water before being placed in the dishwasher, reduce the amount of detergent used accordingly. The number and type of wash cycles and options may vary depending on the dishwasher model. Wash cycle selection instructions Extremely soiled dishes and pans (not to be used for delicate items). Detergent (A) = compartment A (B) = compartment B Wash cycle Drying Wash cycle duration (tolerance ±10%) Hrs. Min.
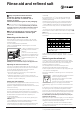
Rinse aid and refined salt Only use products which have been specifically designed for dishwashers. Do not use table salt or industrial salt, or washing up liquid. Follow the instructions given on the packaging. If using a multi-functional product it is not necessary to add rinse aid; however, we recommend that you add salt, especially if you live in an area where the water is hard or very hard. Follow the instructions given on the packaging.
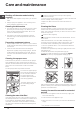
Care and maintenance EN Shutting off the water and electricity supplies Turn off the water tap after every wash cycle to avoid leaks. Always unplug the appliance when cleaning it and when performing maintenance work. Cleaning the dishwasher The external surfaces of the machine and the control panel may be cleaned using a non-abrasive cloth which has been dampened with water. Do not use solvents or abrasive products.
Precautions and advice This appliance was designed and manufactured in compliance with current international safety standards. The following information has been provided for safety reasons and should therefore be read carefully.
Troubleshooting EN Whenever the appliance fails to work, check for a solution from the following list before calling for Assistance. Problem: Possible causes / Solutions: The dishwasher does not start or cannot be controlled • Switch off the appliance by pressing the ON/OFF button, switch it back on after approximately one minute and reset the program. • The appliance has not been plugged in properly. • The dishwasher door has not been shut properly. The door won’t close • The lock was released.
Guarantee Guarantee EN 12 months Parts and Labour Guarantee Your appliance has the benefit of our manufacturers guarantee, which covers the cost of breakdown repairs for twelve months from the date of purchase. This gives you the reassurance that if, within that time, your appliance is proven to be defective because of either workmanship or materials, we will, at our discretion, either repair or replace the appliance at no cost to you.
After Sales Service After Sales Service EN No one is better placed to care for your Indesit appliance during the course of its working life than us the manufacturer. Essential Contact Information Indesit Service We are the largest service team in the UK and Ireland offering you access to 400 skilled telephone advisors and 1000 fully qualified engineers on call to ensure you receive fast, reliable, local service. UK: 08448 224 224 Republic of Ireland: 0818 313 413 www.indesitservice.co.
EN 15
195075388.