Instructions for use WASHING MACHINE Contents IT GB English,1 Italiano,13 GB Installation, 2-3 Unpacking and levelling Connecting the electricity and water supplies The first wash cycle Technical data Description of the washing machine and starting a wash cycle, 4-5 Control panel Indicator lights Starting a wash cycle Wash cycles, 6 Table of wash cycles Personalisation, 7 ECO8F 129 Setting the temperature Setting the spin speed Functions Detergents and laundry, 8 Detergent dispenser drawer Bleach
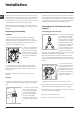
Installation GB ! This instruction manual should be kept in a safe place for future reference. If the washing machine is sold, transferred or moved, make sure that the instruction manual remains with the machine so that the new owner is able to familiarise himself/herself with its operation and features.
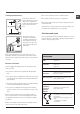
! Do not use extension cords or multiple sockets. Connecting the drain hose 65 - 100 cm Connect the drain hose, without bending it, to a drainage duct or a wall drain located at a height between 65 and 100 cm from the floor; GB ! The cable should not be bent or compressed. ! The power supply cable must only be replaced by authorised technicians. Warning! The company shall not be held responsible in the event that these regulations are not respected.
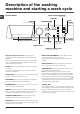
Description of the washing machine and starting a wash cycle GB Control panel WASH CYCLE PROGRESS indicator lights DISPLAY ON/OFF button with indicator light Detergent dispenser drawer DOOR LOCKED TEMPERATURE button indicator light START/PAUSE SPIN SPEED button WASH CYCLE knob FUNCTION buttons with indicator lights button with indicator light CONTROL PANEL LOCK button with indicator light Detergent dispenser drawer: used to dispense detergents and washing additives (see “Detergents and laun
Indicator lights The indicator lights provide important information. This is what they can tell you: Wash cycle phase indicator lights As the WASH CYCLE knob is rotated, the indicator lights illuminate, indicating the stages which will be performed by the machine in accordance with the selected wash cycle. Once the desired wash cycle has been selected and has begun, the indicator lights switch on one by one to indicate which phase of the cycle is currently in progress.
Wash cycles Table of wash cycles Wash cycles GB 5 Essentials cycles Cotton + Prewash: extremely soiled whites. Cotton: heavily soiled whites and resistant colours. Cotton (2): heavily soiled whites and delicate colours. Coloured cottons (3): lightly soiled whites and delicate colours. Synthetics: heavily soiled resistant colours. Synthetics: lightly soiled resistant colours. Mix 15’: to refresh lightly soiled garments quickly (not suitable for wool, silk and clothes which require washing by hand).
Personalisation Setting the temperature GB By pressing the TEMPERATURE button to set the wash temperature (see Table of wash cycles). The temperature may be lowered, or even set to a cold wash ( ). The washing machine will automatically prevent you from selecting a temperature which is higher than the maximum value set for each wash cycle. Setting the spin speed By pressing the SPIN SPEED button to set the spin speed for the selected wash cycle.
Detergents and laundry GB Detergent dispenser drawer Good washing results also depend on the correct dose of detergent: adding too much detergent will not necessarily result in a more efficient wash, and may in fact cause build up on the inside of your appliance and contribute to environmental pollution. ! Do not use hand washing detergents because these create too much foam. Open the detergent dispenser drawer and pour 4 in the detergent or washing additive, as follows.
Precautions and tips ! This washing machine was designed and constructed in accordance with international safety regulations. The following information is provided for safety reasons and must therefore be read carefully.
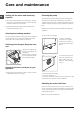
Care and maintenance GB Cutting off the water and electricity supplies • Turn off the water tap after every wash cycle. This will limit wear on the hydraulic system inside the washing machine and help to prevent leaks. • Unplug the washing machine when cleaning it and during all maintenance work. Cleaning the washing machine The outer parts and rubber components of the appliance can be cleaned using a soft cloth soaked in lukewarm soapy water. Do not use solvents or abrasives.
Troubleshooting Your washing machine could fail to work. Before contacting the Technical Assistance Centre (see “Assistance”), make sure that the problem cannot be not solved easily using the following list. GB Problem: Possible causes / Solutions: The washing machine does not switch on. • The appliance is not plugged into the socket fully, or is not making contact. • There is no power in the house. The wash cycle does not start. • • • • • The washing machine door is not closed properly.
Service Before calling for Assistance: • Check whether you can solve the problem alone (see “Troubleshooting”); • Restart the programme to check whether the problem has been solved; • If this is not the case, contact an authorised Technical Assistance Centre using the telephone number provided on the guarantee certificate. GB ! Always request the assistance of authorised technicians. Have the following information to hand: • the type of problem; • the appliance model (Mod.); • the serial number (S/N).
Istruzioni per l’uso LAVABIANCHERIA Sommario I Italiano I Installazione, 14-15 Disimballo e livellamento Collegamenti idraulici ed elettrici Primo ciclo di lavaggio Dati tecnici Descrizione della lavabiancheria e avviare un programma, 16-17 Pannello di controllo Spie Avviare un programma Programmi, 18 Tabella dei programmi Personalizzazioni, 19 ECO8F 129 Impostare la temperatura Impostare la centrifuga Funzioni Detersivi e biancheria, 20 Cassetto dei detersivi Ciclo candeggio Preparare la biancheria
Installazione I ! È importante conservare questo libretto per poterlo consultare in ogni momento. In caso di vendita, di cessione o di trasloco, assicurarsi che resti insieme alla lavabiancheria per informare il nuovo proprietario sul funzionamento e sui relativi avverenti. ! Leggere attentamente le istruzioni: ci sono importanti informazioni sull’installazione, sull’uso e sulla sicurezza. Disimballo e livellamento Disimballo 1. Disimballare la lavabiancheria. 2.
Collegamento del tubo di scarico 65 - 100 cm Collegare il tubo di scarico, senza piegarlo, a una conduttura di scarico o a uno scarico a muro posti tra 65 e 100 cm da terra; ! Non usare prolunghe e multiple. I ! Il cavo non deve subire piegature o compressioni. ! Il cavo di alimentazione deve essere sostituito solo da tecnici autorizzati. Attenzione! L’azienda declina ogni responsabilità qualora queste norme non vengano rispettate.
Descrizione della lavabiancheria e avviare un programma I Pannello di controllo DISPLAY SPIE AVANZAMENTO CICLO Tasto Tasto e spia ON/OFF TEMPERATURA Spia OBLÒ BLOCCATO Cassetto dei detersivi Tasto CENTRIFUGA Manopola PROGRAMMI Cassetto dei detersivi: per caricare detersivi e additivi (vedi “Detersivi e biancheria”). Tasto e spia ON/OFF: per accendere e spegnere la macchina. La spia illuminata indica che la macchina è accesa. Manopola PROGRAMMI: per impostare i programmi.
Spie Le spie forniscono informazioni importanti. Ecco che cosa dicono: Spie temperatura Selezionando un valore di temperatura la spia relativa si illuminerà. I Spie fase in corso Ruotando la manopola PROGRAMMI, le spie si illumineranno indicando le fasi che la macchina effettuerà in base al programma prescelto.
Programmi Descrizione del Programma Temp. max. (°C) Detersivi Velocità max. (giri al Prela- Candeg- Lavaggina gio minuto) vaggio Carico Durata Ammor- max. ciclo (Kg) bidente Programmi Giornalieri 1 Cotone + Prelavaggio: Bianchi estremamente sporchi. 90° 1200 - 8 2 Cotone: Bianchi e colorati resistenti molto sporchi. 60° 1200 - 8 2 Cotone (2): Bianchi e colorati delicati molto sporchi. Cotone Colorati (3): Bianchi poco sporchi e colori 3 delicati.
Personalizzazioni Impostare la temperatura I Premendo il tasto TEMPERATURA si imposta la temperatura di lavaggio (vedi Tabella programmi). La temperatura si può ridurre sino al lavaggio a freddo ( ). La macchina impedirà automaticamente di impostare una temperatura maggiore a quella massima prevista per ogni programma. Impostare la centrifuga Premendo il tasto CENTRIFUGA si imposta la velocità di centrifuga del programma selezionato.
Detersivi e biancheria I Cassetto dei detersivi Il buon risultato del lavaggio dipende anche dal corretto dosaggio del detersivo: eccedendo non si lava in modo più efficace e si contribuisce a incrostare le parti interne della lavabiancheria e a inquinare l’ambiente. ! Non usare detersivi per il lavaggio a mano, perché formano troppa schiuma. Estrarre il cassetto dei detersivi e inserire il detersivo o 4 l’additivo come segue.
Precauzioni e consigli ! La lavabiancheria è stata progettata e costruita in conformità alle norme internazionali di sicurezza. Queste avvertenze sono fornite per ragioni di sicurezza e devono essere lette attentamente.
Manutenzione e cura I Escludere acqua e corrente elettrica Pulire la pompa • Chiudere il rubinetto dell’acqua dopo ogni lavaggio. Si limita così l’usura dell’impianto idraulico della lavabiancheria e si elimina il pericolo di perdite. La lavabiancheria è dotata di una pompa autopulente che non ha bisogno di manutenzione. Può però succedere che piccoli oggetti (monete, bottoni) cadano nella precamera che protegge la pompa, situata nella parte inferiore di essa.
Anomalie e rimedi Può accadere che la lavabiancheria non funzioni. Prima di telefonare all’Assistenza (vedi “Assistenza”), controllare che non si tratti di un problema facilmente risolvibile aiutandosi con il seguente elenco. Anomalie: Possibili cause / Soluzione: La lavabiancheria non si accende. • La spina non è inserita nella presa della corrente, o non abbastanza da fare contatto. • In casa non c’è corrente. Il ciclo di lavaggio non inizia. • • • • • L’oblò non è ben chiuso.
Assistenza 195085340.00 03/2010 - Xerox Fabriano I Prima di contattare l’Assistenza: • Verificare se l’anomalia può essere risolta da soli (vedi “Anomalie e rimedi”). • Riavviare il programma per controllare se l’inconveniente è stato ovviato; • In caso negativo, contattare il Numero Unico 199.199.199*; ! Non ricorrere mai a tecnici non autorizzati. Comunicare: • il tipo di anomalia; • il modello della macchina (Mod.