Mode d’emploi SÈCHE-LINGE Table des matières Installation, 2 FR Français,1 GB English,17 Où installer le sèche-linge Ventilation Raccordement électrique Informations préliminaires Précautions, 4 Sécurité générale Économie d’énergie et protection de l’environnement Soin et entretien, 6 Interruption de l’alimentation électrique Nettoyage du filtre après chaque cycle Contrôle du tambour après chaque cycle Vidange du réservoir d’eau après chaque cycle Nettoyage du groupe condenseur Nettoyage du sèche-li
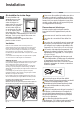
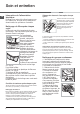
Installation Où installer le sèche-linge 10 mm Si vous installez cet appareil sous un plan de travail, faites en sorte de laisser un espace de 10 mm entre le dessus de l’appareil 15 mm 15 mm et tout autre objet sur ou au-dessus de celuici, et un espace de 15 mm entre ses côtés et les éléments d’ameublement ou les murs latéraux. Ceci a pour objectif d’assurer une ventilation convenable. La surface arrière de l’appareil doit être placée contre un mur.
Service après-vente). ! Le fabricant rejette toute responsabilité en cas de non-respect de toutes ou partie de ces règles. ! En cas de doute au sujet des points précédents, consultez un électricien qualifié. Charge maximale: 8 kg FR Informations préliminaires Une fois que vous avez installé votre sèche-linge, et avant de l’utiliser, nettoyez l’intérieur du tambour pour retirer les poussières qui pourraient s’y être accumulées pendant le transport. Données techniques - Réglementation 392/2012.
Précautions FR ! Cet électroménager a été conçu et réalisé conformément aux normes internationales de sécurité. Ces consignes sont fournies pour des raisons de sécurité, il faut les respecter scrupuleusement.
• • • • • • contenant de l’huile végétale ou de l’huile de cuisson ou ayant été en contact avec des produits coiffants dans le sèche-linge, il convient de les laver au préalable à l’aide d’une dose supplémentaire de détergent. Cette précaution minimise, sans toutefois l’éliminer, le risque d’incendie. Les articles ne doivent pas être retirés du sèche-linge et empilés ou superposés lorsqu’ils sont chauds.
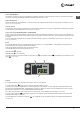
Soin et entretien FR Interruption de l’alimentation électrique ! Débranchez votre sèche-linge lorsque vous ne l’utilisez pas, lorsque vous le nettoyez et durant toutes les opérations d’entretien. Nettoyage du filtre après chaque cycle Le filtre est une pièce importante de votre sèche-linge : il accumule des peluches qui se forment durant le séchage. Par conséquent, une fois le séchage terminé, nettoyez le filtre en le rinçant sous l’eau courante ou avec votre aspirateur.
Nettoyage du sèche-linge Conseils rapides • Pour nettoyer l’extérieur en métal et en plastique et les parties en caoutchouc, utiliser un chiffon humide. • Périodiquement (tous les 6 mois), aspirez la grille d’entrée d’air de devant, ainsi que les évents à l’arrière du sèchelinge pour retirer toute accumulation de peluche ou de poussière. En outre, pour éliminer l’accumulation de peluche de l’avant du condenseur et de la zone du filtre, nettoyez occasionnellement à l’aide d’un aspirateur.
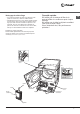
Description du sèche-linge Caractéristiques Ouverture de la porte FR Plaque signalétique de l’appareil Réservoir d’eau Appuyez sur la porte Numéro de série et référence du modèle Filtre Grille d’entrée d’air Groupe condenseur (couvercle ouvert) Poignée du couvercle du condenseur (tirez pour ouvrir) Tableau de bord Touche On/Off Bouton Programmes Touches et voyants Touche Séchage temporisé Options Touche Départ différé Touche avec voyant Marche/Pause Start/Pause Écran Voyant Filtre à net
Touche ON/OFF/Reset Une pression normale sur cette touche fait allumer ou éteindre l’appareil. Si le sèche-linge est en marche, une pression prolongée d’au moins 3 secondes fait éteindre l’appareil et remettre à zéro le cycle en cours. FR Bouton Programmes Permet de sélectionner les programmes : tournez le bouton jusqu’à positionner l’indicateur sur le programme souhaité (voir Démarrage et choix du programme). Touches options Permettent de choisir les options disponibles pour le programme sélectionné.
Comment effectuer un cycle de séchage Démarrage et choix du programme FR 1. Branchez la fiche du sèche-linge dans la prise de courant électrique. 2. Sélectionnez le programme en fonction du type de linge (voir Linge). 3. Ouvrez la porte et assurez-vous que le filtre est propre et en place et que le réservoir d’eau est vide et en place (voir Entretien). 4. Chargez la machine en faisant attention à ce qu’aucun vêtement ne s’interpose entre la porte et le joint de la porte. Fermez la porte. 5.
Programmes et options Tableau des programmes Charge maxi (kg) Programme Options compatibles Durée cycle Fast & Easy 1 Memo - Verrou Touche - Départ différé. 2 Mix 3 Memo - Verrou Touche - Départ différé. 3 Moins Froissé 3 Memo - Verrou Touche. 4 Coton à Repasser 5 Synth. à Repasser Max. Extra Care - Memo - Verrou Touche - Séchage temporisé - Départ différé. 4 Memo - Verrou Touche - Séchage temporisé - Départ différé.
FR Bébé & Délicats Un programme spécialement conçu pour essuyer les vêtements et les sous-vêtements des nouveaux nés (coton et tissu chenille) ainsi que le linge délicat. Ne pas sécher les articles contenant du plastique. Laine C’est un programme réservé aux articles supportant le séchage au tambour et portant le symbole . Vous pouvez l’utiliser pour des charges jusqu’à 1 kg (3 pull-overs environ). Il est conseillé de tourner les vêtements à l’envers avant de les charger dans le sèchelinge.
Départ différé Le départ de certains programmes (voir Programmes et options) peut être retardé d’un délai pouvant aller jusqu’à 24 heures. Appuyez plusieurs fois de suite sur la touche jusqu’à ce que le retard désiré soit affiché. Avant de régler un départ différé, assurez-vous que le réservoir d’eau et vide et que le filtre est propre. Pendant ce cycle, les vêtements tournent régulièrement dans la machine pour empêcher le froissement.
Linge FR Tri du linge Temps de séchage • Vérifiez les symboles sur les étiquettes des vêtements pour vous assurer que les articles peuvent être passés au sèche-linge. • Triez votre linge par type de textile. • Videz les poches et contrôlez les boutons. • Fermez les fermetures éclair et les crochets et attachez les ceintures et les cordons, sans serrer. • Essorez chaque article de manière à éliminer autant d’eau que possible.
Problèmes et solutions Si vous trouvez que le sèche-linge ne fonctionne pas correctement, avant de contacter le Service après-vente (voir Assistance), consultez attentivement le tableau suivant afin de pouvoir résoudre les problèmes éventuels : FR Problème : Causes / Solutions possibles : Le sèche-linge ne démarre pas. • La fiche n’est pas suffisamment insérée dans la prise murale pour qu’il y ait contact. • Il y a une panne de courant. • Le fusible a sauté.
Assistance FR Avant d’appeler le Centre de Service après-vente : Pièces détachées • Suivez le guide d’aide à la résolution des problèmes pour voir si vous n’arrivez pas à résoudre le problème vous-même (voir Problèmes et solutions). • Dans le cas contraire, éteignez votre sèche-linge et contactez le Centre de Service après-vente le plus proche. Ce sèche-linge est un appareil complexe.
Instruction manual TUMBLE DRYER Contents Installation, 18 GB English Where to install the tumble dryer Ventilation Electrical connections Preliminary information Warnings, 20 General safety Saving energy and respecting the environment Care and maintenance, 22 Disconnecting the power supply Cleaning the filter after each cycle Checking the drum after each cycle Emptying the water container after each cycle Cleaning the condenser unit Cleaning the tumble dryer EDCE H G45 B Description of the tumble d
Installation 10 mm If the dryer is installed below a worktop, ensure there are 10 mm between the upper panel of the dryer and any objects above it, and 15 mm between the sides of the machine 15 mm 15 mm and the walls or furniture units adjacent to it. This ensures adequate air circulation. The appliance must be installed with the rear surface placed against a wall. Ventilation Make sure that the dryer is installed in a room free of humidity and with adequate air circulation.
Maximum load sizes: maximum 8 kg GB Product Data - Regulation 392/2012. Brand Indesit Model EDCE H G45 B (FR) Rated capacity of cotton laundry for the "standard cotton programme" at full load - kg 8.
Warnings GB ! This appliance has been designed and built according to international safety standards. These warnings are given for safety reasons and must be followed carefully. General safety • This appliance can be used by children aged from 8 years and above and persons with reduced physical, sensory or mental capabilities or lack of experience and knowledge if they have been given supervision or instruction concerning use of the appliance in a safe way and understand the hazards involved.
flammable or explosive substances. Highly flammable substances commonly used in domestic environments including cooking oil, acetone, denatured alcohol, kerosene, spot removers, turpentine, waxes and wax removers. Ensure these items have been washed in hot water with an extra amount of detergent before being dried in the tumble dryer. • Do not tumble dry items containing foam rubber (also known as latex foam), or similarly textured rubber like materials.
Care and maintenance GB Disconnecting the power supply ! Disconnect the dryer when not in use or during cleaning and maintenance operations. Cleaning the filter after each cycle The filter is a fundamental component of the dryer: its function is to collect lint and fluff that form during drying. Clean the filter once drying is completed, by rinsing it under running water or cleaning it with a vacuum cleaner.
le making sure that the catches are securely fixed. Cleaning the tumble dryer • The external metal, plastic and rubber parts can be cleaned with a damp cloth. • Clean the front air intake grille regularly (every 6 months) with a vacuum cleaner to remove any lint, fluff or dust deposits. Furthermore, remove any lint deposits from the front part of the condenser and from the filter area, using a vacuum cleaner every so often. ! Do not use solvents or abrasives.
Description of the tumble dryer Features Opening the door GB Rating plate Water container Press the door Model & Serial Numbers Filter Air intake grille Condenser unit (cover open) Condenser cover handle (pull to open) Control panel On/Off button Options Timed Drying buttons and indicator lights button Programme selection knob Delay start button Start/Pause Marche/Pause button and indicator light Display Clean filter indicator light Clean condenser unit Empty water container indicator l
ON/OFF/Reset button Pressing the button normally will cause the machine to switch on or off. If the button is pressed for 3 seconds while the dryer is in use, the machine will switch off and the running cycle will reset. Programme selection knob Allows for setting the programme: turn until the indicator points towards the desired programme (see Starting and selecting a programme). Options buttons Allows selection of the options available for the selected programme.
How to carry out a drying cycle Starting and selecting a programme GB 1. Plug the dryer into the power supply socket. 2. Select the programme according to the type of laundry (see Laundry). 3. Open the door, ensure that the filter is clean and securely placed and that the water container is empty and correctly slotted (see Maintenance). 4. Load the machine, making sure that no piece of laundry gets between the door and the relative seal. Close the door. 5. Press the ON/OFF button to switch on the machine.
Programmes and options Programme chart Max. load (kg) Programme Compatible options Cycle duration Fast & Easy 1 Memo - Key Lock- Delay Timer. 2 Easy mix 3 Memo - Key Lock- Delay Timer. 3 Memo - Key Lock. 3 Less Creased Max. Extra Care - Memo - Key Lock- Time Dry - Delay Timer. 4 Cotton fast Iron 5 Synthetic fast Iron Essentials 2 4 Memo - Key Lock- Time Dry - Delay Timer. 6 Standard Cotton Max. Extra Care - Energy Saver1 - Memo - Key Lock- Time Dry - Delay Timer.
GB Baby&Delicates A programme appropriately designed to dry clothing and linen of new-born babies (cotton and chenille) and delicate clothes. Do not dry articles which have plastic covering. Wool Programme This programme is specific for items that withstand tumble drying and are labelled with the symbol. It is suitable for loads of up to 1 kg (about 3 jerseys). We recommend turning the garments inside out before drying them.
Options GB The options allow for customising the selected programme according to one’s own needs. Timed drying After selecting a programme, press the “Timed drying” button to enter a drying time. Every time this button is pressed, the duration of the selected drying cycle appears on the display. When pressed the first time, the highest allowed value for the selected cycle appears on the display. When pressed each of the following times, the set time is reduced until OFF appears.
Laundry GB Sorting laundry Drying times • Check the symbols on the care labels of the various garments to verify whether the garments can be safely tumble dried. • Sort laundry according to the type of fabric. • Empty all pockets and check for loose buttons. • Close zips and hooks and fasten belts and strings without tightening them. • Wring out garments to remove the maximum amount of water possible.
Troubleshooting If you feel that the dryer is not working properly, consult the following troubleshooting suggestions before contacting the Technical Assistance Centre (see Assistance). GB The dryer does not start. • • • • • • • • The plug has not been inserted far enough into the socket to make contact. There has been a power cut. The fuse has blown. Try connecting another appliance to the same socket. If an extension cord is used, try connecting the dryer plug directly into the socket.
Assistance 12/2016 - Xerox Fabriano Spare parts GB This dryer is a complex machine. Attempting to repair it personally or with the aid unqualified personnel may put the safety of people at risk, damage the machine or invalidate the spare parts guarantee. Always contact a qualified technician when experiencing problems with this machine.