Instructions for use WASHING MACHINE Contents DE GB English,1 Deutsch,13 IT BG Български,37 Italiano,49 GB Installation, 2-3 TR Türkçe,25 Unpacking and levelling Connecting the electricity and water supplies The first wash cycle Technical data Care and maintenance, 4 Cutting off the water or electricity supply Cleaning the washing machine Cleaning the detergent dispenser drawer Caring for the door and drum of your appliance Cleaning the pump Checking the water inlet hose Precautions and tips, 5 Ge
Installation GB ! This instruction manual should be kept in a safe place for future reference. If the washing machine is sold, transferred or moved, make sure that the instruction manual remains with the machine so that the new owner is able to familiarise himself/ herself with its operation and features. Levelling the machine correctly will provide it with stability, help to avoid vibrations and excessive noise and prevent it from shifting while it is operating.
Connecting the drain hose 65 - 100 cm Connect the drain hose, without bending it, to a drainage duct or a wall drain located at a height between 65 and 100 cm from the floor; ! Do not use extension cords or multiple sockets. ! The cable should not be bent or compressed. ! The power supply cable must only be replaced by authorised technicians. Warning! The company shall not be held responsible in the event that these regulations are not respected.
Care and maintenance GB Cutting off the water and electricity supplies Caring for the door and drum of your appliance • Turn off the water tap after every wash cycle. This will limit wear on the hydraulic system inside the washing machine and help to prevent leaks. • Unplug the washing machine when cleaning it and during all maintenance work. • Always leave the porthole door ajar in order to prevent unpleasant odours from forming.
Precautions and tips ! This washing machine was designed and constructed in accordance with international safety regulations. The following information is provided for safety reasons and must therefore be read carefully. the appliance it must be separately collected. Consumers should contact their local authority or retailer for information concerning the correct disposal of their old appliance. General safety • This appliance was designed for domestic use only.
Description of the washing machine Control panel GB Button with indicator light KEYPAD LOCK TEMPERATURE ON/OFF Button button OPTION buttons with indicator lights START/PAUSE button with indicator light DISPLAY Detergent dispenser drawer WASH CYCLE SPIN SPEED Button DELAYED START Button knob Detergent dispenser drawer: used to dispense detergents and washing additives (see “Detergents and laundry”). ON/OFF button : press this briefly to switch the machine on or off.
Display GB B A C The display is useful when programming the machine and provides a great deal of information. The duration of the available programmes and the remaining time of a running cycle appear in section A; if the DELAY START option has been set, the countdown to the start of the selected programme will appear.
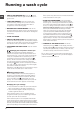
Running a wash cycle GB 1. SWITCH THE MACHINE ON. Press the button; the START/PAUSE indicator light will flash slowly in a green colour. 2. LOAD THE LAUNDRY. Open the porthole door. Load the laundry, making sure you do not exceed the maximum load value indicated in the table of programmes on the following page. 3. MEASURE OUT THE DETERGENT. Pull out the detergent dispenser drawer and pour the detergent into the relevant compartments as described in “Detergents and laundry”. 4. CLOSE THE DOOR. 5.
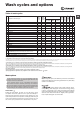
Wash cycles and options Residual dampness % Energy consumption kWh Total water lt Cycle duration EVERYDAY FAST 1 Colour Mix 59’ 40° 1000 - 6 - - - 59’ 2 Cotton 59’ 60° 1000 - 6 - - - 59’ 3 Cotton 45’ 40° 40° (Max.
Detergents and laundry GB Detergent dispenser drawer Good washing results also depend on the correct dose of detergent: adding too much detergent will not necessarily result in a more efficient wash, and may in fact cause build up on the inside of your appliance and contribute to environmental pollution. ! Do not use hand washing detergents because these create too much foam. ! Use powder detergent for white cotton garments, for prewashing, and for washing at temperatures over 60°C.
Troubleshooting Your washing machine could fail to work. Before contacting the Technical Assistance Centre (see “Assistance”), make sure that the problem cannot be solved easily using the following list. GB Problem: Possible causes / Solutions: The washing machine does not switch on. • The appliance is not plugged into the socket fully, or is not making contact. • There is no power in the house. The wash cycle does not start. • • • • • The washing machine door is not closed properly.
Service GB Before calling for Assistance: • Check whether you can solve the problem alone (see “Troubleshooting”); • Restart the programme to check whether the problem has been solved; • If this is not the case, contact an authorised Technical Assistance Centre using the telephone number provided on the guarantee certificate. ! Always request the assistance of authorised technicians. Have the following information to hand: • the type of problem; • the appliance model (Mod.); • the serial number (S/N).
Bedienungsanleitungen WASCHVOLLAUTOMAT INHALTSVERZEICHNIS DE Deutsch DE Installation, 14-15 Auspacken und Aufstellen Wasser- und Elektroanschlüsse Erster Waschgang Technische Daten Reinigung und Pflege, 16 Abstellen der Wasser- und Stromversorgung Reinigung des Gerätes Reinigung der Waschmittelschublade Pflege der Gerätetür und Trommel Reinigung der Pumpe Kontrolle des Wasserzulaufschlauchs Vorsichtsmaßregeln und Hinweise, 17 Allgemeine Sicherheit Entsorgung EWE 61252 Beschreibung Ihres Waschvollautom
Installation DE ! Es ist äußerst wichtig, diese Bedienungsanleitung sorgfältig aufzubewahren, um sie jederzeit zu Rate ziehen zu können. Sorgen Sie dafür, dass sie im Falle eines Umzugs oder einer Übergabe an einen anderen Benutzer das Gerät stets begleitet, damit auch der neue Inhaber die Möglichkeit hat, diese zu Rate zu ziehen. ! Lesen Sie die Hinweise bitte aufmerksam durch, sie liefern wichtige Informationen hinsichtlich der Installation, des Gebrauchs und der Sicherheit.
Anschluss des Ablaufschlauches Schließen Sie den Ablaufschlauch ohne ihn dabei abzuknicken an einen geeigneten Abfluss an. Die Minde65 - 100 cm stablaufhöhe beträgt 65 - 100 cm (gemessen vom Boden), oder hängen Sie diesen mittels des Schlauchhalters gesichert in ein Becken oder Wanne ein; Oder hängen Sie den Ablaufschlauch in ein Becken oder eine Wanne ein; befestigen Sie ihn in diesem Falle mittels der Führung (beim Kundendienst erhältlich) an dem Wasserhahn (siehe Abbildung).
Reinigung und Pflege DE Abstellen der Wasser- und Stromversorgung • Drehen Sie den Wasserhahn nach jedem Waschvorgang zu. Hierdurch wird der Verschleiß der Wasseranlage verringert und Wasserlecks vorgebeugt. • Ziehen Sie den Netzstecker aus der Steckdose, bevor Sie Ihren Waschvollautomaten reinigen. Reinigung des Gerätes • Die Gehäuseteile und die Teile aus Gummi können mit einem mit warmer Spülmittellauge angefeuchteten Tuch gereinigt werden. Vermeiden Sie Löse- und Scheuermittel.
Vorsichtsmaßregeln und Hinweise ! Der Waschvollautomat wurde nach den strengsten internationalen Sicherheitsvorschriften entworfen und gebaut. Nachstehende Hinweise werden aus Sicherheitsgründen geliefert und sollten aufmerksam gelesen werden. Allgemeine Sicherheit Das Symbol „durchgestrichene Mülltonne“ auf jedem Produkt erinnert Sie an Ihre Verpflichtung, dass Elektrohaushaltsgeräte gesondert entsorgt werden müssen.
Beschreibung Ihres Waschvollautomaten DE Bedienblende Taste mit Kontrollleuchte Taste TASTENSPERRE TEMPERATUR Taste ON/OFF Taste mit Kontrollleuchte Tasten mit Kontrollleuchten START/ PAUSE FUNKTIONEN DISPLAY Waschmittelschublade Wählschalter PROGRAMMWAHL Waschmittelschublade: für Waschmittel und Zusätze (siehe „Waschmittel und Wäsche“). Taste ON/OFF : Drücken Sie kurz auf die Taste, um das Gerät ein- bzw. auszuschalten.
Display DE B A C Das Display dient nicht nur zur Programmierung des Gerätes, sondern liefert auch zahlreiche Informationen. Im Abschnitt A werden die Dauer der verschiedenen verfügbaren Programme sowie die Restzeit nach Zyklusstart angezeigt; wurde eine STARTZEITVORWAHL eingestellt, dann wird die bis zum Start des ausgewählten Programms verbleibende Zeit angezeigt.
Durchführung eines Waschprogramms DE 1. EINSCHALTEN DES GERÄTES. Drücken Sie auf die Taste ; die Kontrollleuchte START/PAUSE blinkt langsam grün. 2. EINFÜLLEN DER WÄSCHE. Öffnen Sie die Gerätetür. Füllen Sie die Wäsche ein. Achten Sie hierbei bitte darauf, die in der Programmtabelle (auf der nächsten Seite) angegebene Wäschemenge nicht zu überschreiten. 3. DOSIERUNG DES WASCHMITTELS.
Programme und Funktionen Restfeuchtigkeit % Energieverbrauch kWh Wasser gesamt lt Programmdauer EVERYDAY FAST 1 Mix Bunt 59’ 40° 1000 - 6 - - - 59’ 2 Baumwolle 59’ 60° 1000 - 6 - - - 59’ 3 Baumwolle 45’ 40° 40° (Max. 60°) 30° 1200 - 3 - - - 45’ 1000 - 3 44 0,50 39 59’ 800 - 3 70 0,17 31 30’ 20° 800 - 3 - - - 20’ 40° 600 - 3 - - - ** Wasch-programme Max.
Waschmittel und Wäsche DE Waschmittel und Wäsche Ein gutes Waschergebnis hängt auch von einer korrekten Waschmitteldosierung ab: Eine zu hohe Dosierung bedeutet nicht unbedingt reinere Wäsche, sie trägt nur dazu bei, die Maschineninnenteile zu verkrusten und die Umwelt zu belasten. ! Verwenden Sie keine Handwaschmittel, sie verursachen eine zu hohe Schaumbildung. ! Waschmittel in Pulverform für Baumwollweißwäsche, für die Vorwäsche und für Waschprogramme bei Temperaturen über 60°C verwenden.
Störungen und Abhilfe Bei Funktionsstörung: Bevor Sie sich an den Technischen Kundendienst wenden (siehe „Kundendienst“), vergewissern Sie sich zuerst, ob es sich nicht um eine Kleinigkeit handelt, die Sie selbst beheben können. Ziehen Sie hierzu nachstehendes Verzeichnis zu Rate. Störungen: DE Mögliche Ursachen / Lösungen: Der Waschvollautomat schaltet sich • Der Stecker steckt nicht in der Steckdose, oder nicht so, dass der Kontakt hergenicht ein. stellt wird. • Der Strom ist ausgefallen.
Kundendienst DE Bevor Sie sich an den Kundendienst wenden: • Sollten einige Kontrollen vorab selbst durchgeführt werden (siehe „Störungen und Abhilfe“); • Starten Sie daraufhin das Programm erneut, um sicherzustellen, dass die Störung auch wirklich behoben wurde; • Ist dies nicht der Fall, dann kontaktieren Sie den autorisierten Kundendienst unter der auf dem Garantieschein befindlichen Telefonnummer. ! Wenden Sie sich auf keinen Fall an nicht autorisierte Techniker.
Kullanma Kılavuzu ÇAMAŞIR MAKİNESİ İçindekiler TR Türkçe TR Montaj, 26-27 Ambalajın çıkartılması ve seviye ayarı getirilmesi Su ve elektrik bağlantıları İlk yıkama Teknik veriler Bakım ve özen, 28 Su ve elektrik kesilmesi Çamaşır makinesin temizlenmesi Deterjan haznesinin temizlenmesi Kapak ve hazne bakımı Pompanın temizlenmesi Su besleme hortumunun kontrol edilmesi Önlemler ve öneriler, 29 EWE 61252 Genel güvenlik uyarıları Atıkların tasfiye edilmesi Çamaşır makinesinin tanımı, 30-31 Kontrol pane
Montaj TR ! Bu kitapçığı gerektiği her an danışabilmeniz için özenle saklayınız. Çamaşır makinesinin satılması, devri veya nakli durumlarında da, yeni sahibinin faydalanabilmesi için bu kılavuz makineyle beraber saklanmalıdır. ! Talimatları dikkatlice okuyunuz; montaj, kullanım ve güvenliğe ilişkin önemli bilgiler içermektedir.
Tahliye hortumunun takılması 65 - 100 cm Tahliye hortumunu, katlanmasını önleyerek, zemindeki veya yerden 65 ile 100 cm yükseklik arasındaki bir duvar tahliyesine takınız Alternatif olarak, kılavuzu musluğa (şekile bakın) bağlayarak tahliye oturumunu lavabo veya küvetin kenarına yerleştirin (teknik destek merkezinden satın alınabilir). Tahliye hortumunun serbest ucunun suya girmemesi gerekir.
Bakım ve özen TR Su ve elektrik kesilmesi Kapak ve hazne bakımı • • Kötü kokuların oluşmasını engellemek için kapağı daima aralık bırakınız. Su musluğunu her yıkamadan sonra kapatınız. Böylece çamaşır makinesinin su tesisatının eskimesi engellenir, su kaçağı tehlikesi ortadan kalkar. • Bakım ve temizlik işlemleri esnasında çamaşır makinesinin fişini çekiniz. Çamaşır makinesinin temizlenmesi • Dış gövde ve plastik aksam ılık su ve sabunla ıslatılmış bir bez vasıtasıyla temizlenebilir.
Önlemler ve öneriler ! Çamaşır makinesi uluslararası güvenlik standartlarına uygun olarak projelendirilmiş ve üretilmiştir. Bu uyarılar güvenlik amaçlı olup dikkatlice okunmalıdır. Genel güvenlik uyarıları • Makine meskenlerde kullanılmak üzere tasarlanmış olup profesyonel kullanım amaçlı değildir. sembolü verilmiştir. Cihazların tasfiye edilmesi konusunda daha geniş bilgi almak için cihaz sahiplerinin mevcut müşteri hizmetine veya satış noktalarına başvurulması gerekir.
Çamaşır makinesinin tanımı TR Kontrol paneli ÇOCUK KİLİDİ uyarı lambalı tuşu ON/OFF tuşu SİCAKLİK AYARİ tuşu FONKSÝYON START/PAUSE uyarý lambalý tuþlarý uyarı lambalı tuşu Ekran Deterjan Bölmesi PROGRAMLAR düğmesi SANTRÜFÜJ tuşu GECIKMELI BAŞLAMA tuşu Deterjan Bölmesi: ve diğer katkıları koyunuz (“Deterjanlar bölümüne” bakınız). SİCAKLİK AYARİ tuşu : sıcaklığı azaltmak veya tamamen çıkarmak için basınız – değer ekranda görünür.
Ekran TR B A C Makineyi programlamak için yararlı bir gereç olmasının yanı sıra ekranda değişik bilgiler verilmektedir. Mevcut programların süresi ve çalışan devrin kalan süresi bölüm A’da görünür; GECIKMELI BAŞLAMA seçeneği ayarlanmışsa, seçili programın başlangıcı için geri sayım görünecektir. İlgili butona basarak, makine, seçilen çevrimle uyumlu ise maksimum sicakligi, seçilen çevrim için ayarli dönüs hizi degerlerini veya en son kullanilan ayarlari otomatik olarak görüntüler.
Bir yıkama devri nasıl yapılır TR 1. MAKINENIN ÇALIŞTIRILMASI. tuşuna bastıktan ve START/PAUSE uyarı lambası yeşil renkte yanıp sönmeye başlayacaktır. 2. MAKİNANIN DOLDURULMASI. Kapağı açınız. Sonraki sayfada bulunan program tabelasında belirtilen yük miktarını geçmeyecek şekilde tamburu çamaşırlarınızla doldurunuz. 3. DETERJAN KONULMASI. Deterjan haznesini açınız ve deterjanı “Deterjan ve çamaşır” bölümünde açıklandığı gibi koyunuz. 4. MAKINE KAPAĞININ KAPATILMASI. 5. PROGRAMIN SEÇILMESI.
Programlar ve işlevler Devir süresi 5 Karma 30’ 6 Ekspres 20’ Özel 7 Spor Giysiler Toplam su lt 4 Sentetik 59’ (3) Enerji tüketimi kWh GÜNLÜK HIZLI 1 Karma Renkli 59’ 2 Pamuklu 59’ 3 Pamuklu 45’ Kalan nem % Program açýklamasý 40° 1000 - 6 - - - 59’ 60° 1000 - 6 - - - 59’ 40° 40° (Max.
Deterjanlar ve çamaşır TR Deterjan haznesi Yıkamanın iyi sonuç vermesi doğru dozda deterjan kullanılmasına da bağlıdır: aşırı deterjan kullanmak suretiyle daha temiz çamaşırlar elde edilemeyeceği gibi makinenin aksamına zarar verilerek, çevre kirliliğine sebebiyet verilir. ! Elde yıkama deterjanları kullanmayınız, çünkü aşırı köpük yaparlar. ! Beyaz pamuklu çamaşırlar, ön yıkama ve 60°C’den yüksek sıcaklık derecesi ile yıkamalar için toz deterjan kullanınız.
Arızalar ve onarımlar Çamaşır makinesi çalışmıyor olabilir. Teknik Servise başvurmadan önce (Teknik Servis bölümüne bakınız) aşağıdaki liste yardımıyla kolay çözülebilecek bir problem olup olmadığını kontrol ediniz. Arızalar: Olası nedenler / Çözümler: Çamaşır makinesi çalışmıyor. • Fiş prize takılı değil veya tam temas etmiyor. • Evde elektrik yok. Yıkama işlemi başlamıyor. • • • • • Makinanın kapağı tam kapanmamış. ON/OFF düğmesine basılmamış. START/PAUSE düğmesine basılmamış.
Teknik Servis TR Servise baþvurmadan önce: • Servise baþvurmadan çözülebilecek bir ariza olup olmadýðýný kontrol ediniz (“Arýzalar ve onarýmlar” bölümüne bakýnýz); • Programý tekrar baþlatarak, sorunun çözülüp çözülmediðini görünüz; • Aksi takdirde, garanti belgesinde belirtilen telefon numaralarýndan teknik servisi arayýnýz. ! Kesinlikle, yetkili olmayan tamircilere müracaat etmeyiniz. Þunlarý bildiriniz: • arýza tipini; • cihazýn modeli (Mod.); • seri numarasý (S/N).
Инструкции за ползване ПЕРАЛНА МАШИНА Съдържание BG Български BG Монтиране, 38-39 Разопаковане и нивелиране Хидравлични и електрически връзки Първо пране Технически данни Поддръжка и почистване, 40 Спиране на водата и изключване на електрозахранването Почистване на пералната машина Почистване на чекмеджето за перилните препарати Поддръжка на люка и на барабана Почистване на помпата Проверка на маркуча за студената вода Мерки за безопасност и препоръки, 41 EWE 61252 Общи предохранителни мерки Рецикли
Монтиране BG ! Важно е да съхранявате инструкциите, за да можете да правите допълнителни справки по всяко време. В случай че пералната машина се продаде, преотстъпи или премести, трябва да се погрижите инструкциите винаги да я придружават, за да се предостави информация на новия собственик за работата и съответните предупреждения. ! Прочетете внимателно инструкциите: защото съдържат важна информация за монтажа, използването и безопасността. Разопаковане и нивелиране Разопаковане 1.
Свързване на маркуча за мръсната вода 65 - 100 cm Свържете маркуча за мръсната вода, без да го прегъвате, към канализационната тръба или към т р ъ бат а з а отвеждане в стената, разположени на височина между 65 и 100 см от пода, или го подпрете на ръба на мивката или ваната, Като алтернатива окачете отходния маркуч за водата в края на мивката или ваната, свързвайки водача (можете да го получите от В а ш и я с е р в и зе н център) към крана (вж. фигура).
Поддръжка и почистване BG Спиране на водата и изключване на електрозахранването • Затваряйте крана за вода след всяко изпиране. По този начин се ограничава износването на хидравличната инсталация на пералната машина и се ограничава опасността от течове. • Изключвайте щепсела от електрическото захранване, когато почиствате пералната машина и по време на работи по поддръжката. Почистване на пералната машина • Външната част и гумените части могат да се почистват с кърпа с хладка вода и сапун.
Мерки за безопасност и препоръки ! Пералната машина е проектирана и произведена в съответствие с международните норми за безопасност. Предупрежденията тук са продиктувани по причини за безопасност и трябва да се четат внимателно. Общи предохранителни мерки • Този уред е предназначен изключително за домашна употреба.
Описание на пералната машина BG Табло за управление Бутон със светлинен индикатор БЛОКИРАНЕ НА БУТОНИТЕ Бутон ON/OFF Бутон ТЕМПЕРАТУРА Бутон със светлинен индикатор Бутони със светлинни индикатори ФУНКЦИЯ START/PAUSE Дисплей Чекмедже за перилните препарати Програматор ПРОГРАМИ Бутон ЦЕНТРОФУГА Бутон ОТЛОЖЕН СТАРТ Чекмедже за перилните препарати: за дозиране на перилните препарати и добавките (вж. “Перилни препарати и дрехи за пране”).
Дисплей BG B A C Дисплеят служи за програмиране на пералната машина и дава допълнителна информация. В сектор A ще се изобрази продължителността на програмите, а при пуснат в действие цикъл показва времето, което остава до завършването му; в случай, че е било зададено ОТЛОЖЕН СТАРТ показва времето, оставащо до включване на избраната програма.
Как се извършва един цикъл на пране BG 1. ВКЛЮЧВАНЕ НА ПЕРАЛНЯТА. Натиснете бутона . Светлинният индикатор START/PAUSE мига бавно в зелено. 2. ЗАРЕЖДАНЕ НА ДРЕХИТЕ ЗА ПРАНЕ. Отворете вратата на люка. Заредете дрехите за пране, като внимавате да не превишите количеството на зареждане, посочено в таблицата с програмите на следващата страница. 3. ДOЗИРАНЕ НА ПЕРИЛНИЯ ПРЕПАРАТ. Извадете чекмеджето и изсипете перилния препарат в специалните ванички, както е обяснено в ”Перилни препарати и дрехи за пране”. 4.
Програми и функции 4 Синтетика 59’ (3) 5 Смесено пране 30’ 6 Експрес 20’ Special & Partial 7 Спортно облекло 40° 1000 - 6 - - - 59’ 60° 1000 - 6 - - - 59’ 40° 40° (Max. 60°) 30° 1200 - 3 - - - 45’ 1000 - 3 44 0,50 39 59’ 800 - 3 70 0,17 31 30’ 20° 800 - 3 - - - 20’ 40° 600 - - - - ** 30° 600 - - - - ** 40° 800 - 3 (ìaêñ.2 ÷èôòà.
Перилни препарати и дрехи за пране BG Чекмедже за перилните препарати Добрият резултат от прането зависи и от правилното дозиране на перилните препарати. с предозиране не се пере по-ефикасно, а това води до отлагане на налепи по вътрешната страна на пералната машина и до замърсяване на околната среда. ! Не използвайте препарати за ръчно пране, защото образуват много пяна. ! Използвайте прахообразни перилни препарати за бели памучни тъкани за предпране и за пране при температура над 60°C.
Проблеми и мерки за отстраняването им Възможно е пералната машина да откаже да работи. Преди да се обадите в сервиза за техническа поддръжка и ремонт (вж. “Сервизно обслужване”), проверете дали не става въпрос за лесно решим проблем, като си помогнете със следващия списък. Проблеми: Възможни причини / Мерки за отстраняването им: Цикълът на изпиране не започва. • • • • • Люкът не е затворен добре. Бутонът ON/OFF не е бил натиснат. Бутонът START/PAUSE не е бил натиснат. Кранът за вода не е отворен.
Сервизно обслужване BG Преди да се свържете с техническия сервиз: • Проверете дали можете да решите сами проблема (вж. “Проблеми и мерки за отстраняването им”); • Включете отново програмата, за да проверите дали неизправността е отстранена; • В противен случай се обърнете към оторизирания технически сервиз на телефонния номер, указан на гаранционната карта. ! Никога не ползвайте услугите на неоторизирани техници. Съобщете: • типа на проблема; • модела на машината (Mod.); • серийния номер (S/N).
Istruzioni per l’uso LAVABIANCHERIA Sommario IT Italiano IT Installazione, 50-51 Disimballo e livellamento Collegamenti idraulici ed elettrici Primo ciclo di lavaggio Dati tecnici Manutenzione e cura, 52 Escludere acqua e corrente elettrica Pulire la lavabiancheria Pulire il cassetto dei detersivi Curare oblò e cestello Pulire la pompa Controllare il tubo di alimentazione dell’acqua Precauzioni e consigli, 53 EWE 61252 Sicurezza generale Smaltimento Descrizione della lavabiancheria, 54-55 Pannello di
Installazione IT ! È importante conservare questo libretto per poterlo consultare in ogni momento. In caso di vendita, di cessione o di trasloco, assicurarsi che resti insieme alla lavabiancheria per informare il nuovo proprietario sul funzionamento e sui relativi avvertimenti. ! Leggere attentamente le istruzioni: ci sono importanti informazioni sull’installazione, sull’uso e sulla sicurezza. Disimballo e livellamento Disimballo 1. Disimballare la lavabiancheria. 2.
Collegamento del tubo di scarico 65 - 100 cm Collegare il tubo di scarico, senza piegarlo, a una conduttura di scarico o a uno scarico a muro posti tra 65 e 100 cm da terra. In alternativa, appoggiare il tubo di scarico al bordo di un lavandino o di una vasca, legando la guida (acquistabile presso il servizio assistenza) al rubinetto (vedi figura). L’estremità libera del tubo di scarico non deve rimanere immersa nell’acqua.
Manutenzione e cura IT Escludere acqua e corrente elettrica Pulire la pompa • Chiudere il rubinetto dell’acqua dopo ogni lavaggio. Si limita così l’usura dell’impianto idraulico della lavabiancheria e si elimina il pericolo di perdite. • Staccare la spina della corrente quando si pulisce la lavabiancheria e durante i lavori di manutenzione. La lavabiancheria è dotata di una pompa autopulente che non ha bisogno di manutenzione.
Precauzioni e consigli ! La lavabiancheria è stata progettata e costruita in conformità alle norme internazionali di sicurezza. Queste avvertenze sono fornite per ragioni di sicurezza e devono essere lette attentamente. Sicurezza generale • Questo apparecchio è stato concepito esclusivamente per un uso di tipo domestico.
Descrizione della lavabiancheria IT Pannello di controllo Tasto e spia Tasto ON/OFF Tasto TEMPERATURA BLOCCO Tasto e spia START/ TASTI PAUSE OPZIONE Tasti e spie DISPLAY Cassetto dei detersivi MANOPOLA PROGRAMMI Cassetto dei detersivi: per caricare detersivi e additivi (vedi “Detersivi e biancheria”). Tasto ON/OFF : premere brevemente il tasto per accendere o spegnere la macchina. La spia START/PAUSE che lampeggia lentamente di colore verde indica che la macchina è accesa.
Display IT B A C Il display è utile per programmare la macchina e fornisce molteplici informazioni. Nella sezione A viene visualizzata la durata dei vari programmi a disposizione e a ciclo avviato il tempo residuo alla fine dello stesso; nel caso fosse stata impostata una PARTENZA RITARDATA, viene visualizzato il tempo mancante all’avvio del programma selezionato.
Come effettuare un ciclo di lavaggio IT 1. ACCENDERE LA MACCHINA. Premere il tasto ; la spia START/PAUSE lampeggerà lentamente di colore verde. 2. CARICARE LA BIANCHERIA. Aprire la porta oblò. Caricare la biancheria facendo attenzione a non superare la quantità di carico indicata nella tabella programmi della pagina seguente. 3. DOSARE IL DETERSIVO. Estrarre il cassetto e versare il detersivo nelle apposite vaschette come spiegato in “Detersivi e biancheria”. 4. CHIUDERE L’OBLO’. 5. SCEGLIERE IL PROGRAMMA.
Programmi e opzioni Consumo energia kWh Acqua totale lt Durata ciclo 40° 1000 - 6 - - - 59’ 60° 1000 - 6 - - - 59’ 40° 40° (Max. 60°) 30° 1200 - 3 - - - 45’ 1000 - 3 44 0,50 39 59’ 800 - 3 70 0,17 31 30’ 20° 800 - 3 - - - 20’ 40° 600 - 3 - - - ** - - - ** Temp. max. (°C).
Detersivi e biancheria IT Cassetto dei detersivi Il buon risultato del lavaggio dipende anche dal corretto dosaggio del detersivo: eccedendo non si lava in modo più efficace e si contribuisce a incrostare le parti interne della lavabiancheria e a inquinare l’ambiente. Il buon risultato del lavaggio dipende anche dal corretto dosaggio del detersivo: eccedendo non si lava in modo più efficace e si contribuisce a incrostare le parti interne della lavabiancheria e a inquinare l’ambiente.
Anomalie e rimedi Può accadere che la lavabiancheria non funzioni. Prima di telefonare all’Assistenza (vedi “Assistenza”), controllare che non si tratti di un problema facilmente risolvibile aiutandosi con il seguente elenco. Anomalie: Possibili cause / Soluzione: La lavabiancheria non si accende. • La spina non è inserita nella presa della corrente, o non abbastanza da fare contatto. • In casa non c’è corrente. Il ciclo di lavaggio non inizia. • • • • • L’oblò non è ben chiuso.
Assistenza 195135843.02 03/2017 IT Prima di contattare l’Assistenza: • Verificare se l’anomalia può essere risolta da soli (vedi “Anomalie e rimedi”). • Riavviare il programma per controllare se l’inconveniente è stato ovviato; • In caso negativo, contattare il Numero Unico 199.199.199*. ! Non ricorrere mai a tecnici non autorizzati. Comunicare: • il tipo di anomalia; • il modello della macchina (Mod.); • il numero di serie (S/N).