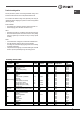
FIS 531 K C.
Warnings Avertissements WARNING: The appliance and its accessible parts become hot during use. Care should be taken to avoid touching heating elements. Children less than 8 years of age shall be kept away unless continuously supervised.
Assistance ! Never use the services of an unauthorised technician. Please have the following information to hand: • The type of problem encountered. • The appliance model (Mod.). • The serial number (S/N). The latter two pieces of information can be found on the data plate located on the appliance. Assistance ! Ne jamais faire appel à des techniciens non agréés. Lui indiquer : • le type d’anomalie; • le modèle de l’appareil (Mod.
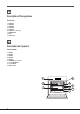
Description of the appliance Overall view 1 2 3 4 5 6 7 8 9 POSITION 1 POSITION 2 POSITION 3 POSITION 4 POSITION 5 GUIDES for the sliding racks DRIPPING PAN GRILL Control panel Description de l’appareil Vue d’ensemble 1 2 3 4 5 6 7 8 9 NIVEAU 1 NIVEAU 2 NIVEAU 3 NIVEAU 4 NIVEAU 5 GLISSIERES de coulissement Support LECHEFRITE Support GRILLE Tableau de bord 9 6 8 5 7 3 1 4 4 2
Description of the appliance Control panel 1 2 3 4 SELECTOR knob ELECTRONIC programmer THERMOSTAT knob THERMOSTAT indicator light Description de l’appareil Tableau de bord 1 2 3 4 Bouton PROGRAMMES Programmateur ELECTRONIQUE Bouton THERMOSTAT Voyant THERMOSTAT 1 2 3 4 5
Installation ! Please keep this instruction booklet in a safe place for future reference. If the appliance is sold, given away or moved, please make sure the booklet is also passed on to the new owners so that they may benefit from the advice contained within it. Centring and fixing Secure the appliance to the cabinet by opening the oven door and inserting 4 screws into the 4 holes on the outer frame.
Before connecting the appliance to the power supply, make sure that • The appliance is earthed and the plug is compliant with the law. • The socket can withstand the maximum power of the appliance, which is indicated on the data plate. • The voltage is in the range between the values indicated on the data plate. • The socket is compatible with the plug of the appliance. If the socket is incompatible with the plug, ask an authorised technician to replace it. Do not use extension cords or multiple sockets.
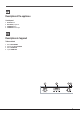
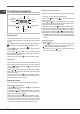
GB Start-up and use Cooking modes WARNING ! The oven is provided with a stop system to extract the racks and prevent them from coming out of the oven (1). As shown in the drawing, to extract them completely, simply lift the racks, holding them on the front part, and pull (2). ! The first time you use your appliance, heat the empty oven with its door closed at its maximum temperature for at least half an hour. Ensure that the room is well ventilated before switching the oven off and opening the oven door.
Practical cooking advice GB ! Do not place racks in position 1 and 5 during fan-assisted cooking. This is because excessive direct heat can burn temperature sensitive foods. ! In the GRILL and GRATIN cooking modes, particularly when using the rotisserie spit, place the dripping pan in position 1 to collect cooking residues (fat and/or grease). MULTI-COOKING • Use positions 2 and 4, placing the food which requires more heat on 2. • Place the dripping pan on the bottom and the rack on top.
GB The electronic programmer ! A cooking duration must be set before the cooking end time can be scheduled. DISPLAY END OF COOKING icon CLOCK icon DURATION icon TIMER icon DECREASE TIME button INCREASE TIME button SET TIME button Setting the clock ! The clock may be set when the oven is switched off or when it is switched on, provided that a the end time of a cooking cycle has not been programmed previously.
Precautions and tips ! This appliance has been designed and manufactured in compliance with international safety standards. The following warnings are provided for safety reasons and must be read carefully. General safety • The appliance was designed for domestic use inside the home and is not intended for commercial or industrial use. • The appliance must not be installed outdoors, even in covered areas. It is extremely dangerous to leave the appliance exposed to rain and storms.
GB Maintenance and care Replacing the light bulb To replace the oven light bulb: 1. Remove the glass cover of the lamp-holder. 2. Remove the light bulb and replace it with a similar one: Wattage 25 W, cap E 14. 3. Replace the glass cover (see diagram). Switching the appliance off Disconnect your appliance from the electricity supply before carrying out any work on it.
Installation ! Conservez ce mode d’emploi pour pouvoir le consulter à tout moment. En cas de vente, de cession ou de déménagement, veillez à ce qu’il suive l’appareil pour informer le nouveau propriétaire sur son fonctionnement et lui fournir les conseils correspondants. Centrage et fixation Pour fixer l’appareil au meuble : ouvrir la porte du four et visser 4 vis à bois dans les 4 trous du cadre.
FR • la prise est bien compatible avec la fiche de l’appareil. Si ce n’est pas le cas, remplacez la prise ou la fiche, n’utilisez ni rallonges ni prises multiples. ! Après installation de l’appareil, le câble électrique et la prise de courant doivent être facilement accessibles ! Le câble ne doit être ni plié ni excessivement écrasé. ! Il doit être contrôlé périodiquement et ne peut être remplacé que par un technicien agréé (voir Assistance).
Mise en marche et utilisation ATTENTION ! Le four est équipé d’un système d’arrêts de grilles qui permet de les retirer sans que ces dernières sortent entièrement du four (1). Pour sortir complètement les grilles il suffit, comme illustré, de les soulever en les saisissant par l’avant et de les tirer (2). Programmes FR Programmes de cuisson ! Pour tous les programmes, une température comprise entre 60°C et MAX. peut être sélectionnée, sauf pour : • GRILL (il est conseillé dans ce cas de sélectionner MAX.
FR Conseils de cuisson ! Pour les cuissons ventilées ne pas utiliser les gradins 1et 5: ils sont directement frappés par l’air chaud qui pourrait brûler les mets délicats. ! Pour les cuissons GRILL et GRATIN, notamment au tournebroche, placer la lèchefrite au gradin 1 pour récupérer les graisses ou jus de cuisson. MULTICUISSON • Utiliser les gradins 2 et 4 et placer au 2 les plats qui exigent davantage de chaleur. • Placer la lèchefrite en bas et la grille en haut.
Le programmateur électronique •• •• Mise à l’heure de l’horloge ! Son réglage est possible que le four soit éteint ou allumé mais ceci ne correspond pas à une programmation de fin de cuisson. Après branchement au réseau électrique ou après une panne de courant, l’icône et les quatre chiffres de l’afficheur clignotent. 1. Appuyer plusieurs fois de suite sur la touche jusqu’à ce que l’icône et les trois chiffres de l’AFFICHEUR se mettent à clignoter ; 2.
FR Précautions et conseils ! Cet appareil a été conçu et fabriqué conformément aux normes internationales de sécurité. Ces conseils sont fournis pour des raisons de sécurité et doivent être lus attentivement. Sécurité générale • Cet appareil a été conçu pour un usage familial, de type non professionnel. • Cet appareil ne doit pas être installé en extérieur, même dans un endroit à l’abri, il est en effet très dangereux de le laisser exposé à la pluie et aux orages.
Nettoyage et entretien Remplacement de l’ampoule d’éclairage Pour changer l’ampoule d’éclairage du four: 1. Dévissez le couvercle en verre du boîtier de la lampe. 2. Dévissez l’ampoule et remplacez-la par une autre de même type : puissance 25 W, culot E 14. 3. Remontez le couvercle à sa place (voir figure). Mise hors tension Avant toute opération de nettoyage ou d’entretien coupez l’alimentation électrique de l’appareil.
195137327.00 11/2015 - XEROX FABRIANO FR Indesit Company S.p.A. Viale Aristide Merloni,47 60044 Fabriano (AN) www.indesit.