Istruzioni per luso FORNO Sommario IT Italiano, 1 NL Nederlands, 29 GB English,11 DE Deutsch, 38 FR Français, 20 Installazione, 2-3 Posizionamento Collegamento elettrico Targhetta caratteristiche Descrizione dellapparecchio, 4 Vista dinsieme Pannello di controllo Avvio e utilizzo, 5 Avviare il forno Utilizzare il timer Programmi, 6-7 Programmi di cottura Consigli pratici di cottura Tabella cottura FP M4.
Installazione È importante conservare questo libretto per poterlo consultare in ogni momento. In caso di vendita, di cessione o di trasloco, assicurarsi che resti insieme allapparecchio per informare il nuovo proprietario sul funzionamento e sui relativi avvertimenti. Leggere attentamente le istruzioni: ci sono importanti informazioni sullinstallazione, sulluso e sulla sicurezza. Aerazione Per garantire una buona aerazione è necessario eliminare la parete posteriore del vano.
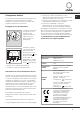
Collegamento elettrico I forni dotati di cavo di alimentazione tripolare sono predisposti per il funzionamento con corrente alternata, con tensione e frequenza indicate nella targhetta caratteristiche (vedi sotto). Montaggio del cavo di alimentazione 1. Aprire la morsettiera facendo leva con un cacciavite sulle linguette laterali del coperchio: tirare e aprire il coperchio (vedi figura). N L 2.
Descrizione dellapparecchio IT Vista dinsieme Pannello di controllo GUIDE di scorrimento dei ripiani posizione 5 posizione 4 posizione 3 posizione 2 posizione 1 Ripiano GRIGLIA Ripiano LECCARDA Pannello di controllo Manopola PROGRAMMI Spia TERMOSTATO 4 Manopola TIMER DI FINE COTTURA Manopola TERMOSTATO
Avvio e utilizzo Alla prima accensione fare funzionare il forno a vuoto per almeno unora con il termostato al massimo e a porta chiusa. Poi spegnere, aprire la porta del forno e aerare il locale. Lodore che si avverte è dovuto allevaporazione delle sostanze usate per proteggere il forno. Avviare il forno 1. Selezionare il programma di cottura desiderato ruotando la manopola PROGRAMMI. 2. Scegliere la temperatura ruotando la manopola TERMOSTATO.
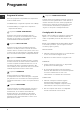
Programmi IT Programmi di cottura Per tutti i programmi è impostabile una temperatura tra 60°C e MAX, tranne: BARBECUE (si consiglia di impostare solo su MAX); ROSTICCERIA (si consiglia di non superare la temperatura di 200°C). Programma FORNO TRADIZIONALE Si attivano i due elementi riscaldanti inferiore e superiore. Con questa cottura tradizionale è meglio utilizzare un solo ripiano: con più ripiani si ha una cattiva distribuzione della temperatura.
Tabella cottura IT Peso (Kg) Posizione dei ripiani Preriscaldamento (minuti) Temperatura consigliata Durata cottura (minuti) 1 1 1 1 3 3 3 3 3 15 15 15 15 15 200 200 200 180 180 65-75 70-75 70-80 15-20 30-35 Pizza (su 2 ripiani) Lasagne Agnello Pollo arrosto + patate Sgombro Plum-cake Bignè (su 2 ripiani) Biscotti(su 2 ripiani) Pan di spagna (su 1 ripiano) Pan di spagna (su 2 ripiani) Torte salate 1 1 1 1+1 1 1 0.5 0.5 0.5 1 1.
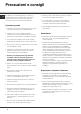
Precauzioni e consigli IT Lapparecchio è stato progettato e costruito in conformità alle norme internazionali di sicurezza. Queste avvertenze sono fornite per ragioni di sicurezza e devono essere lette attentamente. Sicurezza generale Lapparecchio è stato concepito per un uso di tipo non professionale allinterno dellabitazione. Lapparecchio non va installato allaperto, nemmeno se lo spazio è riparato, perché è molto pericoloso lasciarlo esposto a pioggia e temporali.
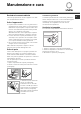
Manutenzione e cura Escludere la corrente elettrica Controllare le guarnizioni Prima di ogni operazione isolare lapparecchio dalla rete di alimentazione elettrica. Controllare periodicamente lo stato della guarnizione attorno alla porta del forno. In caso risulti danneggiata rivolgersi al Centro Assistenza più vicino (vedi Assistenza). È consigliabile non usare il forno fino allavvenuta riparazione.
Assistenza IT Comunicare: il modello della macchina (Mod.) il numero di serie (S/N) Queste ultime informazioni si trovano sulla targhetta caratteristiche posta sullapparecchio e/o sullimballo. Assistenza attiva 7 giorni su 7 In caso di necessità dintervento chiamare il Numero Unico Nazionale 199.199.199*. Un operatore sarà a completa disposizione per fissare un appuntamento con il Centro Assistenza Tecnico Autorizzato più vicino al luogo da cui si chiama.
Operating Instructions OVEN Contents IT Italiano, 1 NL Nederlands, 29 GB English,11 DE Deutsch, 38 FR Français, 20 Installation, 12-13 Positioning Electrical connections Data plate Description of the appliance, 14 Overall view Control panel Start-up and use, 15 Starting the oven How to use the timer Cooking modes, 16-17 Cooking modes Practical cooking advice Cooking advice table FP M4.
Installation Before placing your new appliance into operation please read these operating instructions carefully. They contain important information for safe use, for installation and for care of the appliance. Please keep these operating instructions for future reference. Pass them on to possible new owners of the appliance. Ventilation To ensure good ventilation, the back panel of the cabinet must be removed.
Electrical connections ! Ovens equipped with a three-pole power supply cable are designed to operate with alternating current at the voltage and frequency indicated on the data plate located on the appliance (see below). Fitting the power supply cable 1. Open the terminal board by inserting a screwdriver into the side tabs of the cover. Use the screwdriver as a lever by pushing it down to open the cover (see diagram). 2.
Description of the appliance GB Overall view GUIDES for the sliding racks Control panel position 5 position 4 position 3 position 2 position 1 GRILL DRIPPING PAN Control panel SELECTOR Knob Indicator light THERMOSTAT 14 COOKING TIMER Knob THERMOSTAT Knob
Start-up and use ! The first time you use your appliance, heat the empty oven with its door closed at its maximum temperature for at least half an hour. Ensure that the room is well ventilated before switching the oven off and opening the oven door. The appliance may produce a slightly unpleasant odour caused by the burning away of protective substances used during the manufacturing process. Starting the oven 1. Select the desired cooking mode by turning the SELECTOR knob. 2.
Cooking modes GB Cooking modes ! A temperature value can be set for all cooking modes between 60°C and Max, except for BARBECUE (recommended: set only to MAX power level); ROTISSERIE (recommended: do not exceed 200°C). TRADITIONAL OVEN mode Both the top and bottom heating elements will come on. With this traditional cooking mode, it is best to use one cooking rack only: if more than one rack is used, the heat will be distributed unevenly.
Cooking advice table Cooking modes Foods GB Weight (in kg) Rack position Pre-heating time (min) Recommended temperature Cooking time (minutes) Duck 1 3 15 200 65-75 Roast veal or beef 1 3 15 200 70-75 70-80 Pork roast 1 3 15 200 Biscuits (short pastry) 3 15 180 15-20 Tarts 1 3 15 180 30-35 15-20 2 and 4 230 1 15 Pizza (on 2 racks) 30-35 3 180 1 10 Lasagne 40-45 2 180 1 10 Lamb 60-70 2 and 4 200 1+1 15 Roast chicken + potatoes 30-35 2 180 1 10 Mackerel 40-50 2 170 1 10 Multi-cooking Plum cake 20-25 2
Precautions and tips GB ! The appliance was designed and manufactured in compliance with international safety standards. The following warnings are provided for safety reasons and must be read carefully. General safety The appliance was designed for domestic use inside the home and is not intended for commercial or industrial use. The appliance must not be installed outdoors, even in covered areas. It is extremely dangerous to leave the appliance exposed to rain and storms.
Maintenance and care Switching the appliance off Disconnect your appliance from the electricity supply before carrying out any work on it. Cleaning the appliance The stainless-steel or enamel-coated external parts as well as the rubber seals may be cleaned using a sponge that has been soaked in lukewarm water and neutral soap. If these stains are difficult to remove, use only specialised products. After cleaning, rinse and dry thoroughly. Do not use abrasive powders or corrosive substances.
Mode demploi FOUR Sommaire FR IT Italiano, 1 NL Nederlands, 29 GB English,11 DE Deutsch, 38 FR Français, 20 Installation, 21-22 Positionnement Raccordement électrique Plaquette signalétique Description de lappareil, 23 Vue densemble Tableau de bord Mise en marche et utilisation, 24 Mise en marche du four Utilisation du minuteur Programmes, 25-26 Programmes de cuisson Conseils de cuisson Tableau de cuisson FP M4.
Installation ! Conservez ce mode demploi pour pouvoir le consulter à tout moment. En cas de vente, de cession ou de déménagement, veillez à ce quil suive lappareil pour informer le nouveau propriétaire sur son fonctionnement et lui fournir les conseils correspondants.
FR Raccordement électrique ! Les fours munis dun câble dalimentation tripolaire sont prévus pour un fonctionnement au courant alternatif à la tension et à la fréquence indiquées sur la plaquette signalétique (voir ci-dessous). Montage du câble dalimentation 1. Pour ouvrir le bornier, faites pression à laide dun tournevis sur les languettes latérales du couvercle : tirez et ouvrez le couvercle (voir figure). N L 2.
Description de lappareil Vue densemble FR GLISSIERES de coulissement Tableau de bord Support GRILLE niveau 5 niveau 4 niveau 3 niveau 2 niveau 1 Support LECHEFRITE Tableau de bord Bouton PROGRAMMES Voyant THERMOSTAT Bouton PROGRAMMATEUR FIN DE CUISSON Bouton THERMOSTAT 23
Mise en marche et utilisation FR ! Lors de son premier allumage, faites fonctionner le four à vide, porte fermée, pendant au moins une heure en réglant la température à son maximum. Puis éteignez-le, ouvrez la porte et aérez la pièce. Lodeur qui se dégage est due à lévaporation des produits utilisés pour protéger le four. Mise en marche du four 1. Pour sélectionner le programme de cuisson souhaité, tournez le bouton PROGRAMMES. 2. Pour choisir la température, tournez le bouton THERMOSTAT.
Programmes Programmes de cuisson Programme FOUR PATISSERIE FR BARBECUE (il est conseillé dans ce cas de sélectionner MAX.); Mise en marche de la résistance arrière et de la turbine pour obtenir une chaleur douce et uniforme à lintérieur du four. Ce programme est particulièrement indiqué pour la cuisson de mets délicats (comme des gâteaux levés par ex.) et certains petits-fours sur trois niveaux en même temps. ROTISSERIE (il est conseillé de ne pas dépasser 200°C).
FR Tableau de cuisson Programmes Four Tradition Multicuisson Four Pizza Barbecue Rôtisserie Four Pâtisserie Aliments Canard Rôti de veau ou de buf Rôti de porc Biscuits (pâte brisée) Tartes Pizza (sur 2 niveaux) Lasagnes Agneau Poulet rôti + pommes de terre Maquereau Cake aux fruits Profiteroles (sur 2 niveaux) Biscuits (sur 2 niveaux) Génoise (sur 1 niveau) Génoise (sur 2 niveaux) Tartes salées Pizza Rôti de veau ou de buf Poulet Soles et seiches Brochettes de calmars et de crevettes Tranches de
Précautions et conseils ! Cet appareil a été conçu et fabriqué conformément aux normes internationales de sécurité. Ces conseils sont fournis pour des raisons de sécurité et doivent être lus attentivement. Sécurité générale Cet appareil a été conçu pour un usage familial, de type non professionnel. Cet appareil ne doit pas être installé en extérieur, même dans un endroit abrité, il est en effet très dangereux de le laisser exposé à la pluie et aux orages.
Nettoyage et entretien FR Mise hors tension Contrôle des joints Avant toute opération de nettoyage ou dentretien coupez lalimentation électrique de lappareil. Nettoyage de lappareil Nettoyez lextérieur émaillé ou inox et les joints en caoutchouc à laide dune éponge imbibée deau tiède additionnée de savon neutre Si les taches sont difficiles à enlever, utilisez des produits spéciaux. Il est conseillé de rincer abondamment et dessuyer après le nettoyage.
Gebruiksaanwijzing OVEN Samenvatting IT Italiano, 1 NL Nederlands, 29 GB English,11 DE Deutsch, 38 FR Français, 20 Het installeren, 30-31 Plaatsing Elektrische aansluiting Typeplaatje Beschrijving van het apparaat, 32 Algemeen aanzicht Bedieningspaneel Starten en gebruik, 33 De oven starten De timer gebruiken Programmas, 34-35 Kookprogrammas Praktische kooktips Kooktabel FP M4.
Het installeren ! Bewaar dit boekje zorgvuldig voor eventuele verdere raadpleging. Wanneer u het product weggeeft, verkoopt, of wanneer u verhuist, dient u dit boekje bij de oven te bewaren zodat alle nodige informatie voorhanden blijft. ! Lees de gebruiksaanwijzingen zorgvuldig door: er staat belangrijke informatie in over installatie, gebruik en veiligheid. Ventilatie Om een goede ventilatie te kunnen garanderen is het noodzakelijk de achterkant van het meubel te verwijderen.
Elektrische aansluiting Vóór het aansluiten moet u controleren dat: ! De ovens met driepolige voedingskabel functioneren met de wisselstroom, de spanning en de frequentie die aangegeven staan op het typeplaatje ( zie onder ).
Beschrijving van het apparaat NL Algemeen aanzicht Bedieningspaneel GLEUVEN om roosters in te schuiven Rooster GRILL positie 5 positie 4 positie 3 positie 2 positie 1 Rooster LEKPLAAT Bedieningspaneel Knop PROGRAMMAS Controlelampje THERMOSTAAT 32 Knop TIMER EINDE KOOKTIJD Knop THERMOSTAAT
Starten en gebruik ! Wij raden u aan bij het eerste gebruik de oven minstens een uur leeg te laten functioneren, op maximum temperatuur en met de deur dicht. Nadat u de oven hebt uitgedaan, opent u de ovendeur en lucht u het vertrek. De lucht die u ruikt komt door het verdampen van de middelen die worden gebruikt om de oven te beschermen. Ovenverlichting NL Deze gaat werken door de knop PROGRAMMAS op te draaien. Ze blijft aan wanneer u een kookprogramma selecteert.
Programmas NL Kookprogrammas ! U kunt voor alle programmas een temperatuur instellen tussen de 60°C en MAX, behalve voor: BARBECUE (hierbij is het aanbevolen alleen MAX te gebruiken); BRADEN (hierbij is het aanbevolen niet meer dan 200°C in te stellen). Programma TRADITIONELE OVEN De onderste en bovenste verwarmingselementen gaan aan. Met deze traditionele kookwijze is het beter een enkel rooster te gebruiken: met meerdere roosters riskeert u een slechte temperatuursverspreiding.
Kooktabel NL Gewicht Voorverwarming Aangeraden Kooktijd Roosterstanden (kg) (minuten) temperatuur (minuten) Eend 1 3 15 200 65-75 Braadstuk 1 3 15 200 70-75 Traditionele Varkensrollade 1 3 15 200 70-80 oven Koekjes (kruimeldeeg) 3 15 180 15-20 Taarten 1 3 15 180 30-35 Pizza (op 2 roosters) 1 2 en 4 15 230 15-20 Lasagne 1 3 10 180 30-35 Lamsvlees 1 2 10 180 40-45 Kip + gebakken aardappels 1+1 2 en 4 15 200 60-70 Makreel 1 2 10 180 30-35 Plum-cake 1 2 10 170 40-50 Multikoken Soesjes (op 2 roosters) 0.
Voorzorgsmaatregelen en advies NL ! Dit apparaat voldoet aan de geldende internationale veiligheidsvoorschriften. Deze aanwijzingen zijn geschreven voor uw veiligheid en u dient ze derhalve goed door te nemen. Algemene veiligheidsmaatregelen Dit apparaat is vervaardigd voor niet-professioneel gebruik binnenshuis. Het apparaat dient niet buitenshuis te worden geplaatst, ook niet in overdekte toestand. Het is erg gevaarlijk als het in aanraking komt met regen of als het onweert.
Onderhoud en verzorging De elektrische stroom afsluiten Sluit altijd eerst de stroom af voordat u tot enige handeling overgaat. Schoonmaken van de oven De buitenkant, dus zowel het email en het roestvrij staal als de rubberen afdichtingen, kunnen met een spons en een sopje worden afgenomen. Als de vlekken moeilijk te verwijderen zijn, kunt u een speciaal reinigingsmiddel gebruiken. Na het reinigen dient u alles goed af te spoelen en te drogen. Gebruik geen schuurmiddelen of bijtende producten.
Bedienungsanleitung BACKOFEN Inhaltsverzeichnis DE IT Italiano, 1 NL Nederlands, 29 GB English,11 DE Deutsch, 38 FR Français, 20 Installation, 39-40 Aufstellung Elektroanschluss Typenschild Beschreibung des Gerätes, 41 Geräteansicht Bedienfeld Inbetriebsetzung und Gebrauch, 42 Inbetriebsetzung des Backofens Bedienung des Kurzzeitweckers Programme, 43-44 Garprogramme Praktische Back-/Brathinweise Back-/Brattabelle FP M4.
Installation ! Bewahren Sie diese Bedienungsanleitung sorgfältig auf, damit Sie sie jederzeit zu Rate ziehen können. Sorgen Sie dafür, dass sie im Falle eines Verkaufs, eines Umzugs oder einer Übergabe an einen anderen Benutzer das Gerät stets begleitet, damit auch der Nachbesitzer die Möglichkeit hat, darin nachschlagen zu können. ! Lesen Sie bitte folgende Hinweise aufmerksam durch, sie liefern wichtige Informationen hinsichtlich der Installation, dem Gebrauch und der Sicherheit.
DE Elektroanschluss Vor dem Anschluss stellen Sie bitte sicher, dass: ! Die mit einem Dreileiterkabel ausgerüsteten Backöfen sind für den Betrieb mit Wechselstrom bei der auf dem Typenschild angegebenen Spannung und Frequenz ausgelegt (siehe unten).
Beschreibung des Gerätes Geräteansicht DE GLEITFÜHRUNGEN für die Einschübe Bedienfeld Einschub BACKOFENROST Einschubhöhe 5 Einschubhöhe 4 Einschubhöhe 3 Einschubhöhe 2 Einschubhöhe 1 Einschub FETTPFANNE Bedienfeld Drehknopf PROGRAMME Kontrollleuchte THERMOSTAT Drehknopf TIMER ZUR EINSTELLUNG DES GARZEITENDES Drehknopf THERMOSTAT 41
Inbetriebsetzung und Gebrauch DE ! Bei erstmaliger Inbetriebnahme sollte der leere Backofen für etwa eine Stunde bei Höchsttemperatur und geschlossener Backofentür in Betrieb genommen werden. Schalten Sie das Gerät dann aus, öffnen Sie die Backofentür und lüften Sie die Küche. Der bei diesem Vorgang entstehende Geruch wird durch das Verdunsten der zum Schutz des Backofens aufgetragenen Stoffe verursacht. Inbetriebsetzung des Backofens 1.
Programme Garprogramme Backofentür. ! Für alle Programme kann eine Gartemperatur von 60° bis MAX. eingestellt werden, mit Ausnahme der Programme: Programm Gebäck Das hintere Heizelement schaltet sich ein, und das Gebläse wird in Betrieb genommen, wodurch eine äußerst schonende, im Backofen gleichmäßig verteilte Wärme gewährleistet wird. Dieses Programm eignet sich zum Garen empfindlicher Speisen (z.B. zum Backen von Hefeteigen) sowie zur Zubereitung von Kleingebäck auf drei Ebenen gleichzeitig.
DE Back-/Brattabelle Programme Speisen Gew. (kg) 1 1 1 1 1 1 1 1+1 1 1 0.5 0.5 0.5 1 1.5 0.5 1 1 1 1 1 1 1 1 1 1 n.° 4 1.5 1.5 0.5 1 0.7 0.5 1.2 0.
Vorsichtsmaßregeln und Hinweise ! Das Gerät wurde entsprechend den strengsten internationalen Sicherheitsvorschriften entworfen und gebaut. Nachstehende Hinweise werden aus Sicherheitsgründen geliefert und sollten aufmerksam gelesen werden. Ziehen Sie vor der Reinigung oder Wartungsarbeiten stets den Stecker aus der Steckdose. Allgemeine Sicherheit Bei etwaigen Störungen versuchen Sie bitte nicht, Innenteile selbst zu reparieren. Kontaktieren Sie den Kundendienst (siehe Kundendienst).
Reinigung und Pflege DE Abschalten Ihres Gerätes vom Stromnetz Vor jeder Reinigung und Pflege ist das Gerät vom Stromnetz zu trennen. Reinigung des Gerätes F Die emaillierten oder aus Edelstahl gefertigten Außenteile des Gerätes sowie die Gummidichtungen können mit einem mit lauwarmem Wasser und einem neutralen Reinigungsmittel getränkten Schwamm gereinigt werden. Sollten die Flecken nur schwer zu entfernen sein, verwenden Sie spezielle Reinigungsmittel.
DE 47
07/2006 - 195055464.