FT 850.1 (AV) /HA S FT 850.1 (OS) /HA S FT 851.1 (AN) /HA FT 851.
Deutsch Bedienungsanleitung BACKOFEN Inhaltsverzeichnis Bedienungsanleitung,2 Hinweise,5 Kundendienst,8 Beschreibung Ihres Gerätes,10 Beschreibung Ihres Gerätes,12 Installation,48 Inbetriebsetzung und Gebrauch,50 Programme,50 Vorsichtsmaßregeln und Hinweise,53 Reinigung und Pflege,54 Nederlands Gebruiksaanwijzing OVEN Inhoud Gebruiksaanwijzing,2 Belangrijk,6 Service,8 Beschrijving van het apparaat,10 Beschrijving van het apparaat,12 Het installeren,55 Starten en gebruik,57 Programma’s,57 Voorzorgsmaa
Avvertenze Warnings ATTENZIONE: Questo apparecchio e le sue parti accessibili diventano molto caldi durante l’uso. Bisogna fare attenzione ed evitare di toccare gli elementi riscaldanti. Tenere lontani i bambini inferiori agli 8 anni se non continuamente sorvegliati.
Avertissements Advertencias ATTENTION : Cet appareil ainsi que ses parties accessibles deviennent très chauds pendant leur fonctionnement. Il faut faire attention à ne pas toucher les éléments chauffants. Ne pas faire approcher les enfants de moins de 8 ans à moins qu’ils ne soient sous surveillance constante.
Advertências Hinweise ATENÇÃO: Este aparelho e as suas partes acessíveis aquecem muito durante a utilização. É preciso ter atenção e evitar tocar os elementos que aquecem. Manter afastadas as crianças com menos de 8 anos, caso não estejam a ser vigiadas.
Belangrijk Ostrzezenia PAS OP: Dit apparaat en zijn bereikbare onderdelen worden tijdens gebruik zeer heet. Zorg ervoor de verwarmende elementen niet aan te raken. Zorg ervoor dat kinderen die kleiner dan 8 jaar oud zijn niet dichtbij het apparaat kunnen komen, tenzij onder constant toezicht.
Assistenza Assistance ! Non ricorrere mai a tecnici non autorizzati. ! Never use the services of an unauthorised technician. Comunicare: • Il tipo di anomalia; • Il modello della macchina (Mod.) • Il numero di serie (S/N) Queste ultime informazioni si trovano sulla targhetta caratteristiche posta sull’apparecchio Please have the following information to hand: • The type of problem encountered. • The appliance model (Mod.). • The serial number (S/N).
En el SAT encontrará recambios, accesorios y productos específicos para la limpieza y mantenimiento de su electrodoméstico a precios competitivos. ESTAMOS A SU SERVICIO Serwis Techniczny ! Nigdy nie korzystać z usług nieautoryzowanych techników. Assistência ! Nunca recorra a técnicos não autorizados. Comunique: • o tipo de avaria; • o modelo da máquina (Mod.); • o número de série (S/N); Estas últimas informações encontram-se na placa de identificação situada no aparelho.
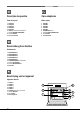
Descrizione dell’apparecchio Descripción del aparato Vista d’insieme Vista en conjunto 1 2 3 4 5 6 7 8 9 1 2 3 4 5 6 7 8 9 POSIZIONE 1 POSIZIONE 2 POSIZIONE 3 POSIZIONE 4 POSIZIONE 5 GUIDE di scorrimento dei ripiani Ripiano LECCARDA Ripiano GRIGLIA Pannello di controllo POSICIÓN 1 POSICIÓN 2 POSICIÓN 3 POSICIÓN 4 POSICIÓN 5 GUÍAS de deslizamiento de las bandejas Bandeja GRASERA Bandeja PARRILLA Panel de control Description of the appliance Overall view 1 2 3 4 5 6 7 8 9 POSITION 1 POSITION 2 POSITI
Descrição do aparelho Opis urządzenia Vista de conjunto Widok ogólny 1 2 3 4 5 6 7 8 9 1 2 3 4 5 6 7 8 9 POSIÇÃO 1 POSIÇÃO 2 POSIÇÃO 3 POSIÇÃO 4 POSIÇÃO 5 GUIAS de escorrimento das prateleiras Prateleira BANDEJA PINGADEIRA Prateleira GRADE Painel de comandos POZIOM 1 POZIOM 2 POZIOM 3 POZIOM 4 POZIOM 5 PROWADNICE boczne Poziom BLACHA UNIWERSALNA Poziom RUSZT Panel sterowania Beschreibung Ihres Gerätes Geräteansicht 1 2 3 4 5 6 7 8 9 EINSCHUBHÖHE 1 EINSCHUBHÖHE 2 EINSCHUBHÖHE 3 EINSCHUBHÖHE 4 EINSCH
Descrizione dell’apparecchio Pannello di controllo 1 2 3 4 Manopola PROGRAMMI Manopola PROGRAMMATORE ANALOGICO Manopola TERMOSTATO Spia TERMOSTATO Description of the appliance Control panel 1 2 3 4 SELECTOR knob ANALOGUE PROGRAMMER knob THERMOSTAT knob THERMOSTAT indicator light Description de l’appareil Tableau de bord 1 2 3 4 Bouton PROGRAMMES Bouton PROGRAMMATEUR ANALOGIQUE* Bouton THERMOSTAT Voyant du THERMOSTAT Descripción del aparato Panel de control 1 2 3 4 Mando PROGRAMAS Mando PROGRAMADOR AN
Descrição do aparelho Painel de comandos 1 2 3 4 Selector dos PROGRAMAS Selector do PROGRAMADOR ANALÓGICO Selector do TERMÓSTATO Luz indicadora do TERMÓSTATO Beschreibung Ihres Gerätes Bedienfeld 1 2 3 4 Drehknopf PROGRAMME Drehknopf ANALOGPROGRAMMIERER Drehknopf THERMOSTAT Kontrollleuchte THERMOSTAT Beschrijving van het apparaat Bedieningspaneel 1 2 3 4 Knop PROGRAMMA’S Controlelampje THERMOSTAAT THERMOSTAATKNOP CONTROLELAMPJE OVEN Opis urządzenia Panel sterowania 1 2 3 4 Pokrętło PROGRAMÓW Pokrętło
Installazione ! È importante conservare questo libretto per poterlo consultare in ogni momento. In caso di vendita, di cessione o di trasloco, assicurarsi che resti insieme all’apparecchio per informare il nuovo proprietario sul funzionamento e sui relativi avvertimenti. ! Leggere attentamente le istruzioni: ci sono importanti informazioni sull’installazione, sull’uso e sulla sicurezza.
IT ! L’installatore è responsabile del corretto collegamento elettrico e dell’osservanza delle norme di sicurezza.
Avvio e utilizzo Programmi ATTENZIONE! Il forno è dotato di un sistema di arresto griglie che consente di estrarle senza che queste fuoriescano dal forno. (1) Per estrarre completamente le griglie è sufficiente, come indicato sul disegno, alzarle, prendendole dalla parte anteriore e tirarle. (2) ! Alla prima accensione fare funzionare il forno a vuoto per almeno un’ora con il termostato al massimo e a porta chiusa. Poi spegnere, aprire la porta del forno e aerare il locale.
IT 5. Portare la manopola PROGRAMMI in posizione “0”. • Esempio: sono le ore 9:00 e viene pianificata una durata di 1 ora e 15 minuti. Il programma si arresta automaticamente alle 10:15. Pianificare una durata con inizio ritardato 1. Ruotare la manopola del PROGRAMMATORE in senso antiorario fino a visualizzare sulla finestrella il tempo di durata cottura desiderato. 2.
Tabella cottura Programmi Alimenti Peso (Kg) Posizione dei ripiani guide guide standard scorrevoli 2 2 2 2 2 2 1 1 1 1 1 1 si si si si si si 200-210 200-210 200 200-210 180 180 70-80 60-70 70-75 70-80 15-20 30-35 0,5 1 0,7 0,7 0,6 0,7 0,7 0,8 0,5 0, 5 2o3 2o3 2o3 2e4 2o3 1e3e5 1e3e5 2 1e3e5 2 1o2 1o2 1o2 1e3 1o2 1e2e4 1e2e4 1 1e2e4 1 si si si si si si si si si si 180 180 170-180 180-190 160-170 180-190 180 200 90 210 25-35 40-50 45-55 20-25 30-40 20-25 20-25 30-35 180 20-25 0,3 0,4 0,5 0,3 0,5
IT Precauzioni e consigli ! L’apparecchio è stato progettato e costruito in conformità alle norme internazionali di sicurezza. Queste avvertenze sono fornite per ragioni di sicurezza e devono essere lette attentamente. Sicurezza generale • L’apparecchio è stato concepito per un uso di tipo non professionale all’interno dell’abitazione. • L’apparecchio non va installato all’aperto, nemmeno se lo spazio è riparato, perché è molto pericoloso lasciarlo esposto a pioggia e temporali.
Manutenzione e cura Sostituire la lampadina Per sostituire la lampadina di illuminazione del forno: 1. Svitare il coperchio in vetro del portalampada. 2. Svitare la lampadina e sostituirla con una analoga: potenza 25 W, attacco E 14. 3. Rimontare il coperchio (vedi figura). Escludere la corrente elettrica Prima di ogni operazione isolare l’apparecchio dalla rete di alimentazione elettrica.
Installation ! Please keep this instruction booklet in a safe place for future reference. If the appliance is sold, given away or moved, please make sure the booklet is also passed on to the new owners so that they may benefit from the advice contained within it. ! Please read this instruction manual carefully: it contains important information concerning the safe operation, installation and maintenance of the appliance.
! The installer must ensure that the correct electrical connection has been performed and that it is fully compliant with safety regulations. APPLIANCE SPECIFICATIONS Before connecting the appliance to the power supply, make sure that • The appliance is earthed and the plug is compliant with the law. • The socket can withstand the maximum power of the appliance, which is indicated on the data plate. • The voltage is in the range between the values indicated on the data plate.
GB Start-up and use Modes WARNING! The oven is provided with a stop system to extract the racks and prevent them from coming out of the oven (1). As shown in the drawing, to extract them completely, simply lift the racks, holding them on the front part, and pull (2). ! The first time you use your appliance, heat the empty oven with its door closed at its maximum temperature for at least half an hour. Ensure that the room is well ventilated before switching the oven off and opening the oven door.
4. When the set time has elapsed, a buzzer will sound. To stop the cooking process, turn the PROGRAMMER knob in an anticlockwise direction until the symbol “ ” is displayed. 5. Turn the SELECTOR knob to the “0” position. • For example: it is 9:00 a.m. and a time of 1 hour and 15 minutes is programmed. The programme will stop automatically at 10:15 a.m. GB Programming a delayed cooking time 1. Turn the PROGRAMMER knob in an anticlockwise direction until the desired cooking time is displayed. 2.
GB Cooking advice table Cooking modes Convection Oven Baking mode Fast cooking Multilevel Pizza Mode Barbecue Gratin Foods Weight (Kg) Rack poYestion standard guide rails sliding guide rails Preheating Recommended Cooking Temperature duration (°C) (minutes) Duck Chicken Roast veal o beef Pork roast Biscuits (short pastry) Tarts 1,5 1,5 1 1 1 2 2 2 2 2 2 1 1 1 1 1 1 Yes Yes Yes Yes Yes Yes 200-210 200-210 200 200-210 180 180 70-80 60-70 70-75 70-80 15-20 30-35 Tarts Fruits cakes Plum-cak
Precautions and tips ! This appliance has been designed and manufactured in compliance with international safety standards. The following warnings are provided for safety reasons and must be read carefully. General safety • The appliance was designed for domestic use inside the home and is not intended for commercial or industrial use. • The appliance must not be installed outdoors, even in covered areas. It is extremely dangerous to leave the appliance exposed to rain and storms.
GB Maintenance and care Replacing the light bulb To replace the oven light bulb: 1. Remove the glass cover of the lamp-holder. 2. Remove the light bulb and replace it with a similar one: Wattage 25 W, cap E 14. 3. Replace the glass cover (see diagram). Switching the appliance off Disconnect your appliance from the electricity supply before carrying out any work on it.
Installation ! Conservez ce mode d’emploi pour pouvoir le consulter à tout moment. En cas de vente, de cession ou de déménagement, veillez à ce qu’il suive l’appareil pour informer le nouveau propriétaire sur son fonctionnement et lui fournir les conseils correspondants.
FR ! L’installateur est responsable du bon raccordement électrique de l’appareil et du respect des normes de sécurité. Avant de procéder au branchement, assurez-vous que : • la prise est bien munie d’une terre conforme à la loi; • la prise est bien apte à supporter la puissance maximale de l’appareil, indiquée sur la plaquette signalétique; • la tension d’alimentation est bien comprise entre les valeurs indiquées sur la plaquette signalétique; • la prise est bien compatible avec la fiche de l’appareil.
Mise en marche et utilisation ATTENTION! Le four est équipé d’un système d’arrêts de grilles qui permet de les retirer sans que ces dernières sortent entièrement du four (1). Pour sortir complètement les grilles il suffit, comme illustré, de les soulever en les saisissant par l’avant et de les tirer (2). ! Lors de son premier allumage, faire fonctionner le four à vide, porte fermée, pendant au moins une heure en réglant la température à son maximum. Puis éteindre le four, ouvrir la porte et aérer la pièce.
FR 4. Une fois le temps écoulé, il émet un signal sonore. Pour le faire taire, tourner le bouton du PROGRAMMATEUR dans le sens inverse des aiguilles d’une montre jusqu’à ce que le symbole “ ” s’affiche dans la fenêtre. 5. Amener le bouton PROGRAMMES sur “0”. • Exemple : il est 9h00 et une durée de 1h15 est programmée. Le programme s’arrête automatiquement à 10h15. Programmer une durée avec démarrage différé 1.
Tableau de cuisson Programmes Aliments FR Poids (Kg) Niveau enfournement glissières standard glissières coulissantes Préchauffage Température Durée préconisée cuisson (°C) (minutes) Canard Poulet Rôti de veau ou de bœuf Rôti de porc Biscuits (pâte brisée) Tartes 1,5 1,5 1 1 1 2 2 2 2 2 2 1 1 1 1 1 1 si si si si si si 200-210 200-210 200 200-210 180 180 70-80 60-70 70-75 70-80 15-20 30-35 Tartes Tarte aux fruits Cake aux fruits Petits gâteaux sur 2 niveaux Génoise Choux sur 3 niveaux Biscuits sur
FR Précautions et conseils ! Cet appareil a été conçu et fabriqué conformément aux normes internationales de sécurité. Ces conseils sont fournis pour des raisons de sécurité et doivent être lus attentivement. Sécurité générale • Cet appareil a été conçu pour un usage familial, de type non professionnel. • Cet appareil ne doit pas être installé en extérieur, même dans un endroit à l’abri, il est en effet très dangereux de le laisser exposé à la pluie et aux orages.
Nettoyage et entretien Remplacement de l’ampoule d’éclairage Pour changer l’ampoule d’éclairage du four: Mise hors tension Avant toute opération de nettoyage ou d’entretien coupez l’alimentation électrique de l’appareil. 1. Dévissez le couvercle en verre du boîtier de la lampe. 2. Dévissez l’ampoule et remplacezla par une autre de même type : puissance 25 W, culot E 14. 3. Remontez le couvercle à sa place (voir figure).
Instalación ! Es importante conservar este manual para poder consultarlo en todo momento. En caso de venta, de cesión o de mudanza, verifique que permanezca junto al aparato para informar al nuevo propietario sobre su funcionamiento y sobre las advertencias correspondientes. ! Lea atentamente las instrucciones: contienen importante información sobre la instalación, el uso y la seguridad.
Conexión del cable de alimentación eléctrica a la red Instale en el cable un enchufe normalizado para la carga indicada en la placa de características (ver al costado). En el caso de conexión directa a la red, es necesario interponer entre el aparato y la red, un interruptor omnipolar con una distancia mínima entre los contactos de 3 mm., dimensionado para esa carga y que responda a las normas vigentes (el cable a tierra no debe ser interrumpido por el interruptor).
ES Puesta en funcionamiento y uso ATENCIÓN! El horno está dotado de un sistema de bloqueo de las parrillas que permite quitarlas sin que sobresalgan del horno (1). Para quitar completamente las parrillas, como se indica en el dibujo, es suficiente levantarlas cogiéndolas de la parte delantera y tirar (2). ! La primera vez que encienda el horno, hágalo funcionar vacío, durante una hora aproximadamente, con el termostato al máximo y con la puerta cerrada.
3. Seleccione el programa de cocción deseado con el mando PROGRAMAS. El horno se encenderá inmediatamente y funcionará durante todo el tiempo de cocción seleccionado. 4. Una vez cumplido el tiempo, se emitirá una señal sonora. Para interrumpirla gire el mando del PROGRAMADOR en sentido antihorario hasta visualizar en la representación visual el símbolo “ ”. 5. Lleve el mando PROGRAMAS hasta la posición “0”. • Ejemplo: son las 9:00 horas y se programa una duración de 1 hora y 15 minutos.
ES Tabla de cocción Programas Alimentos Peso (Kg) Posición de las bandejas Precalentamiento Temperatura aconsejada (°C) Duración de la cocción (minutos) guías guías estándar deslizables Pato Pollo Horno Tradicional Asado de ternera o de vaca Asado de cerdo Bizcochos (de pastaflora) Tortas glaseadas 1,5 1,5 1 1 1 2 2 2 2 2 2 1 1 1 1 1 1 si si si si si si 200-210 200-210 200 200-210 180 180 70-80 60-70 70-75 70-80 15-20 30-35 Tortas glaseadas Torta de fruta Bizcochos con uva Tortas pequeñas en d
Precauciones y consejos ! El aparato ha sido proyectado y fabricado en conformidad con las normas internacionales de seguridad. Estas advertencias se suministran por razones de seguridad y deben ser leídas atentamente. Seguridad general • El aparato ha sido fabricado para un uso de tipo no profesional en el interior de una vivienda. • El aparato no se debe instalar al aire libre, tampoco si el espacio está protegido porque es muy peligroso dejarlo expuesto a la lluvia y a las tormentas.
ES Mantenimiento y cuidados Cortar la corriente eléctrica Antes de realizar cualquier operación, desconecte el aparato de la red de alimentación eléctrica. Controlar las juntas Controle periódicamente el estado de la junta que rodea la puerta del horno. Si se encontrara dañada llame al Centro de Asistencia Técnica más cercano (ver Asistencia). Es aconsejable no usar el horno hasta que no haya sido reparada.
Instalação PT ! É importante guardar este folheto para poder consultá-lo a qualquer momento. No caso de venda, cessão ou mudança, assegure-se que o mesmo permanece com o aparelho para informar o novo proprietário sobre o funcionamento e sobre as respectivas advertências. ! Leia com atenção as instruções: há informações importantes sobre a instalação, a utilização e a segurança.
PT Ligação do cabo de fornecimento à rede eléctrica Monte no cabo uma ficha em conformidade com as normas para a carga indicada na placa de identificação (veja ao lado). No caso de uma ligação directa à rede, será necessário interpor, entre o aparelho e a rede, um interruptor omnipolar com abertura mínima entre os contactos de 3 mm. na dimensão certa para a carga e em conformidade com as normas em vigor (a ligação à terra não deve ser interrompida pelo interruptor).
Início e utilização ATENÇÃO! O forno está equipado com um sistema de bloqueio das grelhas que permite retirá-las sem que estas ressaiam do forno (1). Para retirar completamente as grelhas, tal como indicado no desenho, basta levantá-las, segurando-as pela parte da frente, e puxá-las (2). ! Quando o acender pela primeira vez, aconselhamos de fazer funcionar o forno vazio pelo menos durante uma hora, com o termóstato posto à temperatura máxima e a porta fechada.
PT 2. Puxe o selector do PROGRAMADOR e rode-o na direcção contrária aos ponteiros do relógio até o indicador móvel chegar à correspondência da hora actual. No final da operação ouve-se um clique. 3. Seleccione o programa de cozedura que desejar mediante o selector dos PROGRAMAS. O forno liga-se imediatamente e funcionará durante todo o tempo de duração definido para a cozedura. 4. Quando acabar o tempo, será emitido um sinal acústico.
Tabela de cozedura Programas Forno Tradicional Forno para Pastéis Cozinha Rápida Cozedura Múltipla Forno para Pizza Barbecue Gratin Alimentos PT Peso (Kg) Posição das prateleiras Guias padrão Guias corrediças Pré-aquecimento Temperatura Duração aconselhada da (°C) cozedura (minutos) Pato Franco Carne de vitela ou vaca assada Carne de porco assada Biscoitos (massa tenra) Tortas doces 1,5 1,5 1 1 1 2 2 2 2 2 2 1 1 1 1 1 1 sim sim sim sim sim sim 200-210 200-210 200 200-210 180 180 70-80 60-
PT Precauções e conselhos ! Este aparelho foi projectado e fabricado em conformidade com as normas internacionais de segurança. Estas advertências são fornecidas por razões de segurança e devem ser lidas com atenção. Segurança geral • Este aparelho foi concebido para utilização de tipo não profissional no âmbito de moradas. • Este aparelho não deve ser instalado ao ar livre, mesmo num sítio protegido, porque é muito perigoso deixá-lo exposto a chuva e temporais.
Manutenção e cuidados Substituição da lâmpada Para substituir a lâmpada de iluminação do forno: Desligar a corrente eléctrica Antes de realizar qualquer operação, desligue o aparelho da alimentação eléctrica. 1. Desatarraxe a tampa em vidro do bocal da lâmpada. 2. Desenrosque a lâmpada e troque-a por outra análoga: potência 25 W, engate E 14. 3. Retire a tampa (veja a figura).
Installation ! Bewahren Sie diese Bedienungsanleitung bitte sorgfältig auf, damit Sie sie jederzeit zu Rate ziehen können. Sorgen Sie dafür, dass sie im Falle eines Verkaufs, eines Umzugs oder einer Übergabe an einen anderen Benutzer das Gerät stets begleitet, damit auch der Nachbesitzer die Möglichkeit hat, darin nachschlagen zu können. ! Lesen Sie bitte folgende Hinweise aufmerksam durch, sie liefern wichtige Informationen hinsichtlich der Installation, dem Gebrauch und der Sicherheit.
! Der Installateur ist für den ordnungsgemäßen elektrischen Anschluss sowie die Einhaltung der Sicherheitsvorschriften verantwortlich. Vor dem Anschluss stellen Sie bitte sicher, dass: • die Steckdose geerdet ist und den gesetzlichen Bestimmungen entspricht; • die Netzsteckdose für die auf dem Typenschild angegebene maximale Leistungsaufnahme des Gerätes ausgelegt ist; • die Netzspannung im Bereich der auf dem Typenschild angegebenen Werte liegt; • die Netzsteckdose mit dem Netzstecker kompatibel ist.
DE Inbetriebsetzung und Gebrauch ACHTUNG! Der Ofen ist mit einem Arretierungssystem der Roste ausgestattet. Damit lassen diese sich ausziehen, ohne aus dem Ofen hervorzustehen (1). Um die Roste komplett auszuziehen, braucht man sie nur, wie auf der Zeichnung zu sehen, vorne zu greifen und zu ziehen (2). ! Bei erstmaliger Inbetriebnahme sollte der leere Backofen für etwa eine Stunde bei Höchsttemperatur und geschlossener Backofentür in Betrieb genommen werden.
2. Ziehen Sie den PROGRAMMIERER-Knopf etwas heraus und drehen Sie ihn gleichzeitig nach links, bis der bewegliche Zeiger auf der laufenden Uhrzeit steht, und hörbar einrastet. 3. Wählen Sie das gewünschte Garprogramm mittels des Drehknopfes PROGRAMME aus. Der Backofen setzt sich sofort in Betrieb und bleibt für die gesamte eingestellte Garzeit eingeschaltet. 4. Nach Ablauf der Zeit ertönt ein akustisches Signal.
DE Tabelle der Garzeiten OberUnterhitze Gebäck Fast Cooking (Intensivback en) Einschubhöhe Gew.
Vorsichtsmaßregeln und Hinweise ! Das Gerät wurde entsprechend den strengsten internationalen Sicherheitsvorschriften entworfen und gebaut. Nachstehende Hinweise werden aus Sicherheitsgründen geliefert und sollten aufmerksam gelesen werden. Allgemeine Sicherheit • Dieses Gerät ist für den nicht professionellen Einsatz in privaten Haushalten bestimmt. • Das Gerät darf nicht im Freien aufgestellt werden, auch nicht, wenn es sich um einen geschützten Platz handelt.
DE Reinigung und Pflege Vor jeder Reinigung und Pflege ist das Gerät vom Stromnetz zu trennen. Dichtungen prüfen Den Zustand der Dichtung an der Backofentür in regelmäßigen Abständen prüfen. Sich im Falle einer beschädigten Dichtung an die nächstgelegene Kundendienststelle (siehe Kundendienst) wenden. Es empfiehlt sich, den Backofen bis zur erfolgten Reparatur nicht zu verwenden.
Het installeren ! Bewaar dit boekje zorgvuldig voor eventuele verdere raadpleging. Wanneer u het product weggeeft, verkoopt, of wanneer u verhuist, dient u dit boekje bij het apparaat te bewaren zodat alle nodige informatie voorhanden blijft. ! Lees de gebruiksaanwijzingen zorgvuldig door: er staat belangrijke informatie in over installatie, gebruik en veiligheid.
NL ! De installateur is verantwoordelijk voor een correcte elektrische aansluiting en het in acht nemen van de veiligheidsnormen. Voor het aansluiten moet u controleren dat: • het stopcontact geaard is en voldoet aan de geldende normen; • het stopcontact in staat is het maximale vermogen van het apparaat te dragen, zoals aangegeven op het typeplaatje; • de spanning zich bevindt tussen de waarden die staan aangegeven op het typeplaatje; • het stopcontact en de stekker overeenkomen.
Starten en gebruik BELANGRIJK! De oven is uitgerust met een blokkeringssysteem voor de grill dat het mogelijk maakt om de gril naar buiten te trekken zonder dat deze buiten de oven komt (1). Om de grill volledig te verwijderen, de grill aan de voorkant optillen en naar buiten trekken, zoals op de tekening afgebeeld is (2). Ovenverlichting Deze gaat werken door de knop PROGRAMMA’S op aan wanneer u een kookprogramma selecteert. te draaien. Ze blijft Gebruik de timer Einde Kooktijd* 1.
NL / Programma GRATINEREN Hiermee wordt de rechtstreekse bovenhitte van de grill gecombineerd met de circulatie van de lucht in de oven. Eventueel verbranden van de buitenkant wordt zo vermeden; de warmte dringt gemakkelijker door naar de binnenkant. Kook met de ovendeur dicht. De kooktijd programmeren Programmering onmiddellijke start kooktijd 1. Draai de PROGRAMMEERKNOP tegen de klok in totdat de gewenste kooktijd in het afleesvenstertje verschijnt. 2.
Kooktabel Programma's Gerechten Gewich t (kg) Roosterstanden standaard geleiders verschuifb are geleiders Voorverwarme n Aangerade n temperatuu r (°C) NL Duur bereiding (minuten) Traditionele oven Eend Kip Gebraden kalfs- of rundvlees Gebraden varkensvlees Koekjes (kruimeldeeg) Vruchtentaart (harde bodem) 1,5 1,5 1 1 1 2 2 2 2 2 2 1 1 1 1 1 1 ja ja ja ja ja ja 200-210 200-210 200 200-210 180 180 70-80 60-70 70-75 70-80 15-20 30-35 Gebak oven Vruchtentaart (harde bodem) Vruchtentaart Cakejes
NL Voorzorgsmaatregelen en advies ! Dit apparaat is ontworpen en vervaardigd volgens de geldende internationale veiligheidsvoorschriften. Deze aanwijzingen zijn geschreven voor uw veiligheid en u dient ze derhalve goed door te nemen. Algemene veiligheidsmaatregelen • Dit apparaat is vervaardigd voor niet-professioneel gebruik binnenshuis. • Het apparaat dient niet buitenshuis te worden geplaatst, ook niet in overdekte toestand.
Onderhoud en verzorging Vervangen van het lampje* NL De elektrische stroom afsluiten Voor het vervangen van het ovenlampje: Schoonmaken van het apparaat 1. Schroef het glazen lampenkapje los. 2. Schroef het lampje los en vervang het met eenzelfde soort lampje: sterkte 25W, fitting E 14. 3. Plaats het deksel er weer op (zie afb.). Sluit altijd eerst de stroom af voordat u tot enige handeling overgaat.
Instalacja ! Ważnym jest, aby zachować niniejszą książeczkę instrukcji dla przyszłych konsultacji. W razie sprzedaży, odsprzedania, czy przeniesienia, należy upewnić się, czy znajduje się ona wraz z urządzeniem i odpowiednimi uwagami, aby poinformować nowego właściciela o jego funkcjonowaniu. ! Należy uważnie przeczytać instrukcję: zawieraja ona ważne informacje dotyczące instalacji, użytkowania i bezpieczeństwa.
! Osoba instalująca urządzenie jest odpowiedzialna za jego właściwe podłączenie do prądu i zachowanie norm bezpieczeństwa.
PL Uruchomienie i użytkowanie pociągnąć do siebie (2). UWAGA! Piekarnik jest wyposażony w system blokowania rusztu, który umożliwia jego wysuwanie bez całkowitego wyjmowania z piekarnika (1). W celu całkowitego wyjęcia rusztu wystarczy go unieść w sposób przedstawiony na rysunku, chwytając za przednią część i ! Przed pierwszym użyciem włączyć na przynajmniej jedną godzinę pusty piekarnik z zamkniętymi drzwiczkami i termostatem nastawionym na najwyższą temperaturę.
4. Po upływie czasu wydaje sygnał akustyczny i piekarnik wyłączy się. • Przykład: jest godzina 9:00 i zostaje zaprogramowany czas pieczenia na 1 godzinę i 15 minut. Pieczenie zatrzyma się automatycznie o godzinie 10:15. PL Planowanie czasu z rozpoczęciem natychmiastowym. 1. Obrócić pokrętło PROGRAMATORA w kierunku przeciwnym do wskazówek zegara aż do pojawienia się w okienku żądanego czasu trwania gotowania. 2.
PL Tabela pieczenia Programy Piekarnik tradycyjny Piekarnik do wypieku ciast Fast cooking Multipieczenie Piekarnik do pizzy Barbecue Gratin Potrawy Kaczka Kurczak Pieczeń cielę ca lub wołowa Pieczeń wieprzowa Herbatniki (z kruchego ciasta) Kruche ciasta Kruche ciasta Ciasto z owocami Ciasto ś liwkowe Małe ciastka na 2 półkach Ciasto biszkoptowe Ptysie na 3 półkach Herbatniki na 3 półkach Naleś niki z farszem Bezy na 3 półkach Słone ciastka francuskie z serem Mroż onki Pizza Cukinie i raki w lanym
Zalecenia i środki ostrożności ! Urządzenie zostało zaprojektowane i wyprodukowane zgodnie z międzynarodowymi przepisami bezpieczeństwa. Mając na względzie Wasze bezpieczeństwo podajemy Wam poniższe zalecenia, które należy uważnie przeczytać. Ogólne zasady bezpieczeństwa • Niniejsze urządzenie przeznaczone jest do nieprofesjonalnych zastosowań domowych.
195122438.00 04/2014- XEROX FABRIANO PL Konserwacja i utrzymanie Odłączenie prądu elektrycznego Przed naprawą odłączyć urządzenie od sieci zasilania elektrycznego. Czyszczenie urządzenia • Części zewnętrzne emaliowane lub ze stali inox oraz uszczelki gumowe mogą być czyszczone przy pomocy gąbki nasączonej letnią wodą i neutralnym mydłem. Jeśli plamy trudno usunąć, zastosować specjalne produkty do czyszczenia. Po zakończeniu czyszczenia zaleca się dokładne spłukanie wodą i wysuszenie.