
Setup and user guide

You can download the Safety Instructions, User Manual, Product Fiche and Energy data by:
• Visiting our website - docs.indesit.eu
• Using QR Code
• Alternatively, contact our After-sales Service (See phone number in the warranty booklet). When
contacting our After-sales Service, please state the codes provided on your product’s identi cation plate.
THANK YOU FOR BUYING A INDESIT PRODUCT.
In order to receive a more complete assistance,
please register your product on
www.indesit.eu/register
EN
Quick guide
Before using the appliance carefully read the Safety Instructions.
xxxxxxxxxxxx
xxxx
Before using the appliance carefully read the Safety Instructions.
xxxxxxxxxxxx
xxxx
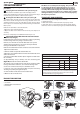
CARE AND MANTENANCE
Unplug the dryer during the cleaning and maintenance
procedures.
Emptying the water tank after each cycle (see Fig. A).
Pull the container out of the dryer and and empty it into a
sink or other suitable drain, then place it back. Do not use the dryer
without having inserted the container back in place.
Cleaning the door lter after each cycle (see Fig. B).
Pull the lter out and clean it by removing the lint from the
lter surface under running water or using a vacuum cleaner. For
optimal performance, dry up all the lters before inserting them
back in place. Do not use the dryer without having reinserted the
lter in place.
Remove the door lter as described below:
1. Open the door and pull upwards.
2. Open the lter and remove lint from all its parts. Replace it
correctly.
Ensure it is completely inserted ush with the dryer seal.
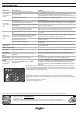
Cleaning the bottom lter when the relevant indicator
turns on (see Fig. C).
Pull the lter out and remove the lint from its surface by washing
it under runing water or by using a vacuum cleaner.
However, it is advisable to clean this lter after each cycle to
optimise drying performance. Do not use the dryer without
having inserted the lter in place rst.
Remove the bottom lter and the condenser as described below:
1. Open the bottom door.
2. Take the handle and pull the bottom lter out.
3. Open the rear side of the lter and remove the lint from the inner
surface of the mesh.
4. Clean the bottom lter chamber (there might be residual water:
this is normal).
5a. Approximately every 3 months, clean the condensing unit
(gure D) situated behind the bottom lter.
5b. Lower the levers situated on the sides of the condenser. After
having removed the condenser, clean it under running water.
5c. Place the condenser back in place and lift the levers.
6. Close the rear side of the bottom lter and place it back by
checking it is perfectly integrated in place.
7. Lower the lter handle and close the bottom door.
8. Make sure the air intake is free.
PRODUCT DESCRIPTION
1. Water Tank
2. Air Intake
3. Bottom lter and condenser
4. Door lter
The lters are essential parts for drying. They are intended
to collect the lint formed during drying process. In case
of clogged lters, the air ow inside the dryer would be
seriously aected: the drying times would be longer, the
energy consumption would increase and the dryer could be
damaged. If these procedures are not carried out properly,
the dryer may not start.
TRANSPORT AND HANDLING
Never lift the dryer by holding it at the worktop.
1. Unplug the dryer.
2. Make sure that door and water tank are properly closed.
3. If the drain hose is connected to your sewage system, x the
drain hose on the rear of the dryer again (see Installation Guide)..
Power consumption
o-mode (Po) - Watts 0.50
left-on mode (Pl) - Watts 1.00
Programs Kg kWh Minutes
Eco Cotton *
7 4.28 114
Eco Cotton
3.5 2.22 61
Synthetics 4 1.83 90
*This is the reference programme for the energy label and suitable to
dry normal wet cotton laundry. This is the most ecient programme
in terms of energy consumption for drying wet cotton laundry.
(Standard/Default starting conguration)
AB
1
4
2
3
CD