Operating Instructions COOKER AND OVEN GB English, 1 Contents WARNING,2 Installation, 3 I5ESH/UK I5ESH1/UK Positioning and levelling Electrical connection Table of characteristics Description of the appliance, 4 Overall view Control panel Start-up and use, 5 Using the oven Cooking modes Practical cooking advice Oven cooking advice table Using the electric hob, 7 Switching the cooking zones on and off Cooking zones Precautions and tips, 9 General safety Disposal Respecting and conserving the environm
CAUTION: the use of inappropriate hob guards can cause accidents. Do not use harsh abrasive cleaners or sharp metal scrapers to clean the oven door glass since they can scratch the surface, which may result in shattering of the glass. The internal surfaces of the compartment (where present) may become hot. 2 Positioning and levelling ! It is possible to install the appliance alongside cupboards whose height does not exceed that of the hob surface.
Levelling If it is necessary to level the appliance, screw the adjustable feet into the places provided on each corner of the base of the cooker (see figure). The legs* fit into the slots on the underside of the base of the cooker. Electrical connection Electric cookers come without a power supply cable. The cooker is designed to operate on an electricity supply which conforms to the electrical data shown on the Rating Plate.
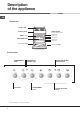
Description of the appliance GB Overall view Electric hob GUIDE RAILS for the sliding racks position 5 position 4 position 3 position 2 position 1 Control panel GRILL rack DRIPPING PAN Adjustable foot Adjustable foot Control panel THERMOSTAT knob THERMOSTAT indicator light Timer knob* * Only available in certain models.
Start-up and use Using the oven Oven light ! The first time you use your appliance, heat the empty oven with its door closed at its maximum temperature for at least half an hour. Ensure that the room is well ventilated before switching the oven off and opening the oven door. The appliance may emit a slightly unpleasant odour caused by protective substances used during the manufacturing process burning away. This is switched on by turning the SELECTOR knob to any position other than “0”.
Cooking modes GB ! Do not place flammable materials in the lower oven compartment. ! The internal surfaces of the compartment (where present) may become hot ! A temperature value can be set for all cooking modes between 50°C and MAX, except for the GRILL programme, for which only the MAX power level is recommended. TRADITIONAL (CONVECTION) OVEN mode Both the top and bottom heating elements will come on. When using this traditional cooking mode, it is best to use one cooking rack only.
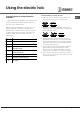
Using the electric hob Practical advice on using the electric hotplates Practical advice on using the hob • Use pans with a thick, flat base to ensure that they adhere perfectly to the cooking zone. GB To avoid heat loss and damage to the hotplates use pans with a flat base, whose diameter is no less than that of the hotplate itself. ! Before using the hotplates for the first time, you should heat them at maximum temperature for approximately 4 minutes, without placing any pans on them.
GB Cooking advice table for the oven Sele tor no Foo to e oo e setting 1 !on&e tion (Traditional) uck !oast veal or beef "ork roast #iscuits (short pastr$) %arts 'asagne 'amb *ackerel "lum+cake Cream puffs /ponge+cake /avour$ pies 2 Pastr' (o e !aised Cakes %arts Fruit cakes #rioches eig t !oo ing ra in g "osition #rom ottom Pre eating time min$tes % ermostat no setting !oo ing time min$tes 1 1 1 + 1 1 1 1 1 6.7 6.8 1.
Precautions and tips ! The appliance was designed and manufactured in compliance with international safety standards. The following warnings are provided for safety reasons and must be read carefully. • • General safety • These instructions are only valid for the countries whose symbols appear in the manual and on the serial number plate. • The appliance was designed for domestic use inside the home and is not intended for commercial or industrial use.
Care and maintenance GB Switching the appliance off Disconnect your appliance from the electricity supply before carrying out any work on it. Cleaning the appliance ! Do not use abrasive or corrosive detergents such as stain removers, anti-rust products, powder detergents or sponges with abrasive surfaces: these may scratch the surface beyond repair. ! Never use steam cleaners or pressure cleaners on the appliance.
Removing and fitting the oven door: 1.Open the door 2.Make the hinge clamps of the oven door rotate backwards completely (see photo) WARNING! Oven must not be operated with inner door glass removed! WARNING! When reassembling the inner door glass insert the glass panel correctly so that the text written on the panel is not reversed and can be easily legible. 7.Replace the profile, a click will indicate that the part is positioned correctly. 8.Open the door completely. 9.Close the supports (see photo). 3.
02/2014 - 195118678.00 XEROX FABRIANO Steam-Assisted Oven Cleaning GB This method of cleaning is recommended especially after cooking very fatty (roasted)meats. This cleaning process allows to facilitate the removal of dirt of the walls of the oven by the generation of steam that is created inside the oven cavity for easier cleaning. ! Important! Before you start steam -cleaning: -Remove any food residue and grease from the bottom of the oven. - Remove any oven accessories (grids and drip pans).