
Instruction for Use


9
GB
! If the flame is accidentally extinguished, switch off the
burner and wait for at least 1 minute before attempting
to relight the oven.
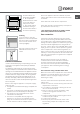
Adjusting the temperature
To set the desired cooking temperature, turn the
OVEN control knob in an anticlockwise direction.
Temperatures are displayed on the control panel and
may vary between MIN (140°C) and MAX (250°C).
Once the set temperature has been reached, the oven
will keep it constant by using its thermostat.
Turnspit*
To operate the rotisserie (see diagram) proceed as
follows:
1. Place the dripping
pan in position 1.
2. Place the rotisserie
support in position 4 and
insert the spit in the hole
provided on the back
panel of the oven.
3. Acitvate the function
by pressing the
TURNSPIT button.
Oven light
The light may be switched on at any moment by
pressing the OVEN LIGHT button.
Timer*
To activate the Timer proceed as follows:
1. Turn the TIMER knob in a clockwise direction for
almost one complete revolution to set the buzzer.
2. Turn the TIMER knob in an anticlockwise direction
to set the desired length of time.
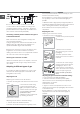
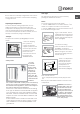
A
S
In gas cooker models, there is
a sliding protection layer A that
shields the lower compartment
from the heat generated by the
burner (see gure).
To remove the sliding
protection remove the screw S
see gure). To replace it.
lock it in place with the screw
S.
! Before using the oven make
sure that the sliding protection
is fixed correctly.
Lower compartment*
There is a compartment
underneath the oven
that may be used to
store oven accessories
or deep dishes. To
open the door pull it
downwards (see gure).
!
The internal surfaces
of the compartment (where present) may become
hot.
! Do not place flammable materials in the lower oven
compartment.
(
Safety Chain
! In order
to prevent
accidental
tipping of the
appliance, for
example by
a child clim-
bing onto the
oven door, the
supplied safety
chain MUST be
installed!
The cooker is fitted with a safety chain to be fixed by
means of a screw (not supplied with the cooker) to
the wall behind the appliance, at the same height as
the chain is attached to the appliance.
WARNING! The oven is
provided with a stop sys-
tem to extract the racks
and prevent them from
coming out of the oven.(1)
As shown in the drawing,
to extract them comple-
tely, simply lift the racks,
holding them on the front
part, and pull (2).
Choose the screw and the screw anchor according
to the type of material of the wall behind the applian-
ce. If the head of the screw has a diameter smaller
than 9mm, a washer should be used. Concrete wall
requires the screw of at least 8mm of diameter, and
60mm of length.
Ensure that the chain is fixed to the rear wall of the
cooker and to the wall, as shown in figure, so that
after installation it is tensioned and parallel to the
ground level.