Mode d’emploi CUISINIERE FR Français,1 GB English, 14 Sommaire Attention,2 Installation, 3-6 Positionnement et nivellement Raccordement électrique Raccordement gaz Adaptation aux différents types de gaz Caractéristiques techniques Tableau Caractéristiques des brûleurs et des injecteurs Description de l’appareil, 7 Vue d’ensemble Tableau de bord I6GGC2G/FR Mise en marche et utilisation, 8-10 Utilisation du plan de cuisson Utilisation du four Tableau de cuisson Précautions et conseils, 11 Sécurité géné
ATTENTION FR ATTENTION : cet appareil ainsi que ses parties accessibles deviennent très chauds pendant leur fonctionnement. Il faut faire attention de ne pas toucher les éléments chauffants. Ne laisser s’approcher les enfants de moins de 8 ans à moins qu’ils ne soient sous surveillance constante.
Installation ! Conservez ce mode d’emploi pour pouvoir le consulter à tout moment. En cas de vente, de cession ou de déménagement, veillez à ce qu’il suive l’appareil. ! Lisez attentivement les instructions : elles contiennent des conseils importants sur l’installation, l’utilisation et la sécurité de votre appareil. ! L’installation de l’appareil doit être effectuée par un professionnel du secteur conformément aux instructions du fabricant. ! N’importe quelle opération de réglage, d’entretien, etc.
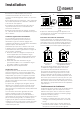
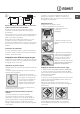
20 mm. Min. min. 650 mm. with hood min. 700 mm. without hood 420 mm. Min. FR • si la cuisinière est installée sous un HOOD élément suspendu, Min. 600 mm. il faut que ce dernier soit placé à au moins 420mm de distance du plan.
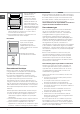
Point de raccordement Bouchon d'isolation SURFACE CHAUDE Point de raccordement Bouchon d'isolation Tuyau Tuyau Raccordement gaz par tuyau flexible en acier inox, à paroi continue avec raccords filetés Assurez-vous que le tuyau et les joints sont bien conformes aux normes applicables dans le pays d’installation. Pour installer le tuyau, enlevez l’about annelé équipant l’appareil (le raccord d’entrée du gaz à l’appareil est fileté 1/2 gaz mâle cylindrique).
La chaîne de sécurité FR ! Pour éviter le basculement de l’appareil, par exemple si un enfant s’accroche à la porte du four, la chaîne de sécurité DOIT être installée ! La cuisinière est équipée d’une chaîne de sécurité qui doit être fixée à l’aide d’une vis (non fournie avec l’appareil) au mur derrière l’appareil, à la même hauteur que sur la cuisinière. Choisissez une vis et un système d’ancrage adapté au mur contre lequel se trouve l’appareil.
Description de l’appareil Vue d’ensemble FR Brûleur à gaz Grille du plan de cuisson Plateau du plan de cuisson GLISSIERES de coulissement niveau 5 niveau 4 niveau 3 niveau 2 niveau 1 Tableau de bord Support GRILLE Support LECHEFRITE Pied de réglage Pied de réglage Tableau de bord VOYANT de fonctionnement du grill Manette FOUR ALLUMAGE des brûleurs Manettes BRÛLEURS du plan de cuisson ALLUMAGE tournebroche/ lumiere du four 7
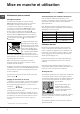
Mise en marche et utilisation FR Utilisation du plan de cuisson Conseils pratiques pour l’utilisation des brûleurs Allumage des brûleurs Pour un meilleur rendement des brûleurs et une moindre consommation de gaz, utilisez des casseroles à fond plat, munies de couvercle et d’un diamètre adapté au brûleur : Un petit cercle plein près de chaque manette BRULEUR indique le brûleur associé à ce dernier. Pour allumer un brûleur du plan de cuisson : 1. approchez une flamme ou un allume-gaz ; 2.
Allumage électronique de brûleur du four Le brûleur gaz du four est à allumage électronique instantané. Pour déclencher ce dispositif, appuyez sur le bouton repérable à son symbole . Pour allumer le brûleur, appuyez sur le bouton tout en appuyant à fond et en tournant la manette correspondante dans le sens inverse des aiguilles d’une montre jusqu’au déclenchement du train d’étincelles. Pour un allumage instantané, nous conseillons d’appuyer d’abord sur le bouton puis de tourner la manette.
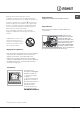
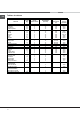
FR Tableau de cuisson Poids (Kg) Niveau enfournement Préchauffage (minutes) Température préconisée (°C) Durée cuisson (minutes) Pâtes Lasagnes Cannelloni Gratin de pâtes 2,5 2,5 2,5 3 3 3 10 10 10 210 200 200 60-75 40-50 40-50 Viande Veau Poulet Canard Lapin Porc Agneau 1,7 1,5 1,8 2 2,1 1,8 3 3 3 3 3 3 10 10 10 10 10 10 200 220 200 200 200 200 85-90 90-100 100-110 70-80 70-80 90-95 Poisson Maquereaux Denté Truite en papillote 1,1 1,5 1 3 3 3 10 10 10 180-200 180-200 180-200 35-40 40-
Précautions et conseils ! Cet appareil a été conçu et fabriqué conformément aux normes internationales de sécurité. Ces conseils sont fournis pour des raisons de sécurité et doivent être lus attentivement. Sécurité générale • Cet appareil a été conçu pour un usage familial, de type non professionnel. • Cet appareil ne doit pas être installé en extérieur, même dans un endroit abrité, il est en effet très dangereux de le laisser exposé à la pluie et aux orages.
Nettoyage et entretien FR Mise hors tension Avant toute opération de nettoyage ou d’entretien coupez l’alimentation électrique de l’appareil. Nettoyage de l’appareil ! Ne pas utiliser de détergents abrasifs ou corrosifs, tels que détacheurs et dérouilleurs, poudres à récurer et éponges à surface abrasive : ils risquent de rayer irrémédiablement la surface. ! Ne nettojez jamais l’appareil avec des nettoyeurs vapeur ou haute pression.
Démontage et remontage de la porte du four : 6.Remonter la vitre. 1.Ouvrir la porte 2.Faire pivoter à l'arrière les crochets des charnières de la porte du four (voir photo) AVERTISSEMENT: Le four ne doit pas etre utilisé avec la porte du four en verre enlevé. FR AVERTISSEMENT: Réassembler le verre correctement afin que le signe sur le verre est correctement lisible. 7.Remonter le profil, un clic signale si la pièce est positionnée comme il faut. 8.Ouvrir la porte complètement. 9.
Operating Instructions COOKER AND OVEN FR Français,1 GB English, 14 Contents Warning, 15 Installation, 16-20 Positioning and levelling Electrical connection Gas connection Adapting to different kinds of gas Table of characteristics Table of burner and nozzle specifications Description of the appliance, 21 Overall view Control panel I6GGC2G/FR Start-up and use, 22-24 Starting the oven Cooking modes Oven cooking advice table Precautions and tips, 25 General safety Disposal Respecting and conserving the
WARNING WARNING: The appliance and its accessible parts become hot during use. Care should be taken to avoid touching heating elements. The internal surfaces of the compartment (where present) may become hot. Children less than 8 years of age shall be kept away unless continuously supervised.
Installation GB ! Before operating your new appliance please read this instruction booklet carefully. It contains important information concerning the safe installation and operation of the appliance. ! Please keep these operating instructions for future reference. Make sure that the instructions are kept with the appliance if it is sold, given away or moved.
420 mm. 420 mm. Min. 600 mm. Min. Min. min. 650 mm. with hood min. 700 mm. without hood HOOD ! Once the appliance has been installed, the power supply cable and the electrical socket must be easily accessible. ! The cable must not be bent or compressed. ! The cable must be checked regularly and replaced by authorised technicians only. ! The manufacturer declines any liability should these safety measures not be observed.
GB between two cupboards), the flexible steel hose must be used instead (see below). 3. While the burner is alight, quickly change the position of the knob from minimum to maximum and vice versa several times, checking that the flame is not extinguished. ! The hob burners do not require primary air adjustment. Adapting the oven Replacing the oven burner nozzle: 1.
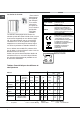
TE CHNI CAL DAT A Oven Dime nsi ons Hx Wx D 31x43,5x43,5 cm Vo lu me 58 l U sef ul measu re me nts re la ting to the oven co mp ar tmen t width 46 cm depth 42 cm height 8,5 cm Vo ltage an d fre quenc y see data plate* Bu rn er s may be adapted for use with any type of gas shown on the data plate.
Table of burner and nozzle specifications GB Table iquid Gas Burner Diameter (mm) Thermal Power kW (p.c.s.*) Nominal Reduced By-Pass 1/100 Nozzle 1/100 Flow* g/h (mm) (mm) *** ** 214 Fast (Large)(R) 100 3.00 0.70 41 87 218 Semi Fast (Medium)(S) 75 1.90 0.40 30 69 138 Auxiliary (Small)(A) 51 1.00 0.40 30 50 Oven - 1.00 52 78 Supply Pressures * ** *** 2.60 Nominal (mbar) Minimum (mbar) Maximum (mbar) At 15°C and 1013 mbar - dry gas Propane P.C.S. = 50.
Description of the appliance Overall view GB Glass cover* Gas burner Containment surface for spills Hob grid GUIDE RAILS for the sliding racks position 5 position 4 position 3 position 2 position 1 Control panel GRILL rack DRIPPING PAN Adjustable foot Adjustable foot Control panel GRILL indicator light OVEN/ GRILL knob BURNER ignition button GAS HOB knobs OVEN LIGHT/ TURNSPIT ignition button 21
Start-up and use GB Using the hob Lighting the burners For each BURNER knob there is a complete ring showing the strength of the flame for the relevant burner. To light one of the burners on the hob: 1. Bring a flame or gas lighter close to the burner. 2. Press the BURNER knob and turn it in an anticlockwise direction so that it is pointing to the maximum flame setting . 3. Adjust the intensity of the flame to the desired level by turning the BURNER knob in an anticlockwise direction.
there is no electricity the burner may be lit using a flame or a lighter, as described above. WARNING! The oven is provided with a stop system to extract the racks and prevent them from coming out of the oven.(1) As shown in the drawing, to extract them completely, simply lift the racks, holding them on the front part, and pull (2). ! The oven is fitted with a safety device and it is therefore necessary to hold the OVEN control knob down for approximately 6 seconds.
GB Oven cooking advice table 24
Precautions and tips ! This appliance has been designed and manufactured in compliance with international safety standards. The following warnings are provided for safety reasons and must be read carefully. General safety • The appliance was designed for domestic use inside the home and is not intended for commercial or industrial use. • The appliance must not be installed outdoors, even in covered areas. It is extremely dangerous to leave the appliance exposed to rain and storms.
Care and maintenance GB Switching the appliance off Gas tap maintenance Disconnect your appliance from the electricity supply before carrying out any work on it. Over time, the taps may become jammed or difficult to turn. If this happens, the tap must be replaced. Cleaning the appliance ! Never use steam cleaners or pressure cleaners on the appliance.
Removing and fitting the oven door: 1.Open the door 2.Make the hinge clamps of the oven door rotate backwards completely (see photo) GB WARNING! Oven must not be operated with inner door glass removed! WARNING! When reassembling the inner door glass insert the glass panel correctly so that the text written on the panel is not reversed and can be easily legible. 7.Replace the profile, a click will indicate that the part is positioned correctly. 8.Open the door completely. 9.Close the supports (see photo).
09/2013 - 195109385.