I6GS1 AG/NL I6GS1AG(W)/NL I6GSH2AG(X)/NL Nederland NL Gebruiksaanwijzing FORNUIS EN OVEN Inhoud Gebruiksaanwijzing,1 WAARSCHUWING,2 Beschrijving van het apparaat-Bedieningspaneel,3 Beschrijving van het apparaat-Aanzichttekening,3 Installatie, 4 Starten en gebruik, 9 Gebruik van de oven,10 Voorzorgsmaatregelen en advies,12 Onderhoud en verzorging,13 Servicedienst,13 GB English Operating Instructions COOKER AND OVEN Contents Operating Instructions,1 Warnings,2 Description of the appliance-Control Panel,3
GB WARNING WARNING: The appliance and its accessible parts become hot during use. Care should be taken to avoid touching heating elements. Children less than 8 years of age shall be kept away unless continuously supervised.
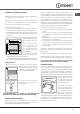
14 7 1 2 3 8 9 10 11 12 13 4 5 6 6 GB Description of the appliance Overall view 1. Hob burner 2.Hob Grid 3.Control panel 4.Sliding grill rack 5.DRIPPING pan 6.Adjustable foot 7.Containment surface for spills 8.GUIDE RAILS for the sliding racks 9.position 5 10.position 4 11.position 3 12.position 2 13.position 1 14.Glass Cover *(Available only on certain models) NL UA Aanzichttekening Aanzichttekening 1. Gasbrander 2. Rooster van het fornuis 3. Bedieningspaneel 4. Ovenrek 5.
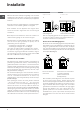
Installatie NL ! Bewaar dit instructieboekje zorgvuldig voor eventuele raadpleging in de toekomst. In het geval u het apparaat verkoopt of u verhuist, moet u het boekje bij het apparaat bewaren. Aangrenzend vertrek Te ventileren vertrek A B ! Lees de instructies aandachtig door: er staat belangrijke informatie in over installatie, gebruik en veiligheid. ! De installatie van het apparaat moet volgens deze instructies worden uitgevoerd door een bevoegde installateur.
Plaatsen en waterpas zetten ! Het apparaat kan naast meubels worden geplaatst die niet hoger zijn dan het werkvlak. ! Controleer dat de wand die in contact komt met de achterkant van het apparaat van niet ontvlambaar materiaal is en bestand tegen hitte (T 90°C). 420 mm. Min. min. 650 mm. with hood min. 700 mm. without hood Min. 420 mm.
NL De aansluiting van het apparaat op de gasleiding of -fles moet worden uitgevoerd m.b.v. een flexibele rubberen of stalen buis, in overeenstemming met de geldende nationale normen en uitsluitend na te hebben gecontroleerd dat het apparaat is afgesteld op het soort gas waarmee het zal worden gevoed (zie etiket met ijking op het deksel: als dit niet het geval is zie onder). Bij gebruik van vloeibaar gas uit een gasfles gebruikt u drukregelaars die voldoen aan de geldende nationale normen.
NL 3. controleer of door de kraan snel van maximum naar minimum te draaien de branders niet uitgaan. ! De branders hebben geen regeling van de primaire lucht nodig. ! Na de afregeling van een ander soort gas dan het goedgekeurde gas moet u het oude etiket van de gasinstelling vervangen met het etiket dat overeenkomt met het nieuwe gas, verkrijgbaar bij onze Erkende Technische Servicedienst.
TECHNISCHE GEGEVENS Afmetingen Oven HxBxD Inhoud NL S R S Afmetingen van de verwarmingsl ade A Spanning en frequentie van de elektris che voedi ng I6GS1AG(W)/NL liter 63 breedte 42 cm diepte 46 cm hoogte 8,5 cm kan worden aangepast voor elk type gas op het data plaat, die zich in de flap of na de ovenruimte is geopend, aan de linker wand in de oven. Branders I6GS1 AG/NL 32,4x43,5x44,5 cm I6GSH2AG(X)/NL ENERGIE LABEL en ECODESIGN zie typeplaatje EU richtlijn nr.
Starten en gebruik Gebruik van de kookplaat NL Aansteken van de branders Naast elke BRANDER knop wordt met een vol rondje aangegeven bij welke brander deze knop hoort. Om een brander van de kookplaat aan te steken: 1. houd een vlam of aansteker bij de brander; 2. druk en draai tegelijkertijd de BRANDER knop linksom tot aan het symbool van de grootste vlam . 3. regel de sterkte van de gewenste vlam, door de BRANDER knop linksom te draaien: op het minimum , op het maximum of op een tussenliggende stand.
! Plaats de ovenschalen altijd op bijgeleverde roosters. NL Controlelampje THERMOSTAAT Het oplichten van dit lampje geeft aan dat de oven aan het verwarmen is. Het licht gaat uit als de geselecteerde temperatuur is bereikt. Vanaf dit moment gaat het controlelampje aan en uit, hetgeen aangeeft dat de thermostaat werkt en de temperatuur in de oven constant houdt. Ovenverlichting De verlichting gaat aan door de PROGRAMMAKNOP in een willekeurige stand (behalve “0”) te zetten.
BELANGRIJK! De oven is uitgerust met een blokkeringssysteem voor de grill dat het mogelijk maakt om de gril naar buiten te trekken zonder dat deze buiten de oven komt(1). Om de grill volledig te verwijderen, de grill aan de voorkant optillen en naar buiten trekken, zoals op de tekening afgebeeld is (2).
Voorzorgsmaatregelen en advies NL ! Dit apparaat is ontworpen en vervaardigd volgens de geldende internationale veiligheidsvoorschriften. Deze aanwijzingen zijn geschreven voor uw veiligheid en u dient ze derhalve goed door te nemen. Algemene veiligheid • Dit apparaat is vervaardigd voor niet-professioneel gebruik binnenshuis. • Het apparaat dient niet buitenshuis te worden geplaatst, ook niet in overdekte toestand. Het is erg gevaarlijk als het in aanraking komt met regen of onweer.
Onderhoud en verzorging • Bereid uw etenswaren in afgesloten potten of pannen met goed passende deksels en gebruik zo weinig mogelijk water. Koken zonder deksel zal het energieverbruik enorm verhogen • Gebruik enkel vlakke potten en pannen • Als u iets bereidt dat lang duurt, kunt u eventueel een snelkookpan gebruiken die twee maal sneller werkt en een derde van de energie bespaart. De elektrische stroom afsluiten Sluit altijd eerst de stroom af voordat u tot enige handeling overgaat.
NL Demonteren en weer monteren van de ovendeur 1. Open de deur 2. Laat de haken van de scharnieren van de ovendeur helemaal naar achter draaien (zie foto) WAARSCHUWING! De oven mag niet worden gebruikt als de glazen plaat aan de binnenzijde is verwijderd! WAARSCHUWING! Als u de glazen plaat aan de binnenzijde weer in elkaar zet, dient u het paneel goed op zijn plaats te schuiven zodat de waarschuwingstekst niet achterstevoren staat en goed te lezen is. 7.
Installation ! Before operating your new appliance please read this instruction booklet carefully. It contains important information concerning the safe installation and operation of the appliance. ! Please keep these operating instructions for future reference. Make sure that the instructions are kept with the appliance if it is sold, given away or moved. ! The appliance must be installed by a qualified professional according to the instructions provided.
GB 420 mm. 420 mm. Min. 600 mm. Min. Min. min. 650 mm. with hood min. 700 mm. without hood HOOD • Do not position blinds behind the cooker or less than 200 mm away from its sides. • Any hoods must be installed according to the instructions listed in the relevant operating manual. ! Once the appliance has been installed, the power supply cable and the electrical socket must be easily accessible. ! The cable must not be bent or compressed.
• Fits firmly into place at both ends, where it will be fixed using clamps that comply with current regulations. ! If one or more of these conditions is not fulfilled or if the cooker must be installed according to the conditions listed for class 2 - subclass 1 appliances (installed between two cupboards), the flexible steel hose must be used instead (see below).
GB Table of burner and nozzle specifications Table1 (for Netherlands) Burner Gaz naturel Diameter (mm) Thermal power kW (p.c.s.*) Nominal Reduced G25/G25.3 Nozzle 1/100 (mm) G20 Capacity* l/h G25/G25.
Start-up and use Using the hob Flame adjustment according to levels Lighting the burners For each BURNER knob there is a complete ring showing the strength of the flame for the relevant burner. To light one of the burners on the hob: 1. Bring a flame or gas lighter close to the burner. 2. Press the BURNER knob and turn it in an anticlockwise direction so that it is pointing to the maximum flame setting . 3.
GB Oven light This is switched on by turning the SELECTOR knob to any position other than “0”. It remains lit as long as the oven is operating. Practical cooking advice Cooking modes GRILL • Insert the rack in position 3 or 4. Place the food in the centre of the rack. • We recommend that the power level is set to maximum. The top heating element is regulated by a thermostat and may not always operate constantly.
Oven cooking advice table Selector knob Food to be cooked setting GB Weight Cooking rack (in kg) position from bottom Preheating time (minutes) Thermostat knob setting Cooking time (minutes) 1 Convection- Duck Roast veal or beef Static Pork roast Biscuits (short pastry) Tarts Lasagne Lamb Mackerel Plum-cake Cream puffs Sponge-cake Savoury pies 1 1 1 1 1 1 1 1 0.3 0.5 1.
Precautions and tips GB ! This appliance has been designed and manufactured in compliance with international safety standards. The following warnings are provided for safety reasons and must be read carefully. General safety • The appliance was designed for domestic use inside the home and is not intended for commercial or industrial use. • The appliance must not be installed outdoors, even in covered areas. It is extremely dangerous to leave the appliance exposed to rain and storms.
Care and maintenance Switching the appliance off Inspecting the oven seals Disconnect your appliance from the electricity supply before carrying out any work on it. Check the door seals around the oven regularly. If the seals are damaged, please contact your nearest Authorised After-sales Service Centre. We recommend that the oven is not used until the seals have been replaced. Cleaning the appliance ! Never use steam cleaners or pressure cleaners on the appliance.
GB Steam-Assisted Oven Cleaning This method of cleaning is recommended especially after cooking very fatty (roasted)meats. 40° This cleaning process allows to facilitate the removal of dirt of the walls of the oven by the generation of steam that is created inside the oven cavity for easier cleaning. ! Important! Before you start steam -cleaning: -Remove any food residue and grease from the bottom of the oven. - Remove any oven accessories (grids and drip pans).
GB 10.Now the door can be completely closed and the oven can be started for normal use.
GB 26
GB 27
Whirlpool EMEA S.p.A. Via Carlo Pisacane n.1 20016 Pero (MI), Italy VAT number: IT00693740425 www.indesit.