
Instruction for Use


6
GB
PLEASE PHONE US TO REGISTER YOUR APPLIANCE AND ACTIVATE YOUR 5 YEAR PARTS GUARANTEE ON 08448 24 24 24
* Varies by number and/or position, available only on certain
models.
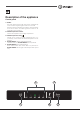
1. Insert the plug into the socket and make sure that the
TEMPERATURE indicator light illuminates. If the temperature
indicator light doesn’t illuminate, press the ON/OFF button.
2. Set the TEMPERATURE indicator lights to an average value .
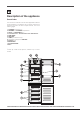
AIR *
It is recognizable due to the presence of the mechanism on the
top part of the refrigerator compartment (see diagram).
A
B
AIR maximises air circulation, improving the efficiency of the
evaporator and helping to achieve the optimal temperature inside
the refrigerator as quickly as possible each time it has been
opened. The blown air (A) is cooled when it comes into contact
with the cold wall, whereas the hotter air (B) is sucked up (see
diagram).
ACTIVE OXYGEN *
This device releases ozone molecules inside the refrigerator;
ozone is a natural substance which combats bacteria and
microorganisms, reducing their proliferation while limiting
unpleasant odours.
Automatically defines the amount of ozone required for prolonging
the freshness of foodstuffs, eliminating odours and preventing
bacteria build-up.
There may be a slight distinctive odour inside the refrigerator.
The very same smell can sometimes be detected during a storm,
due to the ozone produced as the charge in the lightning bolts
is released; this is completely normal. The amount produced by
the device is very small and abates quickly as the antibacterial
action takes place.
Device is activated pressing the dedicated switch located in right
side of the Oxigen device.
With the Active Oxigen switched on, the device will operate
a repeted cycle until the key is pressed again. There will be
an Ozone emission noticed by the switching on of the green
led located on the Active Oxigen device located in the fridge
compartment and a stand-by cicle (without zone emission) noticed
by blue light.
Using the refrigerator to its full potential
• Adjust the temperature using the display.
• Place only cold or lukewarm foods in the compartment, never
hot foods (see Precautions and tips).
• Remember that cooked foods do not last longer than raw foods.
• Do not store liquids in open containers: they will increase the level
of humidity in the refrigerator and cause condensation to form.
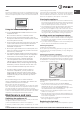
SHELVES: with or without grill.
Due to the special guides the shelves are removable and the
height is adjustable (see diagram), allowing easy storage of large
containers and food. Height can be adjusted without complete
removal of the shelf.
Food Care Zone *
Area dedicated to the storage of fresh food, such as meat and
fish. Thanks to the low temperature inside the compartment, the
Food Care Zone extends the period of time for which the food
can be stored, keeping it fresh for up to a week.
FOOD CARE ZONE 0°C / Safe Defrost*:
In the “FOOD CARE ZONE 0°C” compartment there are lower
temperatures than in the fridge. Temperatures can go below 0°C.
This compartment is the ideal spot to store meat and fish. You
can also store milk, dairy products, fresh pasta, cooked food or
leftovers.
This compartment is also suitable to defrost foods in a healthy
way, because the defrosting process at low temperatures inhibits
the micro organisms proliferation.
This compartment is not suitable for vegetables, salad and salads.
The 0°C can be obtained in normal conditions and when the
fridge compartment is set to 4° and the freezer is set to -18° C.
When you decrease the fridge temperature you also decrease
the temperature of the “FOOD CARE ZONE 0°C” compartment.
FRESH BOX *
This is the new container, designed to keep various foods (such
as cheese and cold meats) fresher for longer. If it is not needed, it
can easily be removed from the refrigerator compartment. If there
is a Bottle Shelf, more internal space can be created by placing
the Fresh Box directly inside it.
TEMPERATURE Indicator light
*: to identify the coldest area in
the refrigerator.
1. Check that OK appears clearly on the indicator light (see
diagram).
2. If the word “OK” does not appear it means that the temperature
is too high: adjust the REFRIGERATOR OPERATION knob to a
higher position (colder) and wait approximately 10 hours until
the temperature has been stabilised.
3. Check the indicator light again: if necessary, readjust it following
the initial process. If large quantities of food have been added
or if the refrigerator door has been opened frequently, it is
normal for the indicator not to show OK. Wait at least 10 hours
before adjusting the REFRIGERATOR OPERATION knob to a
higher setting.