Instruction manual TUMBLE DRYER Contents EN English, 1 NL Nederlands,13 ES Español,25 PT Português,37 EN Installation, 2-3 Where to install the tumble dryer Ventilation Electrical connections Levelling the tumble dryer Before you start your dryer Description of the tumble dryer, 4 Front side Rear side Control panel How to carry out a drying cycle, 5 Starting a drying programme Drying settings, 6 Drying times Drying programmes and options IDV 75 Laundry, 7 Sorting laundry Care labels Special item
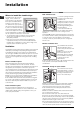
Installation Install the dryer far from gas ranges, stoves, radiators or hobs, as flames may damage it. If the dryer is installed below a worktop, ensure there are 10 mm between the upper panel of the dryer and any objects above it, and 15 mm between the sides 15 mm 15 mm of the machine and the walls or furniture units adjacent to it. This ensures adequate air circulation. Make sure the air inlets on the rear panel are not blocked or obstructed.
Electrical connections Before plugging the appliance into the socket, check the following: Make sure your hands are dry. The socket must have an earth connection. The socket must be able to withstand the machines maximum power output as indicated on the data plate (see Description of the tumble dryer). The power supply voltage must fall within the values indicated on the data plate (see Description of the tumble dryer). The socket must be compatible with the dryers plug.
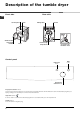
Description of the tumble dryer Front side Rear side EN Control panel Serial number and model number Drum Filter Rating Plate Air inlet Caution, high temperature Connection for ventilation hose Control panel High Heat button Start button Drying time selector knob Drying time selector knob This is used to set the drying time: turn the knob in a clockwise direction until the indicator is set to the desired drying time (see Drying settings). Do not attempt to turn the knob anticlockwise.
How to carry out a drying cycle Starting a drying programme EN 1. Plug the dryer into the power supply socket. 2. Select a suitable drying programme for the type of laundry (see Laundry). 3. Open the door, ensure that the filter is clean and securely placed. 4. Load the machine, making sure that no piece of laundry gets between the door and the door seal. Close the door. 5.
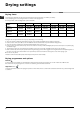
Drying settings Drying times EN The drying time depends on the size of the load and on the type of fabric it contains (see Table). The cold drying cycle runs during the final 10 minutes of the programme. For large loads, select the High Heat option if available.
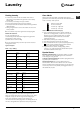
Laundry Sorting laundry Care labels Check the symbols on the care labels of the various garments to verify whether the garments can be safely tumble dried. Sort laundry according to the type of fabric. Empty all pockets and check for loose buttons. Close zips and hooks and fasten belts and strings without tightening them. Wring out garments to remove the maximum amount of water possible. Always check the care labels, especially when placing garments in the tumble dryer for the first time.
Warnings and suggestions This appliance was designed and manufactured in EN compliance with current international safety standards. The following information is provided for safety reasons and must be read carefully.
Care and maintenance Disconnecting the power supply Disconnect the dryer when not in use or during cleaning and maintenance operations. EN Cleaning the filter after each cycle The filter is a fundamental component of the dryer: its function is to collect lint and fluff that form during drying. Clean the filter once drying is completed, by rinsing it under running water or cleaning it with a vacuum cleaner.
Troubleshooting EN If you feel that the dryer is not working properly, consult the following troubleshooting suggestions before contacting the Technical Assistance Centre (see Assistance). Problem: Possible causes / Solutions: The dryer does not start. The plug has not been inserted far enough into the socket to make contact. There has been a power cut. The fuse has blown. Try connecting another appliance to the same socket.
Assistance Before contacting the Technical Assistance Centre: Follow the troubleshooting guide to check whether problems can be solved personally (see Troubleshooting). If not, switch the dryer off and contact the Technical Assistance Centre closest to you. Provide the following data when contacting the Technical Assistance Centre: Spare parts This dryer is a complex machine.
EN 12
Gebruiksaanwijzing WASDROGER Inhoudsopgave NL Nederlands NL Installatie, 14-15 Waar men de wasdroger moet installeren Ventilatie Electrische aansluiting Egalisatie/Nivellering van de droger Informatie vooraf Beschrijving van de wasdroger, 16 Voorkant Achterkant Bedieningspaneel Hoe men de machine laat drogen, 17 Start van een droogcyclus Drooginstellingen, 18 IDV 75 Droogtijden Programma's en droogopties De Was, 19 Sorteren van de was Wasetiketten Bijzondere kledingsstukken Droogtijden Waarschuw
Installatie Vlammen kunnen de wasdroger beschadigen, zet deze dus ver af van kookplaten, kachels, verwarmingen en dergelijke.Indien het toestel geïnstalleerd moet worden onder een bank, is het 15 mm 15 mm noodzakelijk om een ruimte van 10 mm vrij te laten tussen het bovenste paneel van het apparaat en andere voorwerpen hierboven, ook moet er 15 mm vrije ruimte zijn tussen de zijkanten van het apparaat en de wanden of meubels ernaast. Op deze manier is men er zeker van dat er voldoende luchtcirculatie is.
Als de droger niet waterpas staat, een stuk hout gebruiken om de droger te ondersteunen terwijl u de twee voorwieltjes naar boven of beneden afstelt totdat het apparaat waterpas staat. De door de droger uitgestoten lucht mag niet worden via hetzelfde kanaal worden afgevoerd dat de door andere apparaten die gas of andere brandstoffen verbranden uitgestoten rook afvoeren.
Beschrijving van de wasdroger Voorkant Achterkant NL Bedieningspaneel Serienummer en modelnummer Trommel Filter Werkingsprestaties Luchtaanvoer Let op: hoge temperatuur Aansluiting voor de luchtafvoerslang Bedieningspaneel Knoppen Hoge temperatuur Knop START Droogtijdenknop Droogtijdenknop Hiermee kan de droogtijd ingesteld worden: draai de knop met de klok mee totdat de wijzer de gewenste droogtijd aangeeft (zie Drooginstelling).
Hoe men de machine laat drogen Start van een droogcyclus NL 1. Steek de steker van de wasdroger in de contactdoos van de electrische voeding. 2. Kies op basis van het soort wasgoed een droogprogramma (zie Was). 3. Open het deurtje en controleer dat het filter schoon is en in de goede positie zit. 4. Doe de was in de machine en let erop dat er geen kleding tussen het deurtje en de betreffende afdichting blijft zitten. Sluit het deurtje. 5.
Drooginstellingen Droogtijden NL De te kiezen droogtijd hangt af van de lading en van het soort te drogen wasgoed (zie tabel). De laatste 10 minuten van het programma zijn voor de koude cyclus. Voor grote ladingen moet men de optie Hoge Temperatuur kiezen, indien beschikbaar.
De was Sorteren van de was Wasetiketten Controleer de symbolen op de etiketten van alle kledingstukken om te zien of ze met de trommel gedroogd mogen worden. Sorteer de was afhankelijk van het type weefsel. Haal alles uit de zakken en controleer de knopen. Sluit ritsen en haakjes, en maak riemen en lussen vast zonder ze aan te trekken. Wring de kledingstukken uit om zoveel mogelijk water eruit te verwijderen.
Waarschuwingen en raad ! Dit apparaat werd ontworpen en gerealiseerd volgens de NL internationale normen voor de veiligheid. Deze waarschuwingen worden gegeven voor uw veiligheid en moeten dus zorgvuldig worden opgevolgd.
Zorg en onderhoud Onderbreking van de electrische voeding NL ! Maak de wasdroger los van het net als deze niet werkt of als men bezig is met de reiniging of het onderhoud. Reiniging van het filter na elke cyclus Het filter is van fundamentele betekenis bij het drogen: het dient voor het verzamelen van de stof, dat zich vormt tijdens het drogen. Na afloop van de droging moet men het filter dus reinigen door het onder stromend water af te spoelen, of met een stofzuiger.
Problemen en oplossingen NL In het geval dat men de indruk heeft dat de wasdroger niet goed werkt, moet men, voordat men naar het servicecentrum belt, (zie Service) zorgvuldig de volgende hints raadplegen voor het zelf oplossen van problemen. Probleem: Waarschijnlijke oorzaken / oplossingen: De wasdroger start niet. De steker zit niet goed in de contactdoos en maakt geen contact. De spanning is uitgevallen. De zekering is doorgebrand.
Service Voordat men het servicecentrum belt: Reserveonderdelen Volg de leidraad voor het oplossen van de problemen om te kijken of men het zelf kan oplossen (zie Problemen en oplossingen). Anders moet men de wasdroger uitzetten en het dichtstbijzijnde servicecentrum bellen. Deze droger is een complexe machine.
NL 24
Manual de instrucciones SECADORA Índice ES Español ES Instalación, 26-27 Dónde instalar la secadora Aireación Conexión eléctrica Nivelación de la secadora Información preliminar Descripción de la secadora, 28 Parte delantera Parte trasera Panel de control Cómo realizar un secado, 29 Comienza un secado Programación del secado, 30 Tiempos de secado Programas y opciones de secado IDV 75 Ropa, 31 Subdivisión de la ropa Etiquetas de mantenimiento Prendas especiales Tiempos de secado Advertencias y suger
Instalación Dónde instalar la secadora Las llamas pueden averiar la secadora, por lo tanto, debe estar alejada de cocinas a gas, estufas, radiadores o encimeras. Si el electrodoméstico debe instalarse debajo de una encimera, es necesario dejar un espacio de 10 mm entre el 15 mm 15 mm panel superior del electrodoméstico y los otros objetos dispuestos encima de la misma, y un espacio de 15 mm entre los lados del electrodoméstico y las paredes o las decoraciones dispuestas al costado del mismo.
Conexión eléctrica Información preliminar Antes de introducir el enchufe en la toma eléctrica compruebe lo siguiente: Asegurarse que las manos estén secas. La toma debe poseer una conexión a tierra. La toma debe ser capaz de tolerar la potencia máxima prevista para la máquina, indicada en la placa de los datos de funcionamiento (ver Descripción de la secadora).
Descripción de la secadora Parte delantera Parte trasera ES Panel de control Número de serie y número de modelo Cesto Filtro Prestaciones de ejercicio Toma de aire Atención, temperatura alta Conexión para el tubo de aireación Panel de control Boton Temperatura Alta Botón START Mando de tiempos de secado Mando de tiempos de secado Permite programar el tiempo de secado: girar el mando en sentido horario hasta que el indicador marca el tiempo de secado deseado (ver Programación del secado).
Cómo realizar un secado Comienza un secado ES 1. Introduzca el enchufe de la secadora en la toma de alimentación eléctrica. 2. Seleccionar el secado en función del tipo de ropa (ver Ropa). 3. Abra la puerta y controle que el filtro esté limpio y en posición. 4. Cargue la máquina teniendo cuidado que ninguna prenda se interponga entre la puerta y la junta. Cierre la puerta. 5. Girar el Mando de tiempos de secado hasta que el indicador se posicione en el tiempo de secado adecuado al tipo de tejido a secar.
Programación del secado Tiempos de secado ES El tiempo de secado a seleccionar depende de la carga y del tejido a secar (ver la tabla). Los últimos 10 minutos del programa están dedicados al ciclo en frío. Para grandes cargas seleccione la opción Temperatura Alta (si está disponible).
Ropa Subdivisión de la ropa Etiquetas de mantenimiento Controle los símbolos de la etiqueta de las diferentes prendas para comprobar si las prendas pueden someterse a un secado en tambor. Divida la ropa a lavar en función del tipo de tejido. Vacíe los bolsillos y controle los botones. Cierre las cremalleras y los ganchos y ate los cintos y lazos sin ajustar. Estruje las prendas para eliminar la mayor cantidad de agua posible.
Advertencias y sugerencias ES ! Este electrodoméstico ha sido diseñado y fabricado respetando las normas internacionales sobre seguridad. Estas advertencias se suministran por motivos de seguridad y deben ser cumplidas atentamente.
Cuidados y mantenimiento Interrupción de la alimentación eléctrica ! Desconecte la secadora cuando no esté funcionando, del mismo modo durante las operaciones de limpieza y mantenimiento. Limpieza del filtro después de cada ciclo Limpieza de la secadora Las partes externas de metal o de plástico y las partes de goma pueden limpiarse con un paño húmedo. ! No use solventes ni elementos abrasivos.
Problemas y soluciones ES Cuando tenga la sensación de que la secadora no funciona de forma correcta, antes de llamar al Centro de asistencia técnica (ver Asistencia Técnica) consulte atentamente las siguientes sugerencias para la solución de los problemas. Problema: Causas probables/soluciones: La secadora no arranca. El enchufe no está conectado a la toma de corriente de la pared lo bastante profundo como para que haga contacto. Ha habido una interrupción de corriente. El fusible está quemado.
Asistencia Técnica Antes de llamar al Centro de asistencia técnica: Repuestos Consulte la guía para la solución de los problemas para ver si es posible solucionar la avería personalmente (ver Problemas y soluciones). De lo contrario, apague la secadora y llame al Centro de asistencia técnica más cercano. Esta secadora es una máquina compleja.
ES 36
Instruções para a utilização MÁQUINA DE SECAR ROUPA Índice PT Instalação, 38-39 PT Português Onde instalar a máquina de secar roupa Ventilação Ligação eléctrica Nivelamento da máquina de secar roupa Informações preliminares Descrição da máquina de secar roupa, 40 Lado anterior Lado posterior Painel de comandos Como efectuar uma secagem, 41 Iniciar uma secagem Configuração da secagem, 42 IDV 75 Tempos de secagem Programas e opções de secagem Roupa, 43 Triagem da roupa Etiquetas de manutenção Peças e
Instalação As chamas podem danificar a máquina de secar roupa, que deve pois ser instalada num local afastado de fogões a gás, aquecedores, radiadores ou placas de cozinha. Se o electrodoméstico for 15 mm 15 mm instalado sob uma banca, é necessário deixar um espaço de 10 mm entre o painel superior do electrodoméstico e outros objectos colocados sobre o mesmo, e um espaço de 15 mm entre os lados do electrodoméstico e as paredes ou os móveis vizinhos.
Ligação eléctrica Informações preliminares Antes de introduzir a ficha na tomada eléctrica, verifique o seguinte: Certifique-se de que tem as mãos secas. A tomada deve estar equipada com ligação à terra. A tomada deve ter capacidade para suportar a potência máxima prevista para a máquina, indicada na placa dos dados de exercício (consulte Descrição da máquina de secar roupa).
Descrição da máquina de secar roupa Lado anterior Lado posterior PT Painel de comandos Número de série e número do modelo Tambor Filtro Desempenho Atenção, alta temperatura Tomada de ar Ligação para o tubo de ventilação Painel de comandos Botão Alta Temperatura Botão START Selector dos tempos de secagem Selector dos tempos de secagem Consente programar o tempo de secagem: girar o selector na direcção horária até quando o indicador marcar o tempo de secagem desejado (veja Configuração da secag
Como efectuar uma secagem Iniciar uma secagem PT 1. Introduza a ficha da máquina de secar roupa na tomada de alimentação eléctrica. 2. Seleccione a secagem em função do tipo de roupa (consulte Roupa). 3. Abra a porta e certifique-se de que o filtro está limpo e em posição. 4. Carregue a máquina tendo o cuidado de não deixar nenhuma peça de roupa entre a porta e o respectivo vedante. Feche a porta. 5.
Configuração da secagem Tempos de secagem PT O tempo de secagem a ser seleccionado, depende da carga e do tecido a ser secado (consulte a tabela). Os últimos 10 minutos do programa são dedicados ao ciclo a frio. Para grandes cargas, seleccione a opção Alta Temperatura, se disponível.
Roupa Triagem da roupa Etiquetas de manutenção Verifique os símbolos que constam das etiquetas das diversas peças para se certificar de que podem ser submetidas a secagem em tambor. Efectue a triagem da roupa consoante o tipo de tecido. Esvazie os bolsos e verifique os botões. Feche os fechos de correr e outros fechos e ate os cintos e os laços sem apertar demasiado. Torça as peças de roupa para eliminar a maior quantidade de água possível.
Advertências e sugestões PT ! Este electrodoméstico foi concebido e fabricado em conformidade com as normas internacionais em matéria de segurança. Estas advertências são fornecidas por razões de segurança e devem ser observadas com atenção.
Cuidados e manutenção Interrupção da alimentação eléctrica PT ! Desligue a máquina de secar roupa quando não estiver a funcionar, bem como durante as operações de limpeza e de manutenção. Limpeza do filtro no fim de cada ciclo O filtro é um componente fundamental para a secagem: a sua função consiste em recolher os resíduos de lã e o cotão que se formam durante a secagem. No fim da secagem, limpe o filtro enxaguando-o com água corrente ou limpando-o com o aspirador.
Problemas e soluções PT Se lhe parecer que a máquina de secar roupa não está a funcionar correctamente, antes de contactar o Centro de Assistência (consulte Assistência), consulte atentamente as seguintes sugestões para a resolução dos problemas. Problema: Possíveis causas/ Soluções: A máquina de secar roupa não arranca. Os tempos de secagem são longos. A ficha não ficou bem encaixada na tomada eléctrica para que possa fazer contacto. Ocorreu um corte de corrente.
Assistência Antes de contactar o Centro de Assistência: Peças de reposição Siga o guia de resolução de problemas para tentar resolver a avaria pessoalmente (consulte Problemas e soluções). Caso contrário, desligue a máquina e contacte o Centro de Assistência mais próximo de si. Esta máquina de secar roupa é uma máquina complexa.
195077020.