Operating Instructions 50cm Free Standing Electric Cooker Contents GB English, 1 WARNING,2 Introduction, 3 Safety Information, 4 Installation, 5 Features ,6 Control Panel ,7 Use of hotplates ,8 Hotplates General Information Notes ,9 IT50C S IT50C1 S Choosing Your Utensils ,10 Grilling , 11 Grill Chart, 12 Conventional Oven, 13 Conventional Oven cooking charts Meat, 14 Conventional Oven cooking charts |Baking, 15 Using the Main Oven for Other Functions ,16 Care and Cleaning ,17 Cooking Results Not Satisf
WARNING WARNING: The appliance and its accessible parts become hot during use. The internal surfaces of the compartment (where present) may become hot. Care should be taken to avoid touching heating elements. Children less than 8 years of age shall be kept away unless continuously supervised. Never use steam cleaners or pressure cleaners on the appliance. Remove any liquid from the lid before opening it.
Introduction To help you make the best use of your cooker, PLEASE READ THIS BOOKLET CAREFULLY. Your new cooker is guaranteed and will give lasting service. The guarantee is only applicable if the cooker has been installed in accordance with the Installation Instructions. The cooker is designed specifically for domestic use and responsibility will not be accepted for use in any other installation. When first using the cooker ensure that the room is well ventilated (e.g.
For your Safety GB Please read the precautions below before using your cooker. ALWAYS . . . ALWAYS Remove all packing from inside the oven and grill compartments before switching on for the first time. ALWAYS Understand the controls prior to using the appliance. ALWAYS Keep children away from the appliance when grilling as the surfaces will get extremely hot during and after use. ALWAYS Turn controls off when you have finished cooking and when not in use.
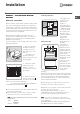
Installation WARNING – THIS APPLIANCE MUST BE EARTHED. Positioning the Cooker GB Electric cookers come without a power supply cable. The cooker is designed to operate on an electricity supply which conforms to the electrical data shown on the Rating Plate. The cooker can be connected to the mains only after removing the back panel of the cooker itself with a screwdriver. ! The following installation procedure must be carried out by a qualified electrician.
Features GB HOB VENTILATION SLOTS 1700W 1200W 1200W 1700W Hob Hot Indicators CONTROL PANEL GRILL/MEAT PAN WITH REMOVABLE HANDLE AND WIRE FOOD SUPPORT GRILL DOOR SWITCH GRILL MODEL & SERIAL NUMBER GRILL DOOR REMOVABLE INNER GLASS DOOR MAIN OVEN WIREWORK SHELF SUPPORTS OVEN ROD SHELVES 6
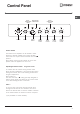
Control Panel GB GRILL MAIN OVEN INDICATOR INDICATOR LIGHT TIMER* GRILL MAIN OVEN LEFT FRONT PLATE PLATE INDICATOR LIGHT LEFT REAR PLATE RIGHT REAR PLATE RIGHT FRONT PLATE Control Knobs The knobs for the hotplates can be rotated in either direction to provide variable heat control, the Main Oven knob can only be rotated clockwise from the Off position. Note: Always ensure that all controls are in the OFF position, when the appliance is not in use.
Hotplate GB Use of Hotplates Ceramic Hob Note: Under no circumstances should the hob be used with aluminium foil in contact with the hob surface. The controls set the hotplates at six pre-set power levels. Each control can be used to select one of six temperature settings from a minimum at position 1 to a maximum at position 6. Do Not leave a hotplate switched on without a pan as this wastes energy and may shorten the life of the hotplate.
Hotplate Hotplates General Information Notes Do Not PANS SHOULD Do not cook directly on the hob surface without a cooking utensil, as this will result in damage to the surface of the hob. Not be concave (bowed in) Not be convex (bowed out) Not be rimmed THE BEST COMBINATIONS This table is a general guide to the types of pan suitable for different types of hobs and cookers. Remember pans should be good quality, with smooth, flat bases. For any further information refer to manufacturers’ instructions.
Hotplate GB Choosing Your Utensils Do not use utensils with rough bases. Do not use lightweight utensils with thin, distorted or uneven bases. Do not use lightweight enamelled steel utensils. Do not use cast iron utensils. Do not use utensils with recessed, scrolled or ridged bases. Do not use a utensil which has a base concavity greater than l mm as this will reduce the performance of the hob. Do not use a utensil with a convex base. Do not use glass ceramic utensils.
Grilling Grilling A switch operated by the door changes the heating element configuration between grill and oven operation. When the door is open, the top inner element is activated for intense downward heat; when the door is closed, the top outer and lower elements are activated to provide even oven heating. To operate the grill proceed as follows: Open the grill door. Pre-heat the grill on setting 6 for approximately 5 minutes (see chart on guide to grilling).
Grill Chart GB Pre - heat the grill for 5 minutes on maximum control setting before grilling GRILL CHART The settings in the above guide have been developed to cook food successfully without excessive fat spitting and splashing. 12 Food Grill Setting Approximate Cooking time Toasting of Bread products 6 3 - 10 mins. Small cuts of meat, sausages, bacon, etc. 5-6 15 - 20 mins. Chops etc. Gammon steaks Chicken pieces 5 20 - 25 mins. Wire food support used in upturned position for chicken.
Main Oven Oven Control Heating of the oven is achieved by turning control clockwise to the required temperature scale on the control panel, as recommended in the temperature charts. The indicator light will immediately come on and will then automatically go off and on during cooking as the oven thermostat maintains the correct temperature. The cooking charts provided in this book are a guide only, giving approximate cooking temperatures and times.
Conventional Oven - Cooking Chart MEAT Note: Where times are stated, they are approximate only. GB Conventional Oven Meat Preheat Temperature °C Time (approx.) Beef Yes 190/200 25-30 mins per 450g (1lb) + 25 mins over. Lamb Yes 190/200 25-30 mins per 450g (1lb) + 25 mins over. Pork Yes 190/200 30-35 mins per 450g (1lb) + 30 mins over. Veal Yes 190/200 25-35 mins per 450g (1lb) + 30 mins over. Poultry/Game up to 4kg (8lb) Yes 180/190 18-20 mins per 450g (1lb) + 20 mins over.
Cooking Chart- Baking GB Conventional Oven Cooking Food Preheat Temperature and Time Position in Oven from bottom Scones Yes 210/220°C approx. 10-15 mins. Runners 1 & 3 Small Cakes Yes 180/190°C approx. 30-35 mins. Runners 1 & 3 Victoria Sandwich Yes 170/180°C 6˝ "-7" tins approx. 20 mins. 8"-8˝ " tins approx. 30 mins. Runners 1 & 3 Sponge Sandwich (Fatless) Yes 190/200°C 7" tins 15-20 mins. Runners 1 & 3 Swiss Roll Yes 200/210°C approx. 10-15 mins.
Using the Main Oven for Other Functions GB ‘S’ SLOW Setting Points to consider when preparing food for “SLOW” cooking: This is used for slow cooking, keeping food warm and warming plates for short periods. Extra care should be taken when warming bone china, as it may be damaged in a hot oven. DO NOT place food or plates directly on the oven floor as this could damage both the oven lining and the plates which are being warmed.
Care and Cleaning Ceramic hob To reduce the amount of cleaning always ensure that the hob and cooking utensils are clean and dry before use. Regular use of cleaner conditioner is recommended for proper care and protection of the hob surface. Apply conditioner before using the hob for the first time. It contains a mild cleaning agent, so that subsequent applications may clean off soil and apply a protective film at the same time.
Cooking Results Not Satisfactory? GB Problem Check Grilling Uneven cooking front to back Ensure that the grill pan is positioned centrally below the grill element. Fat splattering Oven Baking Uneven rising of cake Sinking of cakes Over/Under cooking Fast/Slow cooking 18 Ensure that the grill is not set to too high a temperature. Ensure that the oven shelves are level by using a spirit level on the rod shelf and adjusting, using suitable packing e.g. wood, under the feet of the appliance.
Something Wrong with your Cooker GB Before contacting your nearest Service Centre/Installer, check the problem guide below; there may be nothing wrong with your cooker. Problem Slight odour or small amount of smoke when using the cooker for the first time. This is normal and should cease after a short period. Nothing Works Is the main cooker wall switch turned on? There may be no electricity supply. Oven temperature seems too high or too low.
If it Still Won't Work GB Contact the Service Office If something is still wrong with your appliance after you have been through the 'Something Wrong' list: 1. Switch off and unplug the appliance from the mains. 2. Call your nearest Service Office or local importer. When you contact us we will want to know the following: 1. 2. 3. 4. Your name, address and postcode. Your telephone number. Clear and concise details of the fault. The Model number and the Serial number of your appliance. 5.
Guarantee 12 months Parts and Labour Guarantee GB Your appliance has the benefit of our manufacturer's guarantee, which covers the cost of breakdown repairs for twelve months from the date of purchase. This gives you the reassurance that if, within that time, your appliance is proven to be defective because of either workmanship or materials, we will, at our discretion, either repair or replace the appliance at no cost to you.
After Sales Service GB No one is better placed to care for your Indesit appliance during the course of its working life than us - the manufacturer. Essential Contact Information Indesit Service We are the largest service team in the country offering you access to 400 skilled telephone advisors and 1100 fully qualified engineers on call to ensure you receive fast, reliable, local service. UK: 08448 224 224 Republic of Ireland: 0818 313 413 www.indesitservice.co.
GB 23
04/2014 - 195121989.00 XEROX FABRIANO GB Indesit Company S.P.A. Viale Aristide Merloni,47 60044 Fabriano (AN) www.indesit.