Instructions for use WASHING MACHINE Contents GB Installation, 2-3 GB English,1 PT Português,37 ES Español,13 PL Polski,25 Unpacking and levelling Connecting the electricity and water supplies The first wash cycle Technical data Description of the washing machine and starting a wash cycle, 4-5 Control panel Indicator lights Starting a wash cycle Wash cycles, 6 Table of wash cycles Personalisation, 7 IWC 6105 Setting the temperature Setting the spin speed Functions Detergents and laundry, 8 Deter
Installation GB This instruction manual should be kept in a safe place for future reference. If the washing machine is sold, transferred or moved, make sure that the instruction manual remains with the machine so that the new owner is able to familiarise himself/herself with its operation and features. Levelling the machine correctly will provide it with stability, help to avoid vibrations and excessive noise and prevent it from shifting while it is operating.
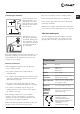
Do not use extension cords or multiple sockets. Connecting the drain hose 65 - 100 cm Connect the drain hose, without bending it, to a drainage duct or a wall drain located at a height between 65 and 100 cm from the floor; GB The cable should not be bent or compressed. The power supply cable must only be replaced by authorised technicians. Warning! The company shall not be held responsible in the event that these regulations are not respected.
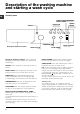
Description of the washing machine and starting a wash cycle GB Control panel WASH CYCLE PROGRESS/ DELAY TIMER indicator lights FUNCTION ON/OFF button buttons with indicator lights TEMPERATURE Detergent dispenser drawer knob Detergent dispenser drawer: used to dispense detergents and washing additives (see Detergents and laundry). ON/OFF button: switches the washing machine on and off. WASH CYCLE knob: programmes the wash cycles. During the wash cycle, the knob does not move.
Indicator lights The indicator lights provide important information. This is what they can tell you: Delayed start If the DELAY TIMER function has been activated (see Personalisation), after the wash cycle has been started the indicator light corresponding to the selected delay period will begin to flash: Wash cycle phase indicator lights Once the desired wash cycle has been selected and has begun, the indicator lights switch on one by one to indicate which phase of the cycle is currently in progress.
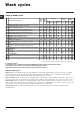
Wash cycles Table of wash cycles Wash cycles GB Description of the wash cycle Max. load Cycle Detergents Max. Max. (kg) duration temp.
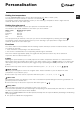
Personalisation Setting the temperature GB Turn the TEMPERATURE knob to set the wash temperature (see Table of wash cycles). The temperature may be lowered, or even set to a cold wash . The washing machine will automatically prevent you from selecting a temperature which is higher than the maximum value set for each wash cycle. Setting the spin speed Turn the SPIN SPEED knob to set the spin speed for the selected wash cycle.
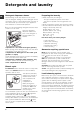
Detergents and laundry GB Detergent dispenser drawer Preparing the laundry Good washing results also depend on the correct dose of detergent: adding too much detergent will not necessarily result in a more efficient wash, and may in fact cause build up on the inside of your appliance and contribute to environmental pollution. Divide the laundry according to: - the type of fabric/the symbol on the label - the colours: separate coloured garments from whites.
Precautions and tips This washing machine was designed and constructed in accordance with international safety regulations. The following information is provided for safety reasons and must therefore be read carefully. Consumers should contact their local authority or retailer for information concerning the correct disposal of their old appliance.
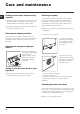
Care and maintenance GB Cutting off the water and electricity supplies Turn off the water tap after every wash cycle. This will limit wear on the hydraulic system inside the washing machine and help to prevent leaks. Unplug the washing machine when cleaning it and during all maintenance work. Cleaning the washing machine The outer parts and rubber components of the appliance can be cleaned using a soft cloth soaked in lukewarm soapy water. Do not use solvents or abrasives.
Troubleshooting Your washing machine could fail to work. Before contacting the Technical Assistance Centre (see Assistance), make sure that the problem cannot be not solved easily using the following list. GB Problem: Possible causes / Solutions: The washing machine does not switch on. The appliance is not plugged into the socket fully, or is not making contact. There is no power in the house. The wash cycle does not start. The washing machine door is not closed properly.
Service Before calling for Assistance: Check whether you can solve the problem alone (see Troubleshooting); Restart the programme to check whether the problem has been solved; If this is not the case, contact an authorised Technical Assistance Centre using the telephone number provided on the guarantee certificate. GB Always request the assistance of authorised technicians. Have the following information to hand: the type of problem; the appliance model (Mod.); the serial number (S/N).
Manual de instrucciones LAVADORA Sumario ES Español ES Instalación, 14-15 Desembalaje y nivelación Conexiones hidráulicas y eléctricas Primer ciclo de lavado Datos técnicos Descripción de la lavadora y comienzo de un programa, 16-17 Panel de control Pilotos Poner en marcha un programa Programas, 18 Tabla de programas Personalizaciones, 19 IWC 6105 Seleccionar la temperatura Seleccionar el centrifugado Funciones Detergentes y ropa, 20 Contenedor de detergentes Ciclo de blanqueo Preparar la ropa Pre
Instalación ES Es importante conservar este manual para poder consultarlo en cualquier momento. En caso de venta, de cesión o de traslado, verifique que permanezca junto con la lavadora para informar al nuevo propietario sobre el funcionamiento y brindar las correspondientes advertencias. Una cuidadosa nivelación brinda estabilidad a la máquina y evita vibraciones, ruidos y desplazamientos durante el funcionamiento.
Conexión del tubo de descarga 65 - 100 cm Conecte el tubo de descarga, sin plegarlo, a una tubería de descarga o a una descarga de pared colocadas a una altura del piso entre 65 y 100 cm; o apóyelo en el borde de un lavamanos o de una bañera, uniendo la guía suministrada con el aparato, al grifo (ver la figura). El extremo libre del tubo de descarga no debe permanecer sumergido en el agua.
Descripción de la lavadora y comienzo de un programa ES Panel de control Pilotos DE AVANCE DEL CICLO/COMIENZO RETRASADO Botón de ENCENDIDO/ APAGADO Botones con pilotos FUNCIÓN Mando de Mando de PROGRAMAS PUESTA EN MARCHA/ PAUSA Piloto PUERTA BLOQUEADA TEMPERATURA Contenedor de detergentes Botón con piloto Mando de CENTRIFUGADO Contenedor de detergentes: para cargar detergentes y aditivos (ver Detergentes y ropa).
Pilotos Los pilotos suministran información importante.
Programas Tabla de programas Programas ES Descripción del Programa 1 2 2 2 3 4 5 6 Prelavado Algodón: blancos sumamente sucios. Algodón: blancos sumamente sucios. Algodón (1): blancos y colores resistentes muy sucios. Algodón (2): blancos y colores delicados muy sucios. Algodón: blancos sumamente sucios. Algodón de color (3): blancos poco sucios y colores delicados. Sintético: colores resistentes muy sucios. Sintético: colores delicados poco sucios. Carga máx. Duración Detergentes Temp. Velocid(Kg.
Personalizaciones Seleccionar la temperatura ES Girando el mando de la TEMPERATURA se selecciona la temperatura de lavado (ver la Tabla de programas). La temperatura se puede disminuir hasta el lavado en frío ( ). La máquina impedirá automáticamente seleccionar una temperatura mayor que la máxima prevista para cada programa. Seleccionar el centrifugado Girando el mando de CENTRIFUGADO se selecciona la velocidad de centrifugado del programa seleccionado.
Detergentes y ropa ES Contenedor de detergentes Preparar la ropa El buen resultado del lavado depende también de la correcta dosificación del detergente: si se excede la cantidad, no se lava de manera más eficaz, sino que se contribuye a encostrar las partes internas de la lavadora y a contaminar el medio ambiente. Subdivida la ropa según: - el tipo de tejido / el símbolo en la etiqueta. - los colores: separe las prendas de color y las blancas. Vacíe los bolsillos y controle los botones.
Precauciones y consejos La lavadora fue proyectada y fabricada en conformidad con las normas internacionales de seguridad. Estas advertencias se suministran por razones de seguridad y deben ser leídas atentamente.
Mantenimiento y cuidados ES Interrumpir el agua y la corriente eléctrica Limpiar la bomba Cierre el grifo de agua después de cada lavado. De este modo se limita el desgaste de la instalación hidráulica de la lavadora y se elimina el peligro de pérdidas. La lavadora posee una bomba autolimpiante que no necesita mantenimiento. Pero puede suceder que objetos pequeños (monedas, botones) caigan en la precámara que protege la bomba, situada en la parte inferior de la misma.
Anomalías y soluciones Puede suceder que la lavadora no funcione. Antes de llamar al Servicio de Asistencia Técnica (ver Asistencia),controle que no se trate de un problema de fácil solución utilizando la siguiente lista. ES Anomalías: Posibles causas / Solución: La lavadora no se enciende. El enchufe no está introducido en la toma de corriente, o no hace contacto. En la casa no hay corriente. El ciclo de lavado no comienza. La puerta no está correctamente cerrada.
Asistencia Antes de llamar al Servicio de Asistencia Técnica: Verifique si la anomalía la puede resolver Ud. solo (ver Anomalías y soluciones); Vuelva a poner en marcha el programa para controlar si el inconveniente fue resuelto; Si no es así, llame al Servicio de Asistencia técnica autorizado, al número de teléfono indicado en el certificado de garantía. ES No recurra nunca a técnicos no autorizados. Comunique: el tipo de anomalía; el modelo de la máquina (Mod.
Instrukcja obs³ugi PRALKA Spis treci PL Polski PL Instalacja, 26-27 Rozpakowanie i wypoziomowanie Pod³¹czenia hydrauliczne i elektryczne Pierwszy cykl prania Dane techniczne Opis pralki i uruchamianie programu, 28-29 Panel sterowania Kontrolki Uruchamianie programu Programy, 30 Tabela programów Personalizacja, 31 IWC 6105 Ustawianie temperatury Ustawianie wirowania Funkcje rodki pior¹ce i bielizna, 32 Szufladka na rodki pior¹ce Cykl wybielania Przygotowanie bielizny Tkaniny wymagaj¹ce szczegól
Instalacja PL Nale¿y zachowaæ niniejsz¹ ksi¹¿eczkê, aby móc z niej skorzystaæ w ka¿dej chwili. W przypadku sprzeda¿y, odst¹pienia lub przeniesienia pralki w inne miejsce nale¿y zadbaæ o przekazanie instrukcji wraz z maszyn¹, aby nowy w³aciciel móg³ zapoznaæ siê z dzia³aniem urz¹dzenia i z dotycz¹cymi go ostrze¿eniami. Nale¿y uwa¿nie przeczytaæ instrukcjê obs³ugi: zawiera ona wa¿ne informacje dotycz¹ce instalacji oraz w³aciwego i bezpiecznego u¿ytkowania pralki.
Pod³¹czenie przewodu odp³ywowego 65 - 100 cm Pod³¹czyæ przewód odp³ywowy, nie zginaj¹c go, do rury ciekowej lub do otworu odp³ywowego w cianie, które powinny znajdowaæ siê na wysokoci od 65 do 100 cm od pod³ogi; ewentualnie oprzeæ go na brzegu zlewu lub wanny, przymocowuj¹c do kranu prowadnik, znajduj¹cy siê w wyposa¿eniu (patrz rysunek). Wolny koniec przewodu odp³ywowego nie powinien byæ zanurzony w wodzie. Nie u¿ywaæ przed³u¿aczy ani rozga³êników.
Opis pralki i uruchamianie programu PL Panel sterowania Kontrolki STANU ZAAWANSOWANIA CYKLU/TIMER OPÓNIENIA Przyciski z kontrolkami FUNKCJI Przycisk W£¥CZANIA/ WY£¥CZANIA Szufladka na rodki pior¹ce Pokrêt³o TEMPERATURY Pokrêt³o PROGRAMÓW Pokrêt³o WIROWANIA Przycisk z kontrolk¹ START/PAUZA Kontrolka BLOKADY OKR¥G£YCH DRZWICZEK Szufladka na rodki pior¹ce: do dozowania rodków pior¹cych i dodatków (patrz rodki pior¹ce i bielizna).
Kontrolki Pranie Kontrolki dostarczaj¹ wa¿nych informacji. Oto co sygnalizuj¹: P³ukanie Timer opónienia Jeli zosta³a w³¹czona funkcja Timer opónienia (patrz Personalizacja), po uruchomieniu programu zacznie pulsowaæ kontrolka wybranegoopónienia: Wydalanie wody Stopniowo wskazywany bêdzie, poprzez pulsowanie odpowiedniej kontrolki, czas pozostaj¹cy do rozpoczêcia cyklu prania. Po up³ywie wybranego czasu opónienia rozpocznie siê ustawiony program.
Programy Tabela programów Programy PL 1 2 2 2 3 4 5 6 Opis programu Programy codzienne (Daily) BAWELNA PRANIE WSTEPNE: bielizna biala £ ³ silnie zabrudzona. BAWELNA: bielizna biala £ ³ silnie zabrudzona. BAWELNA (1): tkaniny biale ³ i kolorowe, wytrzymale, ³ £ mocno zabrudzone. BAWELNA (2): tkaniny biale £ ³ i kolorowe, delikatne, mocno zabrudzone. BAWELNA: mocno tkaniny biale £ ³ ³ i kolorowe, wytrzymale, zabrudzone. BAWELNA KOLOROWE (3): tkaniny biale ³ lekko £ zabrudzone i delikatne kolorowe.
Personalizacja Ustawianie temperatury Obracaj¹c pokrêt³em TEMPERATURA ustawia siê temperaturê prania (patrz Tabela programów). Temperaturê mo¿na zmniejszaæ, a¿ do prania w zimnej wodzie . Pralka automatycznie uniemo¿liwi ustawienie temperatury wy¿szej od maksymalnej temperatury przewidzianej dla danego programu. Ustawianie wirowania Obracaj¹c pokrêt³em WIROWANIE ustawia siê prêdkoæ wirowania dla wybranego programu.
rodki pior¹ce i bielizna PL Szufladka na rodki pior¹ce Dobry rezultat prania zale¿y równie¿ od prawid³owego dozowania rodka pior¹cego: u¿ycie jego nadmiernej iloci nie poprawia skutecznoci prania, lecz przyczynia siê do powstawania nalotów na wewnêtrznych czêciach pralki i do zanieczyszczania rodowiska. Nie stosowaæ rodków do prania rêcznego, poniewa¿ tworz¹ one za du¿o piany. 4 1 2 Wysun¹æ szufladkê i umieciæ w niej rodek pior¹cy lub dodatkowy w nastêpuj¹cy sposób.
Zalecenia i rodki ostro¿noci Pralka zosta³a zaprojektowana i wyprodukowana zgodnie z miêdzynarodowymi normami bezpieczeñstwa. Niniejsze ostrze¿enia zosta³y tu zamieszczone ze wzglêdów bezpieczeñstwa i nale¿y je uwa¿nie przeczytaæ. Konsumenci powinni kontaktowaæ siê z w³adzami lokalnymi lub sprzedawc¹ w celu uzyskania informacji dotycz¹cych postêpowania z ich zu¿ytymi urz¹dzeniami gospodarstwa domowego.
Utrzymanie i konserwacja PL Od³¹czenie wody i pr¹du elektrycznego Zamkn¹æ kurek dop³ywu wody po ka¿dym praniu. W ten sposób zmniejsza siê zu¿ycie instalacji hydraulicznej pralki oraz eliminuje siê niebezpieczeñstwo wycieków. Przed przyst¹pieniem do czyszczenia pralki oraz do czynnoci konserwacyjnych wyj¹æ wtyczkê z gniazdka. Czyszczenie pompy Pralka wyposa¿ona jest w pompê samoczyszcz¹c¹, która nie wymaga zabiegów konserwacyjnych.
Nieprawid³owoci w dzia³aniu i sposoby ich usuwania Mo¿e siê zdarzyæ, ¿e pralka nie dzia³a. Przed wezwaniem Serwisu Technicznego (patrz Serwis Techniczny) nale¿y sprawdziæ, czy problemu nie da siê ³atwo rozwi¹zaæ przy pomocy poni¿szego wykazu. PL Nieprawid³owoci w dzia³aniu: Mo¿liwe przyczyny / Rozwi¹zania: Pralka nie w³¹cza siê. Wtyczka nie jest w³¹czona do gniazdka lub jest wsuniêta za s³abo, tak ¿e nie ma styku. W domu nast¹pi³a przerwa w dostawie pr¹du. Cykl prania nie rozpoczyna siê.
Serwis Techniczny Przed skontaktowaniem siê z Serwisem Technicznym: Sprawdziæ, czy problemu nie mo¿na rozwi¹zaæ samodzielnie (patrz Nieprawid³owoci w dzia³aniu i sposoby ich usuwania); Ponownie uruchomiæ program i sprawdziæ, czy problem nie znikn¹³; Jeli nie, zwróciæ siê do autoryzowanego Serwisu Technicznego, dzwoni¹c pod numer podany w karcie gwarancyjnej. PL Nigdy nie wzywaæ nieautoryzowanych techników. Nale¿y podaæ: rodzaj nieprawid³owoci; model maszyny (Mod.); numer seryjny (S/N).
Instruções para utilização MÁQUINA DE LAVAR ROUPA Sumário PT Português PT Instalação, 38-39 Desembalar e nivelar Ligações hidráulicas e eléctricas Primeiro ciclo de lavagem Dados técnicos Descrição da máquina de lavar roupa e como iniciar um programa, 40-41 Painel de comandos Indicadores luminosos Iniciar um programa Programas, 42 Tabela dos programas Personalizações, 43 IWC 6105 Seleccione a temperatura Seleccione a centrifugação Funções Detergentes e roupa, 44 Gaveta dos detergentes Ciclo para
Instalação PT É importante guardar este manual para poder consultá-lo a qualquer momento. Se a máquina for vendida, cedida ou transferida, certifique-se que este manual permaneça com a máquina para informar o novo proprietário acerca do seu funcionamento e das respectivas advertências. Um cuidadoso nivelamento dá estabilidade à máquina e evita vibrações, ruídos e deslocamentos durante o funcionamento.
Ligação do tubo de descarga 65 - 100 cm Ligue o tubo de descarga, sem dobrá-lo, a um conduto de descarga ou a uma descarga de parede colocados entre 65 e 100 cm do chão; Não empregue extensões nem fichas múltiplas. PT O cabo não deve ser dobrado nem apertado. O cabo de alimentação deve ser substituído somente por técnicos autorizados. Atenção! O fabricante declina toda a responsabilidade se estas regras não forem respeitadas.
Descrição da máquina de lavar roupa e como iniciar um programa PT Painel de comandos Indicadores LUMINOSOS DE AVANÇO DO CICLO/ INÍCIO POSTERIOR Tecla de LIGA/ DESLIGA Teclas com indicadores luminosos de FUNÇÕES Selector da Gaveta dos detergentes PROGRAMAS Gaveta dos detergentes: para colocar detergentes e aditivos (veja Detergentes e roupa). Tecla de LIGA/DESLIGA: para ligar e desligar a máquina de lavar roupa. Selector de PROGRAMAS: para programar os programas.
Indicadores luminosos Os indicadores luminosos fornecem informações importantes. Vejamos o que significam: Início posterior Se tiver sido activada a função Início posterior (veja Personalizações) depois de ter iniciado o programa, começará a lampejar o indicador luminoso relativo ao atraso seleccionado.
Programas Tabela dos programas Programas PT Descrição do Programa Velocità Detergentes Temp. max. max. (rotações PréLava(°C) por lavagLixívia gem minuto) em Carga max. (Kg) Amaciador Duração ciclo Nor- Eco Nor- Eco mal Time mal Time Quotidiano 1 2 2 2 3 4 5 6 Algodão Pré-lavagem 90°C: peças brancas extremamente sujas. Algodão: brancos e coloridos resistentes muito sujos. Algodão (1): brancos e coloridos resistentes muito sujos. Algodão (2): brancos e coloridos delicados muito sujos.
Personalizações Seleccione a temperatura Gire o selector da TEMPERATURA para seleccionar a temperatura de lavagem (veja a Tabela dos programas). A temperatura pode ser diminuída até a lavagem a frio ( ). A máquina impedirá automaticamente a configuração de uma temperatura superior à máxima prevista para cada um dos programas. Seleccione a centrifugação Gire o selector da CENTRIFUGAÇÃO para seleccionar a velocidade de centrifugação do programa seleccionado.
Detergentes e roupa PT Gaveta dos detergentes Preparar a roupa O bom resultado da lavagem depende também do emprego da dose certa de detergente: com excessos não se lava de maneira mais eficaz, mas contribui-se para formar crostas nas peças internas da máquina de lavar roupa e poluir o meio ambiente. Divida a roupa em função: - do tipo de tecido / do símbolo na etiqueta. - das cores: separe as peças coloridas das brancas. Esvazie as algibeiras e verifique se há botões soltos.
Precauções e conselhos Esta máquina de lavar roupa foi projectada e fabricada em conformidade com os regulamentos internacionais de segurança. Estas advertências são fornecidas por razões de segurança e devem ser lidas com atenção.
Manutenção e cuidados PT Interromper a alimentação de água e de corrente eléctrica Feche a torneira da água depois de cada lavagem. Desta maneira diminuiu-se o desgaste do sistema hidráulico da máquina de lavar roupa e elimina-se o risco de inundação. Limpar a bomba Esta máquina de lavar roupa é equipada com uma bomba com limpeza automática que não precisa de operações de manutenção.
Anomalias e soluções Pode acontecer que a máquina de lavar roupa não funcione. Antes de telefonar para a Assistência Técnica (veja Assistência), verifique se não se trata de um problema fácil de resolver com ajuda da seguinte lista. PT Anomalias: Possíveis causas / Solução: A máquina de lavar roupa não liga. A ficha não está colocada na tomada eléctrica, ou não o suficiente para haver contacto. Em casa não há corrente. O ciclo de lavagem não inicia.
Assistência 195073446.04 07/2009 - Xerox Fabriano Antes de contactar a Assistência Técnica: Verifique se consegue resolver a anomalia sozinho (veja Anomalias e soluções); Reinicie o programa para verificar se o inconveniente foi resolvido; Em caso negativo, contacte a o Centro de Assistência técnica autorizada no número de telefone indicado no certificado de garantia. PT Nunca recorra a técnicos não autorizados. Comunique: o tipo de anomalia; o modelo da máquina (Mod.