Instructions for use WASHING MACHINE Contents GB English,1 F Français,13 NL Nederlands,25 GB Installation, 2-3 Unpacking and levelling Connecting the electricity and water supplies The first wash cycle Technical data Description of the washing machine and starting a wash cycle, 4-5 Control panel Indicator lights Starting a wash cycle Wash cycles, 6 Table of wash cycles Personalisation, 7 IWC 6165 Setting the temperature Setting the spin speed Functions Detergents and laundry, 8 Detergent dispense
Installation GB This instruction manual should be kept in a safe place for future reference. If the washing machine is sold, transferred or moved, make sure that the instruction manual remains with the machine so that the new owner is able to familiarise himself/herself with its operation and features. Levelling the machine correctly will provide it with stability, help to avoid vibrations and excessive noise and prevent it from shifting while it is operating.
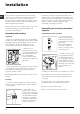
Do not use extension cords or multiple sockets. Connecting the drain hose 65 - 100 cm Connect the drain hose, without bending it, to a drainage duct or a wall drain located at a height between 65 and 100 cm from the floor; GB The cable should not be bent or compressed. The power supply cable must only be replaced by authorised technicians. Warning! The company shall not be held responsible in the event that these regulations are not respected.
Description of the washing machine and starting a wash cycle GB Control panel WASH CYCLE PROGRESS/ DELAY TIMER indicator lights FUNCTION ON/OFF button buttons with indicator lights TEMPERATURE Detergent dispenser drawer knob Detergent dispenser drawer: used to dispense detergents and washing additives (see Detergents and laundry). ON/OFF button: switches the washing machine on and off. WASH CYCLE knob: programmes the wash cycles. During the wash cycle, the knob does not move.
Indicator lights The indicator lights provide important information. This is what they can tell you: Delayed start If the DELAY TIMER function has been activated (see Personalisation), after the wash cycle has been started the indicator light corresponding to the selected delay period will begin to flash: Wash cycle phase indicator lights Once the desired wash cycle has been selected and has begun, the indicator lights switch on one by one to indicate which phase of the cycle is currently in progress.
Wash cycles Table of wash cycles Wash cycles GB Description of the wash cycle Max. load Cycle Detergents Max. Max. (kg) duration temp.
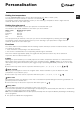
Personalisation Setting the temperature GB Turn the TEMPERATURE knob to set the wash temperature (see Table of wash cycles). The temperature may be lowered, or even set to a cold wash . The washing machine will automatically prevent you from selecting a temperature which is higher than the maximum value set for each wash cycle. Setting the spin speed Turn the SPIN SPEED knob to set the spin speed for the selected wash cycle.
Detergents and laundry GB Detergent dispenser drawer Preparing the laundry Good washing results also depend on the correct dose of detergent: adding too much detergent will not necessarily result in a more efficient wash, and may in fact cause build up on the inside of your appliance and contribute to environmental pollution. Divide the laundry according to: - the type of fabric/the symbol on the label - the colours: separate coloured garments from whites.
Precautions and tips This washing machine was designed and constructed in accordance with international safety regulations. The following information is provided for safety reasons and must therefore be read carefully. Opening the porthole door manually General safety This appliance was designed for domestic use only. The washing machine must only be used by adults, in accordance with the instructions provided in this manual.
Care and maintenance GB Cutting off the water and electricity supplies Turn off the water tap after every wash cycle. This will limit wear on the hydraulic system inside the washing machine and help to prevent leaks. Unplug the washing machine when cleaning it and during all maintenance work. Cleaning the washing machine The outer parts and rubber components of the appliance can be cleaned using a soft cloth soaked in lukewarm soapy water. Do not use solvents or abrasives.
Troubleshooting Your washing machine could fail to work. Before contacting the Technical Assistance Centre (see Assistance), make sure that the problem cannot be not solved easily using the following list. GB Problem: Possible causes / Solutions: The washing machine does not switch on. The appliance is not plugged into the socket fully, or is not making contact. There is no power in the house. The wash cycle does not start. The washing machine door is not closed properly.
Service Before calling for Assistance: Check whether you can solve the problem alone (see Troubleshooting); Restart the programme to check whether the problem has been solved; If this is not the case, contact an authorised Technical Assistance Centre using the telephone number provided on the guarantee certificate. GB Always request the assistance of authorised technicians. Have the following information to hand: the type of problem; the appliance model (Mod.); the serial number (S/N).
Mode demploi LAVE-LINGE Sommaire FR Français FR Installation, 14-15 Déballage et mise à niveau Raccordements eau et électricité Premier cycle de lavage Caractéristiques techniques Description du lave-linge et démarrage dun programme, 16-17 Bandeau de commandes Voyants Démarrage dun programme Programmes, 18 Tableau des programmes Personnalisations, 19 IWC 6165 Sélection de la température Sélection de lessorage Fonctions Produits lessiviels et linge, 20 Tiroir à produits lessiviels Cycle blanchi
Installation FR Conserver ce mode demploi pour pouvoir le consulter à tout moment. En cas de vente, de cession ou de déménagement, veiller à ce quil suive toujours le lave-linge pour que son nouveau propriétaire soit informé sur son mode de fonctionnement et puisse profiter des conseils correspondants. Une bonne mise à niveau garantit la stabilité de lappareil et évite quil y ait des vibrations, du bruit et des déplacements en cours de fonctionnement.
Raccordement du tuyau de vidange 65 - 100 cm Raccorder le tuyau dévacuation, sans le plier, à un conduit dévacuation ou à une évacuation murale placés à une distance du sol comprise entre 65 et 100 cm; Nutiliser ni rallonges ni prises multiples. FR Le câble ne doit être ni plié ni trop écrasé. Le câble dalimentation ne doit être remplacé que par des techniciens agréés. Attention! Nous déclinons toute responsabilité en cas de non-respect des normes énumérées ci-dessus.
Description du lave-linge et démarrage dun programme FR Bandeau de commandes Voyants DÉROULEMENT CYCLE/DÉPART DIFFÉRÉ Touche MARCHE/ ARRÊT Voyant Bouton Bouton PROGRAMMES Tiroir à produits lessiviels: pour charger les produits lessiviels et les additifs (voir Produits lessiviels et linge). Touche MARCHE/ARRÊT: pour allumer ou éteindre le lave-linge. Bouton PROGRAMMES: pour sélectionner les programmes. Pendant le programme, le bouton ne tournera pas.
Voyants Lavage Les voyants fournissent des informations importantes. Voilà ce quils signalent: Rinçage Départ différé Si la fonction Départ différé a été activée (voir Personnalisations), le voyant correspondant au temps sélectionné se mettra à clignoter, après avoir lancé le programme: Vidange Au fur et à mesure que le temps passe, le temps restant est affiché avec clignotement du voyant correspondant. Quand le retard sélectionné touche à sa fin le programme sélectionné démarre.
Programmes Tableau des programmes Programmes FR Description du Programme Charge maxi Vitesse Detersivi Durée cycle Temp. (Kg) maxi maxi.
Personnalisations Sélection de la température FR Tourner le bouton TEMPÉRATURE pour sélectionner la température de lavage (voir Tableau des programmes). La température peut être abaissée jusquau lavage à froid ( ). La machine interdira automatiquement toute sélection dune température supérieure à la température maximale prévue pour chaque programme. Sélection de lessorage Tourner le bouton ESSORAGE pour sélectionner la vitesse dessorage du programme sélectionné.
Produits lessiviels et linge FR Tiroir à produits lessiviels Triage du linge Un bon résultat de lavage dépend aussi dun bon dosage de produit lessiviel: un excès de lessive ne lave pas mieux, il incruste lintérieur du lave-linge et pollue lenvironnement. Trier correctement le linge daprès: le type de textile / le symbole sur létiquette. les couleurs: séparer le linge coloré du blanc. Vider les poches et contrôler les boutons.
Précautions et conseils Ce lave-linge a été conçu et fabriqué conformément aux normes internationales de sécurité. Ces consignes sont fournies pour des raisons de sécurité, il faut les lire attentivement. Ouverture manuelle du hublot Sécurité générale Cet appareil est conçu pour un usage domestique. Ce lave-linge ne doit être utilisé que par des adultes en suivant les instructions reportées dans ce mode demploi.
Entretien et soin FR Coupure de larrivée deau et du courant Fermer le robinet de leau après chaque lavage. Cela réduit lusure de linstallation hydraulique du lave-linge et évite tout danger de fuites. Nettoyage de la pompe Le lave-linge est équipé dune pompe autonettoyante qui nexige aucune opération dentretien. Il peut toutefois arriver que de menus objets (pièces de monnaie, boutons) tombent dans la préchambre qui protège la pompe, placée en bas de cette dernière.
Anomalies et remèdes Il peut arriver que le lave-linge ne fonctionne pas bien. Avant dappeler le Service de dépannage (voir Assistance), contrôler sil ne sagit pas par hasard dun problème facile à résoudre à laide de la liste suivante. FR Anomalies: Causes / Solutions possibles: Le lave-linge ne sallume pas. La fiche nest pas branchée dans la prise de courant ou mal branchée. Il y a une panne de courant. Le cycle de lavage ne démarre pas. Le hublot nest pas bien fermé.
Assistance Avant dappeler le service après-vente: Vérifier si on ne peut pas résoudre lanomalie par ses propres moyens (voir Anomalies et Remèdes); Remettre le programme en marche pour contrôler si linconvénient a disparu; Autrement, contacter le Centre dAssistance technique agréé au numéro de téléphone indiqué sur le certificat de garantie. FR Ne jamais sadresser à des techniciens non agréés. Communiquer: le type de panne; le modèle de lappareil (Mod.); son numéro de série (S/N).
Gebruiksaanwijzing WASAUTOMAAT Inhoud NL Nederlands NL Installatie, 26-27 Uitpakken en waterpas zetten Hydraulische en elektrische aansluitingen Eerste wascyclus Technische gegevens Beschrijving van de wasautomaat en starten van een programma, 28-29 Bedieningspaneel Controlelampjes Een programma starten Programmas, 30 Programmatabel Persoonlijke instellingen, 31 IWC 6165 Instellen van de temperatuur Instellen van de centrifuge Functies Wasmiddelen en wasgoed, 32 Wasmiddelbakje Bleekcyclus Voorbere
Installatie NL Het is belangrijk deze handleiding te bewaren voor latere raadpleging. In het geval u het apparaat verkoopt, of u verhuist, moet het boekje bij de wasautomaat blijven zodat de nieuwe gebruiker de functies en betreffende raadgevingen kan doornemen. Een correcte nivellering geeft de machine stabiliteit en voorkomt trillingen, lawaai en het zich verplaatsen van de automaat tijdens de werking.
Aansluiting van de afvoerbuis 65 - 100 cm Verbind de buis, zonder hem te buigen, aan een afvoerleiding of aan een afvoer in de muur tussen de 65 en 100 cm van de grond Gebruik geen verlengsnoeren of dubbelstekkers. NL Het snoer mag niet gebogen of samengedrukt worden. De voedingskabel mag alleen door een bevoegde installateur worden vervangen. Belangrijk! De fabrikant kan niet aansprakelijk worden gesteld wanneer deze normen niet worden nageleefd.
Beschrijving van de wasautomaat en starten van een programma NL Bedieningspaneel Controlelampjes VOORTGANG CYCLUS/UITGESTELDE START START/ PAUZE FUNCTIE TEMPERATUUR KNOP Wasmiddelbakje Toets met controlelampje Toetsen met controlelampjes AAN/UIT toets PROGRAMMAKNOP Controlelampje DEUR GEBLOKKEERD CENTRIFUGEKNOP Wasmiddelbakje: voor wasmiddelen en wasversterkers (zie Wasmiddelen en wasgoed). Controlelampje DEUR GEBLOKKEERD: om te zien of de deur kan worden geopend (zie pagina hiernaast).
Controlelampjes Hoofdwas De controlelampjes geven belangrijke informatie.
Programmas Programmatabel Programmas NL Beschrijving van het Programma Maximale Temp (°C) Maximale Maximaal Wasmiddel Duur cyclus lading (kg) toerental (toeren per Voor- Was- Bleek- WasverEco Eco Normaal Normaal minuut) Time Time was sen middel zachter Dagelijkse was 90° 90° 60° 40° 60° 40° 60° 40° 1600 1600 1600 1600 1600 1600 800 800 l - l l l l l l l l l l l l l l l l l l l l l l l 6 6 6 6 6 6 2,5 2,5 9 Jeans 40° 30° 40° 600 0 800 - l l l - l l l 10 30° 800 - l - 30° 30° 600
Persoonlijke instellingen Instellen van de temperatuur Door aan de TEMPERATUURKNOP te draaien kunt u de wastemperatuur instellen (zie Programmatabel). De temperatuur kan verlaagd worden tot aan koud wassen ( ). De machine voorkomt dat u een temperatuur instelt die hoger is dan het maximum voorzien voor dat programma. Instellen van de centrifuge Door aan de CENTRIFUGEKNOP te draaien stelt u de snelheid van de centrifuge van het gekozen programma in.
Wasmiddelen en wasgoed NL Wasmiddelbakje Voorbereiden van het wasgoed Een goed wasresultaat hangt ook af van de juiste dosis wasmiddel: te veel wasmiddel maakt het wassen niet beter. Het wasmiddel blijft aan de binnenzijde van de wasautomaat zitten en zorgt voor het vervuilen van het milieu. Gebruik nooit wasmiddelen voor handwas aangezien die te veel schuim vormen.
Voorzorgsmaatregelen en advies De wasmachine is ontworpen en geproduceerd volgens de internationale veiligheidsnormen. Deze aanwijzingen zijn voor uw eigen veiligheid geschreven en moeten aandachtig worden doorgenomen. Algemene veiligheid Handmatige opening van de deur Mocht er in het huis geen stroom aanwezig zijn en u wilt het deurtje openen om de was op te hangen, dan dient u het volgende te doen: Dit apparaat is uitsluitend ontworpen voor huishoudelijk niet-professioneel gebruik.
Onderhoud en verzorging NL Afsluiten van water en stroom Reinigen van de pomp Sluit na iedere wasbeurt de kraan af. Hiermee beperkt u slijtage van de waterinstallatie van de wasmachine en voorkomt u lekkage. De wasautomaat is voorzien van een zelfreinigende pomp en hoeft dus niet te worden onderhouden. Het kan echter gebeuren dat kleine voorwerpen (muntjes, knopen) in het voorvakje dat de pomp beschermt en zich aan de onderkant ervan bevindt, terechtkomen.
Storingen en oplossingen Het kan gebeuren dat de wasautomaat niet werkt. Voor u contact opneemt met de Servicedienst (zie Service)moet u controleren of het niet een storing betreft die u zelf makkelijk kunt verhelpen met behulp van de volgende lijst. Storingen: Mogelijke oorzaken / Oplossing: De wasautomaat gaat niet aan. De stekker zit niet in het stopcontact of niet ver genoeg om contact te maken. Het hele huis zit zonder stroom. De wascyclus start niet.
Service 195073006.01 10/2008 - Xerox Business Services Voordat u de Servicedienst inschakelt: Controleer eerst of u het probleem zelf kunt oplossen (zie Storingen en oplossingen). Start het programma opnieuw om te controleren of de storing is verholpen; Als dit niet het geval is moet u contact opnemen met de erkende Technische Servicedienst via het telefoonnummer dat op het garantiebewijs staat. NL Wendt u nooit tot een niet erkende installateur.