Instructions for use WASHING MACHINE Contents GB English,1 عربي ،عربي,16 GB Installation, 2-3-4-5 Unpacking and levelling Connecting the electricity and water supplies The first wash cycle Technical data Care and maintenance, 6 Cutting off the water or electricity supply Cleaning the washing machine Cleaning the detergent dispenser drawer Caring for the door and drum of your appliance Cleaning the pump Checking the water inlet hose Precautions and tips, 7 General safety Disposal IWC 81481 Descrip
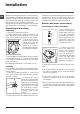
Installation GB ! Keep this instruction manual in a safe place for future reference. Should the appliance be sold, transferred or moved, make sure the instruction manual accompanies the washing machine to inform the new owner as to its operation and features. ! Read these instructions carefully: they contain vital information on installation, use and safety. Unpacking and levelling Unpacking 1. Unpack the washing machine. 2. Check whether the washing machine has been damaged during transport.
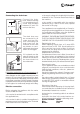
Connecting the drain hose 65 - 100 cm Where it connects to the waste water pipe cut end off spigot or remove the blanking cap Connect the drain hose, without bending it, to a draining duct or a wall drain situated between 65 and 100 cm from the floor; The drain hose may be connected to an under-sink trap. Before connecting the drain hose from the machine ensure that any blanks or removable ends have been taken off the spigot.
GB As the colours of the wires in the lead may not correspond with the coloured markings identifying the terminals in your plug, proceed as follows: Connect Green & Yellow wire to terminal marked E or or coloured Green or Green & Yellow. Connect Brown wire to terminal marked L or coloured Red. Connect Blue wire to terminal marked N or coloured Black. If a 13 amp plug (BS 1363) is used it must be fitted with a 13 amp fuse, either in the plug or adaptor or at the distribution board.
GB 5
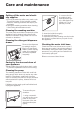
Care and maintenance GB Cutting off the water and electricity supplies • Turn off the water tap after every wash cycle. This will limit wear on the hydraulic system inside the washing machine and help to prevent leaks. • Unplug the washing machine when cleaning it and during all maintenance work. 2. unscrew the lid by rotating it anticlockwise (see figure): a little water may trickle out.
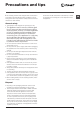
Precautions and tips ! This washing machine was designed and constructed in accordance with international safety regulations. The following information is provided for safety reasons and must therefore be read carefully. Consumers should contact their local authority or retailer for information concerning the correct disposal of their old appliance. General safety • This appliance was designed for domestic use only.
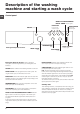
Description of the washing machine and starting a wash cycle GB Control panel WASH CYCLE PROGRESS/ DELAY TIMER indicator lights FUNCTION ON/OFF button buttons with indicator lights TEMPERATURE Detergent dispenser drawer knob Detergent dispenser drawer: used to dispense detergents and washing additives (see “Detergents and laundry”). ON/OFF button: switches the washing machine on and off. WASH CYCLE knob: programmes the wash cycles. During the wash cycle, the knob does not move.
Indicator lights The indicator lights provide important information. This is what they can tell you: Delayed start If the DELAY TIMER function has been activated (see “Personalisation”), after the wash cycle has been started the indicator light corresponding to the selected delay period will begin to flash: Wash cycle phase indicator lights Once the desired wash cycle has been selected and has begun, the indicator lights switch on one by one to indicate which phase of the cycle is currently in progress.
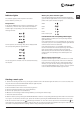
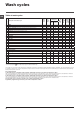
Wash cycles Wash Fabric softener Cycle duration Detergents Total water lt Max. speed (rpm) Energy consumption kWh Max. temp. (°C) Residual dampness % Description of the wash cycle Max. load (kg) Table of wash cycles Wash cycles GB - 170’ Daily 1 White Cotton: extremely soiled whites. 90° 1400 8 - - 2 Cotton Standard (1): heavily soiled whites and resistant colours. 60° 1400 8 53 1.51 3 Cotton Standard (2-3): lightly soiled whites and delicate colours.
Personalisation Setting the temperature GB Turn the TEMPERATURE knob to set the wash temperature (see Table of wash cycles). The temperature may be lowered, or even set to a cold wash . The washing machine will automatically prevent you from selecting a temperature which is higher than the maximum value set for each wash cycle. Setting the spin speed Turn the SPIN SPEED knob to set the spin speed for the selected wash cycle.
Detergents and laundry GB Detergent dispenser drawer Garments requiring special care Good washing results also depend on the correct dose of detergent: adding too much detergent will not necessarily result in a more efficient wash, and may in fact cause build up on the inside of your appliance and contribute to environmental pollution. Outwear (wash cycle 9): is studied for washing waterrepellent fabrics and winter jackets (e.g.
Troubleshooting Your washing machine could fail to work. Before contacting the Technical Assistance Centre (see “Assistance”), make sure that the problem cannot be solved easily using the following list. GB Problem: Possible causes / Solutions: The machine does not switch on. • The appliance is not plugged into the socket fully, or not enough to make contact. • There is no power to the socket, or the fuse has blown in the mains plug. The wash cycle does not start.
GB The machine is noisy. • There will always be some motor, pump and drum noise during spin. The machine wont spin properly. • Out of Balance detected when attempting to go into a spin cycle - If this happens the machine will continue to try to repeat the distribution of the load required before the machine will go into higher spin speeds - This will increase the programme time accordingly. This is a safety feature to prevent damage.
Product Guarantee and Repair Information Guarantee 12 Months Parts and Labour Guarantee Your appliance has the benefit of our manufacturer’s guarantee, which covers the cost of breakdown repairs for twelve months from the date of purchase.
GB 16
تعليمات االستخدام ماكينة غسيل المحتويات AR عربي AR التركيب34-33-32 ، 20-19-18 34-33-32-31 30-31-32-33 إفراغ المحتويات وتحديد المستوى وصل إمدادات الكهرباء والماء دورة الغسيل األولى البيانات التقنية وصف ماكينة الغسيل وتشغيل دورة الغسيل22-21 ، لوحة التحكم المصابيح المؤشرة تشغيل دورة الغسيل دورات الغسل23 ، جدول دورات الغسيل التخصيصات24 ، IWC 81481 ضبط درجة الحرارة ضبط سرعة الدوران الوظائف مواد التنظيف والغسيل25 ، درج وعاء مواد
التركيب AR ! يجب االحتفاظ بدليل التعليمات هذا في مكان آمن لمراجعته في المستقبل .إذا تم بيع الجهاز ،إرساله أو نقله ،تأكد من أن دليل التعليمات قد أرفق بالماكينة بحيث يتمكن مالكوها الجدد من التعرف على عملها وخصائصها. ! اقرأ هذه التعليمات بعناية :إنها تحتوي على معلومات هامة فيما يتعلق بالتركيب اآلمن وتشغيل الجهاز. إفراغ المحتويات وتحديد المستوى تحديد مستوى الماكينة بشكل صحيح سيمنحها الثبات ،سيساعد على تحاشي االرتجاجات والضجيج الزائد وسيمنعها من االنحراف أثناء العمل .
65 - 100 cm اوﺻﻠﻮا ﺧﺮﻃﻮم ﺗﻔﺮﻳﻎ اﻟﻤﺎء ﻣﻦ ﺣﻮض ﻏـﺴـﻴـﻞ اﻟـﻐـﺴـﺎﻟـﺔ ﺑـﺪون ﻃـﻮﻳـﻪ ،ﺑـﻤـﺎﺳـﻮرة ﺻـﺮف ﻟـﻠـﻤـﺎء ،أو ﺑـﻤـﺼـﺮف ﻣـﻮﺟـﻮد ﻓـﻲ اﻟﺤﺎﺋﻂ ﻋﻠﻰ أن ﻳﻜﻮن ارﺗﻔﺎﻋﻪ ﻣﺎ ﺑﻴﻦ 65 و 100ﺳﻨﺘﻤﺘﺮ ﻋﻦ ﺳﻄﺢ اﻷرض ﺗﻐﻴﻴﺮ اﻟﻤﻨﺼﻬﺮة )اﻟﻔﻴﻮز( ﻋـﻨـﺪ ﺗـﻐـﻴـﻴـﺮ اﻟـﻤـﻨـﺼـﻬـﺮة )اﻟـﻔـﻴـﻮز( اﻟـﻤـﻌـﻄـﻮب ،اﺳـﺘـﺨـﺪﻣـﻮا داﺋـﻤـﺎ ﻣـﻨـﺼـﻬـﺮة 13اﻣـﺒـﻴـﺮ ASTAﺧﺎﺿﻌﺔ ﻟﻠﻤﻘﻴﺎس BS 1362وأﻋﻴﺪوا ﻏﻄﺎء اﻟﻤﻨﺼﻬﺮة اﻟﻰ ﻣﻜﺎﻧﻪ اﻟﺬي آـﺎن ﻓـﻴـﻪ ،ﻓـﻲ ﺣـﺎﻟـﺔ ﻓـﻘـﺪان هـﺬا اﻟـﻐـﻄـﺎء ﻻ ﺗـﺴـﺘـﺨـﺪﻣـﻮا اﻟـﻘـﺎﺑـﺲ ﺣـﺘـﻰ اﻟـﺤـﺼـﻮل ﻋـﻠـﻰ
AR ﻓـﻲ ﺣـﺎﻟـﺔ اﻟـﺸـﻚ ﺑـﺎﻟـﺘـﻐـﺬﻳـﺔ اﻟـﻜـﻬـﺮﺑـﺎﺋـﻴـﺔ ﻟـﺠـﻬـﺎزآـﻢ اﺳـﺘـﺪﻋـﻮا ﻓـﻨـﻲ آـﻬـﺮﺑـﺎﺋـﻲ ﻣـﺨـﺘـﺺ ﻗـﺒـﻞ وﺻﻞ اﻟﺠﻬﺎز ﺑﻤﻨﺒﻊ اﻟﺘﻴﺎر اﻟﻜﻬﺮﺑﺎﺋﻲ. وﺻﻞ ﻗﺎﺑﺲ )اﻟﺬآﺮ( ﺑﺪﻳﻞ: أﻟﻮان اﻷﺳﻼك اﻟﺘﻐﺬﻳﻪ اﻟﻜﻬﺮﺑﺎﺋﻴﺔ ﺗﺸﻴﺮ اﻟﻰ اﻟﺘﺎﻟﻲ: ﻣﺤﺎﻳﺪ )ﻧﻴﻮﺗﺮل( )(N ازرق ﺗﻐﺬﻳﺔ )(L ﺑﻨﻲ أﺻﻔﺮ/أﺧﻀﺮ ﺧﻂ أرض )(E دورة الغسيل األولى بعد االنتهاء من تركيب الجهاز ،وقبل استخدامه للمرة األولى ،قم بتشغيل دورة غسيل مستخدما مواد التنظيف من دون غسيل ،باستخدام دورة الغسيل .
وصف ماكينة الغسيل وتشغيل دورة الغسيل لوحة التحكم AR المصابيح المؤشرة برنامج دورة الغسيل/ عداد الوقت المؤجل زر مع مصباح مؤشر بدء/إيقاف مؤقت أزرار مع مصابيح مؤشرة الوظيفة مفتاح درحة الحرارة مصباح مؤشر إقفال الباب زر تشغيل/إيقاف تشغيل مفتاح سرعة العصر مفتاح دورة الغسيل درج وعاء مواد التنظيف درج وعاء مواد التنظيف :يتم استخدامه لتوزيع مواد التنظيف ومضافات الغسيل (انظر "مواد التظيف والغسيل").
المصابيح المؤشرة AR توفر المصابيح المؤشرة معلومات هامة. هذا ما يمكنها أن تخبرك به: تشغيل مؤجل الوقت إذا تم تشغيل وظيفة عداد الوقت المؤجل (انظر "التخصيصات") ،بعد أن بدأت دورة الغسيل ،فسيبدأ المصباح المؤشر المالئم لفترة الوقت المؤجل المختارة بالوميض: المصابيح المؤشرة لمرحلة دورة الغسيل فور اختيار دورة الغسيل المرغوب بها وبدءها ،تضيئ المصابيح المؤشرة ،الواحد تلو الآخر للإشارة إلى الدورة التي تعمل حاليا.
دورات الغسيل جدول دورات الغسيل دورات الغسيل الحد األقصى للحمولة (كجم) نسبة الرطوبة الباقية % استهالك الطاقة كيلووات في الساعة l l 53 l l 53 دقيقة قائق دقائق l 53 l l 3 3 3 - - قائق دقائق قائق دقائق l 7 44 53 0.
التخصيصات AR ضبط درجة الحرارة أدر مفتاح درجة الحرارة لضبط درجة حرارة الغسيل (انظر جدول دورات الغسيل). يمكن خفض درجة الحرارة أو حتى إعدادها للغسيل البارد . ستمنعك ماكينة الغسيل أوتوماتيكيا من اختيار درجة حرارة أعلى من القيمة القصوى المحددة لكل دورة غسيل. ضبط سرعة الدوران أدر مفتاح سرعة الدوران لضبط سرعة الدوران لدورة الغسيل المختارة.
مواد التنظيف والغسيل درج وعاء مواد التنظيف مالبس تتطلب عناية خاصة تعتمد نتائج الغسيل الجيدة أيضا على كمية مواد التنظيف :إن إضافة مواد تنظيف أكثر مما يجب ال يزيد فاعلية الغسيل بالضرورة ،يمكن أن يؤدي إلى انسداد في األجزاء الداخلية من الجهاز لديك وحتى يمكن أن يلوث البيئة. دورات الغسيل 20درجة (منطقة 20درجة) توفر أداء الغسيل الفعال في درجات حرارة منخفضة ،مما يقلل استخدام الكهرباء والنفقات وفي نفس الوقت تفيد البيئة.
وسائل حذر ونصائح AR ! تم تصميم ماكينة الغسيل وتصنيعه طبقا لمواصفات األمان العالمية .يتم تزويد التحذيرات التالية ألسباب وقائية ويجب قراءتها بعناية. الوقاية العامة • تم تصميم هذا الجهاز لالستخدام المنزلي فقط. • يجب استخدام ماكينة الغسيل من قبل البالغين فقط ،بموجب التعليمات المزودة في هذا الدليل. • ال تالمس الماكينة وأنت حافي القدمين أو بيدين ورجلين مبللتين أو رطبتين. • ال تقم بسحب كبل تزويد الطاقة عند فصل الجهاز عن مقبس شبكة الطاقة الكهربائية .امسك القابس واسحبه.
العناية والصيانة قطع إمداد الماء والكهرباء ّ المضخة تنظيف • قم بإقفال حنفية الماء بعد كل دورة غسيل .سيحد هذا من تآكل النظام الهيدروليكي داخل ماكينة الغسيل ويساعد على منع التسربات. ماكينة الغسيل مزودة بمضخة للتنظيف الذاتي ،حيث ال تحتاج إلى أية عناية في أي وقت .في بعض األحيان ،يمكن للقطع الصغيرة (مثل القطع النقدية أو األزرار) أن تسقط داخل الحجرة األولية التي تحمي المضخة ،والموجودة في جزئها األسفل. • افصل الماكينة عن الكهرباء عند تنظيفها أو أثناء أي عمل صيانة.
استكشاف المشاكل وحلها AR يمكن لماكينة الغسيل أن تفشل في العمل فجأة .قبل االتصال بخدمة المساعدة التقنية (أنظر "الخدمة") تأكد من أن المشكلة ال يمكن حلها بسهولة باستخدام الجدول التالي. المشكلة: األسباب المحتملة /الحلول: ال يمكن تشغيل ماكينة الغسيل. • الجهاز غير موصل بالمقبس الكهربائي بشكل كامل ،أو أنه لا يحدث تماس. • يوجد انقطاع كهرباء في البيت. دورة الغسيل ال تبدأ بالعمل. • • • • • باب ماكينة الغسيل غير مقفل بشكل صحيح.
الخدمة قبل استدعاء المساعدة: • افحص فيما إذا كان بإمكانك حل المشكلة بنفسك (أنظر "استكشاف المشاكل وحلها")؛ • أعد تشغيل البرنامج للفحص فيما إذا تم حل المشكلة؛ • إذا لم يكن األمر كذلك ،اتصل بمركز مساعدة تقني معتمد بواسطة رقم الهاتف AR ! اطلب دائما مساعدة فنّي مؤهل. الرجاء خذ بعين االعتبار المعلومات التالية: • نوع المشكلة؛ • طراز الجهاز ().Mod؛ • الرقم التسلسلي (.
AR 1
AR
195138388.02 06/2016 AR Üretici Firma: Indesit Company Beyaz Eşya PAZARLAMA A.Ş. Balmumcu Cad. Karahasan Sok.