Instructions for use WASHING MACHINE Contents GB Installation, 2-3 GB English,1 HU Magyar,13 Unpacking and levelling Connecting the electricity and water supplies The first wash cycle Technical data Description of the washing machine, 4-5 Control panel Display Running a wash cycle, 6 Wash cycles and options, 7 Table of wash cycles Wash options IWE 5105 Detergents and laundry, 8 Detergent dispenser drawer Preparing the laundry Special wash cycles Load balancing system Precautions and tips, 9 Genera
Installation GB This instruction manual should be kept in a safe place for future reference. If the washing machine is sold, transferred or moved, make sure that the instruction manual remains with the machine so that the new owner is able to familiarise himself/herself with its operation and features. Levelling the machine correctly will provide it with stability, help to avoid vibrations and excessive noise and prevent it from shifting while it is operating.
Do not use extension cords or multiple sockets. Connecting the drain hose 65 - 100 cm Connect the drain hose, without bending it, to a drainage duct or a wall drain located at a height between 65 and 100 cm from the floor; GB The cable should not be bent or compressed. The power supply cable must only be replaced by authorised technicians. Warning! The company shall not be held responsible in the event that these regulations are not respected.
Description of the washing machine Control panel GB TEMPERATURE ON/OFF Button button OPTION buttons with indicator lights START/PAUSE button with indicator light DISPLAY Detergent dispenser drawer WASH CYCLE knob SPIN SPEED DELAYED START Button Button Detergent dispenser drawer: used to dispense detergents and washing additives (see Detergents and laundry). : press to set a delayed DELAYED START button start time for the selected wash cycle. The delay time will be shown on the display.
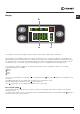
Display GB B A C The display is useful when programming the machine and provides a great deal of information. The duration of the available programmes and the remaining time of a running cycle appear in section A; if the DELAY START option has been set, the countdown to the start of the selected programme will appear.
Running a wash cycle GB 1. SWITCH THE MACHINE ON. Press the button; the START/PAUSE indicator light will flash slowly in a green colour. selected will flash and only the second option will be activated; the indicator light corresponding to the enabled option will remain lit. 2. LOAD THE LAUNDRY. Open the porthole door. Load the laundry, making sure you do not exceed the maximum load value indicated in the table of programmes on the following page.
Wash cycles and options Wash cycles Table of wash cycles Detergents Description of the wash cycle Max . Max. temp. speed (°C) (rpm) Prewash Wash Bleach GB Max. load (kg) Cycle Fabric Eco duration Normal Time softener Daily 1000 1000 1000 1000 1000 1000 800 800 l - l l l l l l l l l l l l l l l l l l l l l l l 5 5 5 5 5 5 2,5 2,5 3,25 3,25 2 2 Wool: for wool, cashmere, etc. Silk/Curtains: for garments in silk and viscose, lingerie.
Detergents and laundry GB Detergent dispenser drawer Good washing results also depend on the correct dose of detergent: adding too much detergent will not necessarily result in a more efficient wash, and may in fact cause build up on the inside of your appliance and contribute to environmental pollution. Do not use hand washing detergents because these create too much foam. Open the detergent 4 dispenser drawer and pour in the detergent or washing additive, as 3 follows.
Precautions and tips This washing machine was designed and constructed in accordance with international safety regulations. The following information is provided for safety reasons and must therefore be read carefully. Opening the porthole door manually General safety This appliance was designed for domestic use only. The washing machine must only be used by adults, in accordance with the instructions provided in this manual.
Care and maintenance GB Cutting off the water and electricity supplies Turn off the water tap after every wash cycle. This will limit wear on the hydraulic system inside the washing machine and help to prevent leaks. Unplug the washing machine when cleaning it and during all maintenance work. Cleaning the washing machine The outer parts and rubber components of the appliance can be cleaned using a soft cloth soaked in lukewarm soapy water. Do not use solvents or abrasives.
Troubleshooting Your washing machine could fail to work. Before contacting the Technical Assistance Centre (see Assistance), make sure that the problem cannot be not solved easily using the following list. GB Problem: Possible causes / Solutions: The washing machine does not switch on. The appliance is not plugged into the socket fully, or is not making contact. There is no power in the house. The wash cycle does not start. The washing machine door is not closed properly.
Service Before calling for Assistance: Check whether you can solve the problem alone (see Troubleshooting); Restart the programme to check whether the problem has been solved; If this is not the case, contact an authorised Technical Assistance Centre using the telephone number provided on the guarantee certificate. GB Always request the assistance of authorised technicians. Have the following information to hand: the type of problem; the appliance model (Mod.); the serial number (S/N).
Használati utasítás MOSÓGÉP Összefoglalás HU Magyar HU Üzembe helyezés, 1415 Kicsomagolás és vízszintbe állítás Víz- és elektromos csatlakozás Elsõ mosási ciklus Mûszaki adatok A mosógép leírása, 16-17 Kezelõpanel Kijelzõ A mosási ciklusok végrehajtása, 18 Programok és funkciók, 19 Programtáblázat Mosási funkciók IWE 5105 Mosószerek és mosandók, 20 Mosószer-adagoló fiók A mosandó ruhák elõkészítése Különleges programok A bepakolt ruhák kiegyensúlyozására szolgáló rendszer Óvintézkedések és tanács
Üzembe helyezés HU Fontos, hogy megõrizze ezt a kézikönyvet, hogy mindig kéznél legyen. Ha a mosógépet eladná, átadná vagy másnál helyezné el, gondoskodjon arról, hogy e kézikönyv a mosógéppel együtt maradjon, hogy az új tulajdonos is megismerhesse a készülék funkcióit és az ezekre vonatkozó figyelmeztetéseket. A pontos vízszintezés biztosítja a gép stabilitását, így az a mûködés során nem fog rezegni, zajt okozni, illetve elmozdulni.
A leeresztõcsõ csatlakoztatása 65 - 100 cm Csatlakoztassa a leeresztõcsövet a lefolyóhoz vagy a padlótól 65 és 100 cm közötti magasságban lévõ fali szifonhoz anélkül, hogy megtörné; Ne használjon hosszabbítót vagy elosztót. HU A kábel ne legyen se megtörve, se összenyomva. A tápkábelt csak engedéllyel rendelkezõ szakember cserélheti. Figyelem! A fenti elõírások figyelmen kívül hagyása esetén a gyártó elhárít minden felelõsséget.
A mosógép leírása HU Kezelõpanel BEKAPCSOLÁS/ KIKAPCSOLÁS gomb HÕMÉRSÉKLET gomb FUNKCIÓ jelzõlámpás gombok ELINDÍTÁS/ SZÜNETELTETÉS jelzõlámpás gomb Kijelzõ Mosószer-adagoló fiók PROGRAMOK tekerõgomb CENTRIFUGÁLÁS KÉSLELTETETT INDÍTÁS gomb gomb Mosószer-adagoló fiók: a mosószerek és adalékanyagok betöltésére szolgál (lásd Mosószerek és mosandók). gomb: a kiválasztott KÉSLELTETETT INDÍTÁS program késleltetett elindításához nyomja meg ezt a gombot. A késleltetés értéke megjelenik a kijelzõn.
Kijelzõ HU B A C A kijelzõ a készülék programozásához nyújt segítséget, és számos információt szolgáltat. Az A feliratmezõben a rendelkezésre álló programok hossza, illetve elindított ciklus esetén a program végéig hátralévõ maradékidõ látható. KÉSLELTETETT INDÍTÁS beállítása esetén a kiválasztott program elindulásáig hátralévõ idõt jeleníti meg.
A mosási ciklusok végrehajtása HU 1. A KÉSZÜLÉK BEKAPCSOLÁSA. Nyomja meg a gombot, az ELINDÍTÁS/SZÜNETELTETÉS lámpa pedig lassan, zöld fénnyel villogni kezd. 2. A MOSANDÓ RUHÁK BEPAKOLÁSA. Nyissa ki az ajtót! Tegye be a mosandó ruhákat, ügyelve arra, hogy ne lépje túl a következõ oldalon található programtáblázatban feltüntetett ruhatöltet-mennyiséget. 3. A MOSÓSZER ADAGOLÁSA. Vegye ki a fiókot, és a Mosószerek és mosandók fejezetben leírtak szerint öntse a mosószert a megfelelõ tégelybe. 4.
Programok és funkciók Programok Programtáblázat P ro g ra m le írá s Max. M o s ó s z e re k ruham ennyiség Max. M ax. (kg) hom õ .- sebesség (°C ) (fo rd./p erc) E lo FehérõmE co Mosás Ö b líto õ N o rm á l T im e osás ítosz õ er HU P ro g ra m id õ o H é tk ö z n a p i p ro g ra m o k õ n sze nnye ze tt fe hé r ruhá k. PAM U T E L Õ O M O S ÁS : E rose PAM U T: E ro õ se n sze nnye ze tt fe hé r ruhá k.
Mosószerek és mosandók HU Mosószer-adagoló fiók A mosás eredményessége függ a mosószer helyes adagolásától is: ha túl sokat adagol belõle, a mosás nem lesz hatékonyabb, de hozzájárul ahhoz, hogy lerakódás képzõdjön a mosógépben, valamint a környezetet is jobban szennyezi. ! Ne használjon kézi mosószert, mert túlzottan sok hab képzõdik. Húzza ki a mosószeradagoló fiókot, és a 4 következõk szerint tegye bele a mosószert, illetve 3 az adalékot.
Óvintézkedések és tanácsok A mosógép a nemzetközi biztonsági szabványoknak megfelelõen lett tervezve és gyártva. Ezeket a figyelmeztetéseket biztonsági okokból írjuk le, kérjük, olvassa el õket figyelmesen! Az ajtó kézi nyitása Amennyiben ki akarja teregetni a mosott ruhanemût, de áramhiány miatt nem tudja kinyitni a mosógép ajtaját, tegye a következõket: Általános biztonság Ez a készüléket háztartási használatra lett tervezve.
Karbantartás és ápolás HU A víz elzárása és az elektromos áram kikapcsolása Minden mosás után zárja el a vízcsapot. Így kíméli a mosógép vízrendszerét és megszünteti a vízszivárgás kockázatát. A mosógép tisztításakor, illetve karbantartásakor húzza ki a hálózati csatlakozódugót az aljzatból. A mosógép tisztítása A külsõ részeket és a gumirészeket langyos, szappanos vizes ronggyal tisztíthatja.
Rendellenességek és elhárításuk Elõfordulhat, hogy a mosógép nem mûködik. Mielõtt felhívná a szervizt (lásd Szerviz), ellenõrizze, hogy nem olyan problémáról van-e szó, amely a következõ lista segítségével egyszerûen megoldható! Rendellenességek: Lehetséges okok / megoldás: A mosógép nem kapcsol be. A hálózati csatlakozódugó nincs bedugva az aljzatba, vagy nem eléggé ahhoz, hogy jól érintkezzen. Nincs áram a lakásban. A mosási ciklus nem indul el. A mosógép ajtaja nincs jól bezárva.
Szerviz 195073452.01 11/2008 - Xerox Business Services Mielõtt a szervizhez fordulna: Gyõzõdjön meg arról, hogy a hibát nem tudja saját maga is elhárítani (lásd Rendellenességek és elhárításuk); Indítsa újra a programot, hogy lássa, elhárította-e a hibát; Ellenkezõ esetben forduljon az engedéllyel rendelkezõ szakszervizhez a garanciajegyen található telefonszámon. HU Soha ne forduljon engedéllyel nem rendelkezõ szerelõhöz! Közölje: a meghibásodás jellegét; a mosógép típusát (Mod.