K3C51/FR S KN3C51/FR S KN3C55/FR S FR Français Mode d’emploi CUISINIERE ET FOUR Sommaire Mode d’emploi,1 Attention,2 Description de l’appareil-Vue d’ensemble, 5 Description de l’appareil-Tableau de bord, 5 Installation,6 Mise en marche et utilisation,7 Utilisation du four,8 Utilisation du plan de cuisson,12 Précautions et conseils, 13 Nettoyage et entretien,14 Assistance,14 GB English Operating Instructions COOKER AND OVEN Contents Operating Instructions,1 W arning,2 Description of the appliance-Overa
ATTENTION FR ATTENTION : cet appareil ainsi que ses parties accessibles deviennent très chauds pendant leur fonctionnement. Il faut faire attention de ne pas toucher les éléments chauffants. Ne laisser s'approcher les enfants de moins de 8 ans à moins qu’ils ne soient sous surveillance constante.
GB WARNING WARNING: The appliance and its accessible parts become hot during use. Care should be taken to avoid touching heating elements. Children less than 8 years of age shall be kept away unless continuously supervised.
ВНИМАНИЕ BG ВНИМАНИЕ: Уредът и неговите открити части се нагряват много при употреба. Бъдете особено внимателни и не докосвайте нагревателните елементи. Не използвайте абразивни продукти и остри метални шпатули за почистване на стъклената вратичка на фурната, защото може да надраскат повърхността, което да доведе до счупване на стъклото. Не допускайте деца под 8 години близо до уреда, освен ако не са под постоянно наблюдение.
GB Description de l’appareil FR Tableau de bord 1.Manette du MINUTEUR* 2.PROGRAMMATEUR DE CUISSON ELECTRONIQUE 3.Voyant lumineux thermostat 4.Manette du THERMOSTAT 5.Manette PROGRAMMES 6.Voyant de fonctionnement de la plaque électrique 7.Manette de la plaque électrique *N’existe que sur certains modèles Description of the appliance GB Control panel 1.TIMER knob* 2.Electronic cooking programmer* 3.THERMOSTAT indicator light 4.THERMOSTAT knob 5.SELECTOR knob 6.ELECTRIC HOTPLATE indicator light 7.
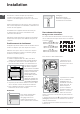
Installation (voir figure). Montage des pieds* fournis avec l’appareil par encastrement sous la base. ! Conservez ce mode d’emploi pour pouvoir le consulter à tout moment. En cas de vente, de cession ou de déménagement, veillez à ce qu’il suive l’appareil.
5. fixez le câble d’alimentation dans le serre-câble prévu. 6. fermez le couvercle du bornier et vissez la vis V. Branchement du câble d’alimentation au réseau électrique Montez sur le câble une fiche normalisée adaptée à la charge indiquée sur l’étiquette des caractéristiques collée sur l’appareil.
Utilisation du four CARACTERISTIQUES TECHNIQUES ! Lors de son premier allumage, faire fonctionner le four à vide, porte fermée, pendant au moins une heure en réglant la température à son maximum. Dimensions du four HxLxP 39,1x41,7x34,0 cm L’odeur qui se dégage est due à l’évaporation des produits utilisés pour protéger le four.
Programmes de cuisson ! Pour tous les programmes, vous pouvez sélectionner une température comprise entre 50°C et MAX., sauf pour : FR Programme DOUBLE GRIL Un gril plus grand que d’habitude et au design novateur qui augmente de 50% les performances de cuisson et qui supprime les zones d’angle où la chaleur n’arrive pas. Utilisez ce gril pour dorer de façon uniforme. • GRIL et DOUBLE GRIL (il est conseillé dans ce cas de sélectionner MAX.
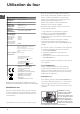
FR Fonction minuterie Minuteur* Pour accéder à cette fonction, appuyez sur la touche Pour actionner le Minuteur procéder comme suit : 1. tourner le bouton MINUTEUR et faire un tour presque complet dans le sens des aiguilles d’une montre pour remonter la sonnerie; 2. tourner le bouton MINUTEUR dans les sens inverse des aiguilles d’une montre pour sélectionner la durée désirée. , l'écran affiche le symbole .
FR Tableau de cuisson Programmes Statique Ventilé Voute Double Gril Double Gril Ventilé Aliments Canard Roast-beef Rôti de porc Biscuits Tartes Pizza (sur 2 niveaux) Lasagnes Agneau Poulet rôti + pommes de terre Maquereaux Cake aux fruits Choux (sur 2 niveaux) Biscuits (sur 2 niveaux) Génoise (sur 1 niveau) Génoise (sur 2 niveaux) Tartes salées Soles et seiches Brochettes de calmars et crevettes Tranches de colin Légumes grillés Steaks de veau Côtelettes Hamburgers Maquereaux Croque-monsieur Avec tou
Utilisation du plan de cuisson vitrocéramique FR ! La colle utilisée pour les joints laisse des traces de graisse sur le verre. Nous conseillons de les éliminer avant d’utiliser l’appareil à l’aide d’un produit d’entretien non abrasif. Une odeur de caoutchouc peut se dégager au cours des premières heures d’utilisation, elle disparaîtra très vite. Allumer et éteindre les foyers Pour allumer un foyer, tourner le bouton correspondant dans le sens des aiguilles d’une montre.
Précautions et conseils ! Cet appareil a été conçu et fabriqué conformément aux normes internationales de sécurité. Ces conseils sont fournis pour des raisons de sécurité et doivent être lus attentivement. Sécurité générale • Le plan de cuisson vitrocéramique résiste aux sautes de température et aux chocs. N’oubliez toutefois pas que des lames ou des ustensiles de cuisine pointus peuvent casser la surface du plan de cuisson.
Nettoyage et entretien FR • La base de votre casserole ou de votre poêle doit couvrir la plaque chauffante. Si elle est plus petite, une quantité précieuse d’énergie sera perdue et les casseroles qui débordent laisseront des résidus incrustés qui peuvent être difficiles à enlever. • Faites cuire vos aliments dans des casseroles ou des poêles à couvercle et utilisez le moins d’eau possible. Faire cuire les aliments dans des casseroles ouvertes augmente considérablement la consommation d’énergie.
Installation ! Before operating your new appliance please read this instruction booklet carefully. It contains important information concerning the safe installation and operation of the appliance. appliance fit into the slots on the underside of the base of the cooker. ! Please keep these operating instructions for future reference. Make sure that the instructions are kept with the appliance if it is sold, given away or moved.
GB 5. Fix the power supply cable in place by fastening the cable clamp screw. 6. Close the terminal board cover by tightening the screws V. Connecting the supply cable to the mains Install a standardised plug corresponding to the load indicated on the data plate located on the appliance. The appliance must be directly connected to the mains using an omnipolar circuit-breaker with a minimum contact opening of 3 mm installed between the appliance and the mains.
Start-up and use GB TECHNICAL DATA Oven dimensions (HxWxD) Volume Useful measurements relating to the oven compartment Power supply voltage and frequency Ceramic hob Front Left Back Left Back Right Front Right Max. ceramic hob consumption 39,1x41,7x34,0 cm 56 l width 42 cm depth 44 cm height 18 cm see data plate 1200 W 1700 W 1200 W 1700 W 5800W Regulation (EU) No 65/2014 supplementing Directive 2010/30/EU. Regulation (EU) No 66/2014 implementing Directive 2009/125/EC.
GB Cooking modes ! A temperature value can be set for all cooking modes between 50°C and Max, except for the following modes • GRILL and DOUBLE GRILL (recommended: set only to MAX power level). • FAN-ASSISTED DOUBLE GRILL (recommended: do not exceed 200°C). DEFROSTING mode The fan located on the bottom of the oven makes the air circulate at room temperature around the food.
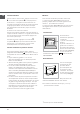
GB Lower compartment* Timer feature This function may be accessed by pressing the button, after which the display will show the symbol . Every time the + button is pressed it corresponds to a time increase of 10 seconds, until it reaches 99 minutes and 50 seconds. After this point, each press of the button represents an increase of one minute, up to a maximum of 10 hours. Pressing the - button reduces the time. After the time period has been set, the timer will begin to count down.
GB Oven cooking advice table Cooking modes Foods Duck Roast veal or beef Static Roast pork Biscuits (shortcrust pastry) Tarts Pizza (on 2 racks) Lasagne Lamb Roast chicken + potatoes Mackerel Fan-assisted Sponge cake made with yoghurt Cream puffs (on 2 racks) Biscuits (on 2 racks) Sponge cake (on 1 rack) Sponge cake (on 2 racks) Savoury pies Sole and cuttlefish Squid and prawn kebabs Top Cod fillet Grilled vegetables Veal steak Cutlets Hamburgers Mackerel Double Grill Toast With the rotisserie Spit-roas
Using the glass ceramic hob ! The glue applied on the gaskets leaves traces of grease on the glass. Before using the appliance, we recommend you remove these with a special nonabrasive cleaning product. During the first few hours of use there may be a smell of rubber which will disappear very quickly. Switching the cooking zones on and off To switch on a cooking zone, turn the corresponding knob in a clockwise direction.
Precautions and tips GB ! This appliance has been designed and manufactured in compliance with international safety standards. The following warnings are provided for safety reasons and must be read carefully. General safety • The glass ceramic hob is resistant to temperature fluctuations and shocks. It is, however, wise to remember that blades or cooking utensils may ruin the surface of the hob.
Care and maintenance • Make the most of your hot plate's residual heat by switching off cast iron hot plates 10 minutes before the end of your cooking time and glass ceramic hot plates 5 minutes before the end of cooking time. • The base of your pot or pan should cover the hot plate. If it is smaller, precious energy will be wasted and pots that boil over leave encrusted remains that can be difficult to remove.
GB Catalitic Cleaning* In some models, the most exposed internal vertical sides of the oven are coated with porous enamel, which is called catalytic enamel. When heated, this enamel destroys fat particles given off by the food. This „oxidation” of the fat particles occurs when the temperature of the sides exceeds 170°C. The porous quality of the catalytic enamel increases the surface area where the exchange vital to the oxidation of the fats takes place.
Инсталиране ! Важно е да съхранявате тази книжка, за да може да я използвате за справка във всеки момент. При продажба на уреда, при прекратяване на използването му или при преместване се уверете, че книжката с инструкциите е заедно с него. ! Прочетете внимателно инструкциите: в тях има важни сведения за инсталирането, използването и безопасността при работа с уреда. ! Инсталирането на уреда трябва да се извърши от квалифициран специалист съгласно настоящите инструкции.
BG Свързване на захранващия кабел към електрическата мрежа Монтираите върху кабела нормализиран щепсел за електрическо натоварване, посочено на табелката с характеристики, която е поставена на уреда (виж таблица „Технически данни”). Свържете уреда директно към мрежата, като за целта използваите многополюсен прекъсвач с минимално отваряне между контактите от 3 mm, поставен между уреда и мрежата.
Пуск и експлоатация Използване на фурната ! При първото включване на фурната тя трябва да поработи празна за наи-малко половин час при термостат на максимум и затворена врата. След това я изключете, отворете вратата и проветрете помещението. Миризмата, която се усеща, се дължи на използваните за защита на фурната вещества. ! Преди употреба трябва да отстраните изцяло пластмасовото покритие, поставено на страничните стени на уреда.
BG Функция “Размразяване” Вентилаторът, разположен в дъното на фурната, принуждава въздухът в обема на фурната да циркулира при стайна температура около храната. Тази функция се препоръчва за размразяване на всички видове храни, но по-специално за деликатни и нежни ястия, които не изискват топлина, като например: сладоледени торти, плодови торти, десерти със сметана или ячен крем. Използвайки вентилаторът времето за размразяване се намалява наполовина.
5. Вентилиран двоен грил - Позиция на ключа : - Ключа на термостата : между 50°C и Max и Обединява еднопосочното термично греене . усилена циркулация на въздуха във фурната в Това не позвлява изгаряне на повърхностния слой, тъй като топлината прониква дълбоко ястието.Чрез тази система на печене се постигат изключителни резултати при приготвянето на, шишчета от месо и зеленчук, свински бутове агнешки котлети, свинско филе и др.Системата е превъзходна за приготвяне на всички видове риба.
Използване на стъклокерамичния готварски плот BG ! Лепилото, използвано при поставяне на уплътненията, оставя маслени следи върху стъклото. Препоръчва се, преди да използвате уреда, да отстраните тези следи със специфичен продукт за поддържане, които не е абразивен. През първите няколко часа на работа може да се усети миризма на гума, която все пак бързо ще изчезне. Включване и изключване на зоните за готвене За да включите зона за печене, завъртете съответния превключвател по посока на часовата стрелка.
Предпазни мерки и препоръки счупят готварския плот. Ако това се случи, незабавно изключете щепсела на печката от мрежата и се обърнете само към оторизиран технически сервиз, като изискате използването на оригинални резервни части. Неспазването на гореизложеното може да се отрази на безопасността на уреда. • Уредът е разработен за непрофесионална употреба в жилищни сгради. • Уредът не трябва да се инсталира на открито, дори когато е на защитено място.
Indesit Company S.P.A. Поддръжка и почистване Viale Aristide Merloni,47 60044 Fabriano (AN) www.indesit.com XEROX FABRIANO 04/2014-195122169.00 Изключете уреда BG Преди да извършите операции по уреда, тои трябва да бъде изключен от мрежата за електрическо захранване. Почистване на фурната ! Не използваите парна струя за почистване. • Вътрешните емаилирани или изработени от неръждаема стомана части и гумените уплътнения могат да се почистват с гъба, напоена с хладка вода и неутрален сапун.