
Instruction for Use


GB
19
Timer*
To activate the Timer proceed as follows:
1. Turn the TIMER knob in a clockwise direction for
almost one complete revolution to set the buzzer.
2. Turn the TIMER knob in an anticlockwise direction
to set the desired length of time.
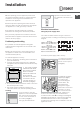
Rotisserie
To operate the rotisserie
(see diagram) proceed as
follows:
1. Place the dripping
pan in position 1.
2. Place the rotisserie
support in position 4 and
insert the spit in the hole
provided on the back
panel of the oven.
3. Activate the rotisserie
by selecting
with
the SELECTOR knob.
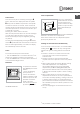
Lower compartment*
There is a compartment
underneath the oven that
may be used to store
oven accessories or deep
dishes. To open the door
pull it downwards (see
gure).
! Do not place flammable
materials in the lower oven compartment.
! The internal surfaces of the compartment (where
present) may become hot.
*
Only available in certain models.
Cooking on several shelves simultaneously
If it is necessary to use two racks, use the FAN OVEN
cooking mode
, as this is the only cooking mode
suited to this type of cooking. We also recommend
that:
• Positions 1 and 5 are not used. This is because
excessive direct heat can burn temperature
sensitive foods.
• Positions 2 and 4 are used and that food that
requires more heat is placed on the rack in position
2.
• When cooking foods that require different cooking
times and temperatures, set a temperature
that is halfway between the two recommended
temperatures (see Oven cooking advice table) and
place the more delicate food on the rack in position
4. Remove the food that requires a shorter cooking
time first.
• When cooking pizzas on several racks with the
temperature set to 220°C, the oven is preheated for
15 minutes. Generally speaking, cooking on the rack
in position 4 takes longer: we recommend that the
pizza cooked on the lowest rack position is removed
first, followed by the pizza cooked in position 4 a few
minutes later.
• Place the dripping pan on the bottom and the rack
on top.
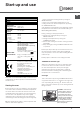
Timer feature
This function may be accessed by pressing the
button, after which the display will show the symbol
. Every time the
+
button is pressed it corresponds
to a time increase of 10 seconds, until it reaches 99
minutes and 50 seconds. After this point, each press of
the button represents an increase of one minute, up to
a maximum of 10 hours.
Pressing the
-
button reduces the time.
After the time period has been set, the timer will begin
to count down. When the timer reaches zero, the
buzzer will sound (this may be stopped by pressing
any button).
The time may be displayed by pressing the
button,
and the
symbol indicates that the timer function has
been set. After approximately 7 seconds, the display
will automatically revert to the timer.