
Instruction for Use
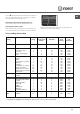

28
GB
* Only available in certain models.
When using this mode, we recommend you set the
energy level to the highest setting, even though lower
levels can be set, simply by adjusting the thermostat
knob to the desired level.
Setting
, “fan assisted grill”,only with the oven door
shut, is extremely useful for grilling foods rapidly, as
the distribution of heat makes it possible not only to
brown the surface, but also to cook the bottom part.
Moreover, it can also be used for browning foods at the
end of the cooking process, such as adding that gratin
finish to pasta bakes, for example.
When using this mode, place the grid on the 2nd or 3rd
oven rack from the bottom (see cooking table) then, to
prevent fat and grease from dripping onto the bottom
of the oven and thus smoke from forming, place a
dripping-pan on the 1st rack from the bottom.
! Always use the grill with the oven door shut. This will
allow you both to obtain excellent results and to save
on energy (approximately 10%).
When using this mode, we advise you to set the
thermostat to 200°C, as it is the most efficient way to
use the grill, which is based on the use of infrared rays.
However, this does not mean you cannot use lower
temperatures, simply by adjusting the thermostat knob
to the desired temperature.
Therefore the best results when using the grill modes
are obtained by placing the grid on the lower racks
(see cooking table) then, to prevent fat and grease
from dripping onto the bottom of the oven and smoke
from forming, place a dripping-pan on the 1st oven
rack from the bottom.
Baking Cakes
When baking cakes, always place them in a preheated
oven. Make sure you wait until the oven has been
preheated thoroughly (the red light “O” will turn off). Do
not open the oven door during baking to prevent the
cake from dropping.
Cooking Pizza
For best results when cooking pizza, use the “fan
assisted “
mode:
• Preheat the oven for at least 10 minutes;
• Use a light aluminium pizza pan, placing it on the
grid supplied with the oven. If the dripping pan is
used, this will extend the cooking time, making it
difficult to get a crispy crust;
• Do not open the oven door frequently while the pizza
is cooking;
• If the pizza has a lot of toppings (three of four), we
recommend you add the mozzarella cheese on top
halfway through the cooking process.
• When cooking pizza on two racks, use the 2nd
and 4th with a temperature of 220°C and place the
pizzas in the oven after having preheated it for at
least 10 minutes.
Cooking Fish and Meat
When cooking white meat, fowl and fish, use
temperature settings from 180 °C to 200 °C.
For red meat that should be well done on the outside
while tender and juicy in the inside, it is a good idea to
start with a high temperature setting (200°C-220°C) for
a short time, then turn the oven down afterwards.
In general, the larger the roast, the lower the
temperature setting. Place the meat on the centre of
the grid and place the dripping pan beneath it to catch
the fat.
Make sure that the grid is inserted so that it is in the
centre of the oven. If you would like to increase the
amount of heat from below, use the low rack heights.
For savoury roasts (especially duck and wild game),
dress the meat with lard or bacon on the top.
Electronic timer*
This function displays the time and works as a timer
which counts down to zero.
! All functions will be implemented approximately 7
seconds after they have been set.
Resetting the clock
After the appliance has been connected to the power
supply, or after a power cut, the clock display will
begin to blink, showing the figure: 0:00
• Press button
and then buttons
-
and
+
to set the
exact time. Press and hold the buttons to quicken
the count upwards.
Any necessary modifications can be made by
repeating the above process.
Timer feature
This function may be accessed by pressing the
button, after which the display will show the symbol
. Every time the
+
button is pressed it corresponds
to a time increase of 10 seconds, until it reaches 99
minutes and 50 seconds. After this point, each press of
the button represents an increase of one minute, up to
a maximum of 10 hours.
Pressing the
- button reduces the time.
After the time period has been set, the timer will begin
to count down. When the timer reaches zero, the
buzzer will sound (this may be stopped by pressing
any button).
The time may be displayed by pressing the
button,