Operating Instructions COOKER AUS AUS Contents Installation, 2-6 English,1 Positioning and levelling Electrical connection Gas connection Adapting to different types of gas Technical data Table of burner and nozzle specifications Description of the appliance, 7 Overall view Control panel Start-up and use, 8-10 K6T21/AUS Using the hob Using the oven Oven cooking advice table Precautions and tips, 11 General safety Disposal Respecting and conserving the environment Care and maintenance, 12 Switching
Installation AUS ! Before operating your new appliance please read this instruction booklet carefully. It contains important information concerning the safe installation and operation of the appliance. ! Please keep these operating instructions for future reference. Make sure that the instructions are kept with the appliance if it is sold, given away or moved. ! The appliance must be installed by a qualified professional according to the instructions provided.
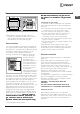
(BS 669 Current Edition). The gas inlet for the cookers is a threaded G 1/2 gas female fitting. 420 mm. 420 mm. Min. 600 mm. Min. Min. min. 650 mm. with hood min. 700 mm. without hood HOOD Fig. A Fig. B ! Some models can have their gas connection inverted. It is important to make sure the safety chain is always situated on the side which corresponds to the hose holder (Fig. B). Gas connection 700 mm T he cooker should be connected to the gas-supply by a corgi registered installer.
AUS Replacement fuse covers: If a replacement fuse cover is fitted, it must be of the correct colour as indicated by the coloured marking or the colour that is embossed in words on the base of the plug. Replacements can be obtained directly from your nearest Service Depot. Removing the plug: If your appliance has a non-rewireable moulded plug and you should wish to remove it to add a cable extension or to re-route the mains cable through partitions, units etc.
Take particular care handling the spark plug wires and the thermocouple pipes. 6. Replace all the parts, following the steps described above in the reverse order.. Adjusting the gas oven burner’s minimum setting: ! If the appliance is connected to a liquid gas supply, the regulatory screw must be fastened as tightly as possible. 3. While the burner is alight, quickly change the position of the knob from minimum to maximum and vice versa several times, checking that the flame is not extinguished.
AUS Table of burner and nozzle specifications Table 1 Liquid Gas Burner Diameter (mm) Thermal Power kW (p.c.s.*) By-Pass 1/100 Nozzle 1/100 Natural Gas Flow* g/h Nozzle 1/100 Nominal Reduced (mm) (mm) *** ** (mm) Flow* l/h Fast (Large)(R) 100 3,00 0,7 41 80 218 214 129 286 Semi Fast (Medium)(S) 75 1,90 0,4 30 64 138 136 110 181 Auxiliary (Small)(A) 55 1,00 0,4 30 50 73 71 85 95 Triple Ring (TC) 130 3.25 1.
Description of the appliance Overall view AUS Glass cover* Gas burner Hob grid Containment surface for spills GUIDE RAILS for the sliding racks position 5 position 4 position 3 position 2 position 1 Control panel GRILL rack DRIPPING PAN rack Adjustable foot Adjustable foot Control panel OVEN LIGHT button OVEN control knob GAS BURNER ignition button* Hob BURNER control knobs TIMER knob * Only available in certain models.
Start-up and use AUS Using the hob Practical advice on using the burners Lighting the burners For each BURNER knob there is a complete ring showing the strength of the flame for the relevant burner. To light one of the burners on the hob: 1. Bring a flame or gas lighter close to the burner. 2. Press the BURNER knob and turn it in an anticlockwise direction so that it is pointing to the maximum flame setting E. 3.
symbol 1, then hold the OVEN control knob and turn it in an anticlockwise direction, towards the MAX position, until the burner is lit. If, after 15 seconds, the burner is still not alight, release the knob, open the oven door and wait for at least 1 minute before trying to light it again. If there is no electricity the burner may be lit using a flame or a lighter, as described above.
AUS Oven cooking advice table Foods Pasta Lasagne Cannelloni Gratin dishes Meat Veal Chicken Duck Rabbit Pork Lamb Fish Mackerel Dentex Trout baked in foil Pizza Neapolitan-style Pies Biscuits Tart Savoury pies Leavened cakes Grilled foods Veal steak Cutlets Hamburgers Mackerel Toast Weight (in kg) Rack position Preheating time (min) Recommended Temperature (°C) Cooking time (minutes) 2.5 2.5 2.5 3 3 3 10 10 10 210 200 200 60-75 40-50 40-50 1.7 1.5 1.8 2 2.1 1.
Precautions and tips ! This appliance has been designed and manufactured in compliance with international safety standards. The following warnings are provided for safety reasons and must be read carefully. General safety • The appliance was designed for domestic use inside the home and is not intended for commercial or industrial use. • The appliance must not be installed outdoors, even in covered areas. It is extremely dangerous to leave the appliance exposed to rain and storms.
Care and maintenance 04/2010 - 195074968.01 XEROX FABRIANO AUS Switching the appliance off Inspecting the oven seals Disconnect your appliance from the electricity supply before carrying out any work on it. Cleaning the appliance Check the door seals around the oven regularly. If the seals are damaged, please contact your nearest Authorised After-sales Service Centre. We recommend that the oven is not used until the seals have been replaced.