Operating Instructions 50cm Free Standing Gas Cooker Contents GB English,1 Introduction, 2 Installation, 3-7 Gas connection Electrial connection Adapting the cooker to different types of gas Burner and Nozzle Specifications Safety Information, 8 Features, 9 Control Panel, 10 Use of hotplates, 11 Grilling, 12 KD3G2/G KD3G2S/IR KD3G2SL/IR KD3G21/G KD3G21S/IR KD3G21SL/IR Oven, 13 Oven cooking charts, 14 Care and Cleaning, 15 Cooking Results Not Satisfactory?, 16 Something Wrong With Your Cooker?, 17 If it
Introduction GB Your new appliance is guaranteed* and will give lasting service. This guarantee is only applicable if the appliance has been installed in accordance with the installation instructions detailed in this booklet. To help make best use of your cooking equipment, please read this booklet carefully. The cooker is designed specifically for domestic use and responsibility will not be accepted for use in any other installation.
Installation The appliance must$only be installed by a competent person. In the UK, CORGI registered installers undertake to work to safe and satisfactory standards. Before moving your cooker check that it is cool, and switch off at the cooker control unit. Movement of your cooker is most easily achieved by lifting the front as follows: Open the grill door sufficiently to allow a comfortable grip on the underside front edge of the oven roof, avoiding any grill elements.
hose holder with that of the cap and replace the gasket (supplied with the appliance). In the case of connection to liquid gas, by tank, use pressure regulators that conform to the regulation in force. The gas supply must be connected to the left of the appliance. Be sure that the hose does not pass through the rear of the cooker touching hot parts.
rating of 45 amp. In this case the cable is not supplied. Disposing of the plug: Ensure that before disposing of the plug itself, you make the pins unusable so that it cannot be accidentally inserted into a socket.
GB · remove screw V and then the oven burner; · Unscrew the oven burner nozzle using the socket spanner for the nozzles Z, or a 7 mm socket spanner, and replace it with a nozzle suited to the new type of gas (see Table 1). Take particular care handling the spark plug wires and the thermocouple pipes. · Replace all the parts, following the steps described above in the reverse order.
Burner and Nozzle Specifications Table 1 Liquid Gas Burner Diameter (mm) By-Pass Nozzle 1/100 1/100 Flow* g/h Nozzle 1/100 Nominal Reduced (mm) (mm) *** ** (mm) Flow* l/h Fast (Large)(R) 100 94 3,00 0,7 41 87 218 214 128 286 Semi Fast (Medium)(S) 75 69 1,90 0,4 30 70 138 136 104 181 Auxiliary (Small)(A) 51 46 1,00 0,4 30 52 73 71 76 95 Oven - 2,60 0,6 36 75 189 186 123 248 Grill - 2,50 1,3 63 80 182 179 122 238 28-30 20 35 37 25 45 Nomina
Safety Information GB When used properly your appliance is completely safe but as with any electrical product there are certain precautions that must be observed. PLEASE READ THE PRECAUTIONS BELOW BEFORE USING YOUR APPLIANCE. Always Remove all packing from inside the oven and grill compartments before switching on for the first time. Understand the controls prior to using the appliance. Keep children away from the appliance when grilling as the surfaces will get extremely hot during and after use.
Features HOB VENTILATION SLOTS GB 1900W 1000W 1900W 3000W CONTROL PANEL GRILL/MEAT PAN WITH REMOVABLE HANDLE AND WIRE FOOD SUPPORT GRILL GRILL DOOR REMOVABLE INNER GLASS DOOR MAIN OVEN WIREWORK SHELF SUPPORTS MODEL & SERIAL NUMBER OVEN ROD SHELVES 9
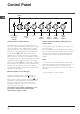
Control Panel TIMER* GB ELECTRONIC* INIECTION BUTTON MAIN OVEN GRILL Control Knobs for the gas burners The position of the gas burner controlled by each one of the knobs is shown by a solid ring . To light one of the burners, hold a lighted match or lighter near the burner and, at the same time, press down and turn the corresponding knob counter clockwise to the maximum - setting. Each burner can be operated at its maximum, minimum or intermediate power.
Use of Hotplates Practical Advice on Using the Burners To use the burners as efficiently as possible, some basic guidelines should be followed: Use cookware that is the right size for each burner (see table) in order to prevent the flame from spreading beyond the bottom of the cookware. Only use cookware with flat bottoms. As soon as the boiling point is reached, turn the knob to the lowest setting. Always use lids with pots and pans.
Grilling GB GRILLING MUST BE DONE WITH THE GRILL DOOR OPEN. CONTROL KNOBS MAY BECOME HOT DURING GRILLING. CAUTION: ACCESSIBLE PARTS WILL BECOME HOT WHEN THE GRILL IS USED - CHILDREN SHOULD BE KEPT AWAY. To operate the grill proceed as follows: Open the grill door and remove the grill pan. Press the ignition button and then push in and turn the grill control knob anti-clockwise to the large flame symbol. Continue to press the ignition button until the spark lights the gas.
Oven The oven has different heat zones - the thermostat settings refer to the temperature on the middle shelf; above this shelf it is hotter and below it is cooler. Two shelves enable full use of the temperatures inside the oven. Each shelf has a safety stop to prevent if from being pulled out too far when attending to food. Shelves are removed from the oven by pulling them out to the stop and then lifting them at the front to withdraw. The grill pan without the handle can be used in the oven.
Oven Cooking Chart GB The following times and setting are for guidance only. You may wish to alter the setting to give a result more to your satisfaction. When a different setting to that shown below is given in a recipe, the recipe instructions should be followed. Allow 15 Food minutes preheat for best results. Always turn the thermostat knob to Mark 9 before selecting the appropriate gas Mark. Shelf position 1 is the highest. Gas M a rk S h e lf P o s itio n A p p ro x.
Care and Cleaning Grill Remove the grill pan and the wire grid food support, it is best to wash these items immediately after use to prevent stains from being burnt on when used again. Wipe out the Grill compartment, use a fine steel wool soap pad to remove stubborn stains from the grill runners and the floor of the compartment. Wipe over the control panel with a damp cloth and polish with a dry cloth.
Cooking Results Not Satisfactory? GB Problem Check Grilling Uneven cooking front to Ensure that the grill pan is positioned centrally below the grill element. back 16 Fat splattering Ensure that the grill is not set to too high a temperature. Oven Baking Uneven rising of cake Ensure that the oven shelves are level by using a spirit level on the rod shelf and adjusting, using suitable packing e.g. wood, under the feet of the appliance. This should be checked both left to right and front to back.
Something Wrong with your Cooker? Before contacting your nearest Service Centre/Installer, check the problem guide below; there may be nothing wrong with your cooker. Problem Ignition does not work Oven Cavity Oven Burner GB Check If all burners fail to ignite: Check that sparks appear at the burners; A clicking noise should be heard. If not Check that the plug is plugged in to a 13amp Electric socket and the supply is switched on.
If It Still Wont Work... GB Contact the Service Office (0870 6070805) If something is still wrong with your appliance after you have been through the Something Wrong list: 1. Switch off and unplug the appliance from the mains. 2. Call your nearest Service Office or local importer. When you contact us we will want to know the following: 1. Your name, address and postcode. 2. Your telephone number. 3. Clear and concise details of the fault. 4. The Model number and the Serial number of your appliance. 5.
Technical Characteristics The European Directive 2002/96/EC on Waste Electrical and Electronic Equipment (WEEE), requires that old household electrical appliances must not be disposed of in the normal unsorted municipal waste stream. Old appliances must be collected separately in order to optimise the recovery and recycling of the materials they contain and reduce the impact on human health and the environment.
Key Contacts 02/2008 - 195048072.07 XEROX BUSINESS SERVICES Repair Service and Information Desk UK: 0870 6070805 GB (Open 8am to 5.30pm Mon - Fri 9am to 5pm Sat and 10am to 4pm Sun Closed Bank Holidays) Note: Our operators will require the following information:Model Number: Serial Number: Extended Warranty To join: UK 0870 442 7661 (Open 8 to 8 Mon-Sun) Genuine Parts & Accessories Mail Order Hotline To join: UK 0870 558 5850 (Open 8.30 to 5 Mon-Fri and 8.30 to 12 Sat).