Operating Instructions Free Standing Gas Cooker Contents GB English, 1 Introduction, 2 For Your Safety, 3 Clock and Minute Minder Operation, 4-5 Hotplate, 6 Grill, 7 Main Oven, 8 Main Oven Cooking Charts, 9-10 Top Oven, 11 Top Oven Cooking Charts, 12-13 KD6G25X KDP60G KD6G25M KD6G25W Care and Cleaning, 14 Something Wrong with your cooker?, 15 Installation Instructions, 16-18 If it still Won't Work, 21 Guarantee Information, 22 Service Information, 23 GB
Introduction GB To help you make the best use of your cooker, PLEASE READ THIS BOOKLET CAREFULLY. Your new cooker is guaranteed and will give lasting service. The guarantee is only applicable if the cooker has been installed in accordance with the Installation Instructions. The cooker is designed specifically for domestic use and responsibility will not be accepted for use in any other installation. When first using the cooker ensure that the room is well ventilated (e.g.
For your Safety Please read the precautions below before using your cooker. GB ALWAYS . . . NEVER . . . ALWAYS NEVER ALWAYS ALWAYS ALWAYS ALWAYS ALWAYS ALWAYS ALWAYS ALWAYS ALWAYS ALWAYS ALWAYS ALWAYS make sure you understand the controls before using the cooker. check that all controls on the cooker are turned off after use. stand back when opening an oven door to allow heat to disperse. use dry, good quality oven gloves when removing items from the ovens.
Clock and Minute Minder CLOCK OPERATION GB 00.00 12.00 To Set Time of Day Step 1 Check that the electricity supply to the cooker is turned on. Step 2 When switched on the display will show 0.00 flashing intermittently. Step 3 Press the " " button and then press either the "+" or "-" buttons to set the correct time of day. Note: If the electricity supply has been off, the "+" button must be pressed once before the "-" button, if it is required to reduce the time of day.
Clock and Minute Minder 00.20 MINUTE MINDER OPERATION GB To Set the Minute Minder Step 1 Press the "+" button until the required time is set. A "Bell" symbol will light up. During setting the time adjusts in 10 second intervals up to a maximum of 99mins 50secs. It can also be adjusted by pressing the "-" button. At the end of the set time, a bleeping sound will be heard and the "Bell" will disappear. 1 3.23 The bleeper can be cancelled by pressing the "+" button.
Hotplate GB The hotplate lid is fitted with a safety device which cuts off the gas supply to the hotplate burners unless the lid is fully open. Do not use the safety device as a means of controlling the hotplate burners. The hotplate has one high speed burner, two normal simmering burners and one small simmering burner which will accommodate pans between 120mm (5") and 260mm (10") diameter. Locate the pan support trivet above one of the simmering burners if a very small pan is being used.
Grill CAUTION - ACCESSIBLE PARTS MAY BECOME HOT WHEN THE GRILL IS USED. YOUNG CHILDREN SHOULD BE KEPT AWAY. The grill is fitted with a safety device that will cut off the gas supply to the burner if the flame is extinguished for any reason. Each time the grill is used, the safety device has to be activated by pushing and holding in the control knob for 3 seconds after the gas has lit. A gentle flow of air will be blown from underneath the control panel when the grill or top oven is in use.
Main Oven GB The main oven is fitted with a safety device that will cut off the gas supply to the burner if the flame has been extinguished for any reason. Each time the main oven is used, the safety device has to be activated by pushing and holding in the control knob for 3 seconds after the gas has lit. The oven has different heat zones - the thermostat settings refer to the temperature on the middle shelf position; above this shelf it is hotter and below it is cooler.
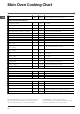
Main Oven Cooking Chart The following times and setting are for guidance only. You may wish to alter the setting to give a result more to your satisfaction. When a different setting to that shown below is given in a recipe, the recipe instructions should be followed. Food Gas Mark Allow 15 minutes preheat for best results. Always turn the thermostat knob to Mark 9 first, before turning back to the required Gas Mark. Shelf position 1 is the highest. GB Shelf Approx.
Main Oven Cooking Chart GB Gas Mark Food Shelf Approx. Cooking Time and Comments Positions CAKES, PASTRIES AND BISCUITS Small cakes - 2 trays 5 1&3 - 1 tray 5 2 or 3 only Victoria sandwich 2x8" (205mm) 4 1&3 Fatless sponge 2x7" (180mm) - 3 egg mix 5 2 20 - 25 mins. 2 tins side by side Christmas cake 2 3 or 4 4 - 6½ hrs depending on recipe Madeira cake 7" 4 3 1¼ - 1½ hrs. Rich Fruit cake 9" (230mm) 2 3 3 - 3½ hrs.
Top Oven The top oven can be used to cook small quantities of food or used in conjunction with the main oven to provide additional cooking space. The top oven is fitted with a safety device that will cut off the gas supply to the burner if the flame is extinguished for any reason. Each time the top oven is used, the safety device has to be activated by pushing and holding in the control knob for 3 seconds after the gas has lit.
Top Oven Cooking Chart GB The following times and setting are for guidance only. You may wish to alter the setting to give a result more to your satisfaction. When a different setting to that shown below is given in a recipe, the recipe instructions should be followed. Food Gas Mark Allow 15 minutes preheat for best results. Always turn the thermostat knob to Mark 8 first, before turning back to the required Gas Mark. Shelf Approx.
Top Oven Cooking Chart Food Gas Mark Shelf Approx. Cooking Time and Comments Positions GB CAKES, PASTRIES AND BISCUITS Small Cakes (16 per tray) 5 2 20 - 25 mins Victoria sandwich (2x180mm / 7 ") 4 2 25 - 30 mins. Swiss Roll (3 egg quantity) 6 2 10 - 12 mins. Christmas cake (1 x 205mm / 8") 2 2 or 3 Madeira cake (1 x 180mm / 7") 4 2 Rich Fruit cake (1 x 180mm / 7") 2 2 or 3 2¼ - 2½ hrs. Gingerbread 3 2 1½ - 1¾ hrs. Scones - 16 per tray 7 2 12 - 15 mins.
Care and Cleaning GB ! Never use steam cleaners or pressure cleaners on the appliance. ! Clean the glass part of the oven door using a sponge and a non-abrasive cleaning product, then dry thoroughly with a soft cloth. Do not use rough abrasive material or sharp metal scrapers as these could scratch the surface and cause the glass to crack. ! The accessories can be washed like averyday crockery (even in your dishwasher). ! Switch off the electricity supply and allow to cool before cleaning the cooker.
Something Wrong with your Cooker Before contacting your Service Centre or Installer, check the problem guide below, there may be nothing wrong with your cooker. PROBLEM CHECK Burner will not light: If all burners fail to ignite: Check that sparks appear at the burners; a clicking noise should be heard. If not; GB Check that the electricity supply is turned on. If the electricity supply has failed, all burners can be lit by a match.
Installation GB Prior to installation, ensure that the local distribution conditions (nature of the gas and gas pressure) and the adjustment conditions are compatible. The adjustment conditions for this appliance are stated on the data badge which is fitted on the back panel. This appliance is not designed to be connected to a combustion products evacuation device. It must be installed and connected in accordance with current installation regulations.
Installation SPACE FOR FIXING 750mm Min 840 mm Min 400 mm Min The cooker can be close fitted below hotplate level. This requires a minimum distance of 600mm between cupboard units of hotplate height. When installing next to a tall cupboard, partition or wall, for a minimum distance of 400mm above hotplate level, allow a side clearance of at least 65mm. The diagram below illustrates the minimum clearance between the cooker and adjacent walls, cupboards etc.
Installation STABILITY CHAIN A hole in the gas inlet valve bracket can be used to engage a stability chain. CONNECTING TO GAS SUPPLY 300 670 GB Connection to the cooker should be made with an approved appliance flexible connection to BS 669. A length of 0.9 to 1.25m is recommended. The length of hose chosen should be such that when the cooker is in situ, the hose does not touch the floor.
Electrical Connection WARNING - THIS APPLIANCE MUST BE EARTHED. CONNECT TO A 230-240V A.C. SUPPLY ONLY. Connection to the electricity supply should be made via a properly earthed, readily accessible wall socket which is adjacent to but not directly above, and not more than 1.25m away from the appliance and capable of electrical isolation. The mains lead should be routed such that it cannot touch hot parts of the cooker i.e. the back panel above a height of 650mm from the floor.
Installation GB INSTALLATION AND OPERATIONAL CHECKS After installation, check for gas soundness. The supply pressure can be checked at the front left hotplate burner injector. Fit the hotplate burner bodies and caps, pan supports and shelf shield(s). Referring to the instructions for use where necessary, 1. Check that the hotplate burners ignite and crosslight to all ports. Check for a steady flame on the low setting. 2.
If it Still Won't Work Contact the Service Office (UK: 08709 066 066) If something is still wrong with your appliance after you have been through the 'Something Wrong' list: 1. Switch off and unplug the appliance from the mains. 2. Call your nearest Service Office or local importer. When you contact us we will want to know the following: 1. 2. 3. 4. Your name, address and postcode. Your telephone number. Clear and concise details of the fault. The Model number and the Serial number of your appliance. 5.
Guarantee GB 12 months Parts and Labour Guarantee Your appliance has the benefit of our manufacturer's guarantee, which covers the cost of breakdown repairs for twelve months from the date of purchase. This gives you the reassurance that if, within that time, your appliance is proven to be defective because of either workmanship or materials, we will, at our discretion, either repair or replace the appliance at no cost to you.
After Sales Service GB No one is better placed to care for your Indesit appliance during the course of its working life than us - the manufacturer. Essential Contact Information Indesit Service We are the largest service team in the country offering you access to 400 skilled telephone advisors and 1100 fully qualified engineers on call to ensure you receive fast, reliable, local service. UK: 08709 066 066 Republic of Ireland: 0818 313 413 www.indesitservice.co.
11/2007 - 195064062.