Mode d’emploi CUISINIERE FR GB Sommaire Installation, 2-3 Français, 1 English, 12 Positionnement et nivellement Raccordement électrique Caractéristiques techniques Description de l’appareil, 4 Vue d’ensemble Tableau de bord Utilisation du four, 5-8 Mise en marche du four Programmes de cuisson Tableau de cuisson KN3E6 A/FR Utilisation du plan électrique, 9 Allumer et éteindre les foyers Les foyers Précautions et conseils, 10 Sécurité générale Mise au rebut Economies et respect de l’environnement
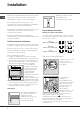
Installation ! Conservez ce mode d’emploi pour pouvoir le consulter à tout moment. En cas de vente, de cession ou de déménagement, veillez à ce qu’il suive l’appareil. Montage des pieds* fournis avec l’appareil par encastrement sous la base.
5. fixez le câble d’alimentation dans le serre-câble prévu. 6. fermez le couvercle du bornier et vissez la vis V. Branchement du câble d’alimentation au réseau électrique Montez sur le câble une fiche normalisée adaptée à la charge indiquée sur l’étiquette des caractéristiques collée sur l’appareil.
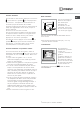
Description de l’appareil FR Vue d’ensemble Table de cuisson electrique GLISSIERES de coulissement niveau 5 niveau 4 niveau 3 niveau 2 niveau 1 Tableau de bord Support GRILLE Support LECHEFRITE Pied de réglage Pied de réglage Tableau de bord Voyant THERMOSTAT Bouton THERMOSTAT Bouton PROGRAMMES 4 Voyant FONCTIONNEMENT PLAQUE ELECTRIQUE Bouton foyer PLAQUE ELECTRIQUE
Utilisation du four ! Pour les modèles équipés d’une grille de réduction, n’utiliser cette dernière que pour le brûleur auxiliaire, en cas d’utilisation de casseroles ayant moins de 12 cm de diamètre. FR Utilisation du four ! Lors de son premier allumage, faire fonctionner le four à vide, porte fermée, pendant au moins une heure en réglant la température à son maximum. Puis éteindre le four, ouvrir la porte et aérer la pièce.
FR Programmes de cuisson ! Pour tous les programmes, vous pouvez sélectionner une température comprise entre 50°C et MAX., sauf pour : Programme DOUBLE GRIL Un gril plus grand que d’habitude et au design novateur qui augmente de 50% les performances de cuisson et qui supprime les zones d’angle où la chaleur n’arrive pas. Utilisez ce gril pour dorer de façon uniforme. • GRIL et DOUBLE GRIL (il est conseillé dans ce cas de sélectionner MAX.
Fonction minuterie Niche inférieure* Pour accéder à cette fonction, appuyez sur la touche Une niche ménagée audessous du four peut être utilisée pour entreposer des accessoires ou des casseroles. Pour ouvrir le volet, faites-le pivoter vers le bas (voir figure). n, l'écran affiche le symbole n. A chaque pression de la touche + correspond un avancement de 10 secondes jusqu'à 99 minutes 50 secondes.
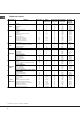
Tableau de cuisson FR Programmes Statique Ventilé Voute Double Gril Double Gril Ventilé Four Pâtisserie Aliments Poids (Kg) Niveau enfournement Préchauffag e (minutes) Température préconisée Canard Roast-beef Rôti de porc Biscuits Tartes Pizza (sur 2 niveaux) Lasagnes Agneau Poulet rôti + pommes de terre Maquereaux Cake aux fruits Choux (sur 2 niveaux) Biscuits (sur 2 niveaux) Génoise (sur 1 niveau) Génoise (sur 2 niveaux) Tartes salées Soles et seiches Brochettes de calmars et crevettes Tranc
Utilisation du plan de cuisson électrique ! La colle utilisée pour les joints laisse des traces de graisse sur le verre. Nous conseillons de les éliminer avant d’utiliser l’appareil à l’aide d’un produit d’entretien non abrasif. Une odeur de caoutchouc peut se dégager au cours des premières heures d’utilisation, elle disparaîtra très vite.
Précautions et conseils FR ! Cet appareil a été conçu et fabriqué conformément aux normes internationales de sécurité. Ces conseils sont fournis pour des raisons de sécurité et doivent être lus attentivement. Sécurité générale • Le plan de cuisson vitrocéramique résiste aux sautes de température et aux chocs. N'oubliez toutefois pas que des lames ou des ustensiles de cuisine pointus peuvent casser la surface du plan de cuisson.
Nettoyage et entretien Mise hors tension Avant toute opération de nettoyage ou d’entretien coupez l’alimentation électrique de l’appareil. Nettoyage de l’appareil ! Ne pas utiliser de détergents abrasifs ou corrosifs, tels que détacheurs et dérouilleurs, poudres à récurer et éponges à surface abrasive : ils risquent de rayer irrémédiablement la surface. ! Ne nettojez jamais l’appareil avec des nettoyeurs vapeur ou haute pression.
Operating Instructions COOKER AND OVEN FR Français, 1 GB English, 12 Contents Installation, 13-14 Positioning and levelling Electrical connections Technical data Description of the appliance, 15 Overall view Control panel Start-up and use, 16-19 Starting the oven Cooking modes Oven cooking advice table KN3E6 A/FR Using the electric hob, 20 Switching the cooking zones on and off Cooking zones Precautions and tips, 21 General safety Disposal Respecting and conserving the environment Care and maintena
Installation ! Before operating your new appliance please read this instruction booklet carefully. It contains important information concerning the safe installation and operation of the appliance. The legs* provided with the appliance fit into the slots on the underside of the base of the cooker. ! Please keep these operating instructions for future reference. Make sure that the instructions are kept with the appliance if it is sold, given away or moved.
GB 5. Fix the power supply cable in place by fastening the cable clamp screw. 6. Close the terminal board cover by tightening the screws V. Connecting the supply cable to the mains Install a standardised plug corresponding to the load indicated on the data plate located on the appliance. The appliance must be directly connected to the mains using an omnipolar circuit-breaker with a minimum contact opening of 3 mm installed between the appliance and the mains.
Description of the appliance GB Overall view Containment surface for spills ELECTRIC HOTPLATE GUIDE RAILS for the sliding racks position 5 position 4 position 3 position 2 position 1 Control panel GRILL DRIPPING pan Adjustable foot Adjustable foot Control panel THERMOSTAT indicator light THERMOSTAT knob PROGRAMMER knob ACTIVE HOTPLATE indicator light ACTIVE HOTPLATE knobs 15
Start-up and use GB ! The first time you use your appliance, heat the empty oven with its door closed at its maximum temperature for at least half an hour. Ensure that the room is well ventilated before switching the oven off and opening the oven door. The appliance may emit a slightly unpleasant odour caused by protective substances used during the manufacturing process burning away. ! Before operating the product, remove all plastic film from the sides of the appliance. Starting the oven 1.
Cooking modes ! A temperature value can be set for all cooking modes between 50°C and Max, except for the following modes • GRILL and DOUBLE GRILL (recommended: set only to MAX power level). • FAN-ASSISTED DOUBLE GRILL (recommended: do not exceed 200°C). BAKING mode The rear heating element and the fan come on, guaranteeing the distribution of heat delicately and uniformly throughout the oven.
GB begin to count down. When the timer reaches zero, the buzzer will sound (this may be stopped by pressing any button). The time may be displayed by pressing the G button, and the n symbol indicates that the timer function has been set. After approximately 7 seconds, the display will automatically revert to the timer. Rotisserie To operate the rotisserie (see diagram) proceed as follows: 1. Place the dripping pan in position 1. 2.
Oven cooking advice table Cooking modes Static Fan-assisted Oven Top Double Grill Fan-assisted Double Grill Baking Mode * Foods Duck Roast veal or beef Roast pork Biscuits (shortcrust pastry) Tarts Pizza (on 2 racks) Lasagne Lamb Roast chicken + potatoes Mackerel Sponge cake made with yoghurt Cream puffs (on 2 racks) Biscuits (on 2 racks) Sponge cake (on 1 rack) Sponge cake (on 2 racks) Savoury pies Sole and cuttlefish Squid and prawn kebabs Cod fillet Grilled vegetables Veal steak Cutlets Hamburger
Using the glass ceramic hob GB ! The glue applied on the gaskets leaves traces of grease on the glass. Before using the appliance, we recommend you remove these with a special nonabrasive cleaning product. During the first few hours of use there may be a smell of rubber which will disappear very quickly. • Avoid using the same cookware that is used on gas burners: the heat concentration on gas burners may have warped the base of the pan, causing it not to adhere to the surface correctly.
Precautions and tips ! This appliance has been designed and manufactured in compliance with international safety standards. The following warnings are provided for safety reasons and must be read carefully. General safety • The glass ceramic hob is resistant to temperature fluctuations and shocks. It is, however, wise to remember that blades or cooking utensils may ruin the surface of the hob.
Care and maintenance GB Switching the appliance off The cover If the cooker is fitted with a glass cover, this cover should be cleaned using lukewarm water. Do not use abrasive products. It is possible to remove the cover in order to make cleaning the area behind the hob easier. Open the cover fully and pull it upwards (see figure). Disconnect your appliance from the electricity supply before carrying out any work on it.
Catalitic Cleaning* GB In some models, the most exposed internal vertical sides of the oven are coated with porous enamel, which is called catalytic enamel. When heated, this enamel destroys fat particles given off by the food. This "oxidation" of the fat particles occurs when the temperature of the sides exceeds 170°C. The porous quality of the catalytic enamel increases the surface area where the exchange vital to the oxidation of the fats takes place.
XEROX FABRIANO 11/2010 - 195086696.