Mode d’emploi CUISINIERE FR FR Français, 1 GB English, 13 Sommaire Attention, 2 Installation, 3-6 KN3 G1 S/FR S Positionnement et nivellement Raccordement électrique Raccordement gaz Adaptation aux différents types de gaz Données techniques Tableau Caractéristiques des brûleurs et des injecteurs Description de l’appareil, 7 Vue d’ensemble Tableau de bord Mise en marche et utilisation, 8-10 Utilisation du plan de cuisson Utilisation du four Tableau de cuisson Précautions et conseils, 11 Sécurité géné
ATTENTION FR ATTENTION : cet appareil ainsi que ses parties accessibles deviennent très chauds pendant leur fonctionnement. Il faut faire attention de ne pas toucher les éléments chauffants. Ne laisser s’approcher les enfants de moins de 8 ans à moins qu’ils ne soient sous surveillance constante.
Installation ! Conservez ce mode d’emploi pour pouvoir le consulter à tout moment. En cas de vente, de cession ou de déménagement, veillez à ce qu’il suive l’appareil. ! Lisez attentivement les instructions : elles contiennent des conseils importants sur l’installation, l’utilisation et la sécurité de votre appareil.
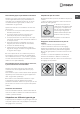
Positionnement et nivellement ! L’appareil peut être installé à côté de meubles dont la hauteur ne dépasse pas celle du plan de cuisson. ! Assurez-vous que le mur en contact avec la paroi arrière de l’appareil est réalisée en matériel ignifuge résistant à la chaleur (T 90°C). 420 mm. Min. min. 650 mm. with hood min. 700 mm. without hood 420 mm.
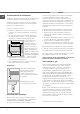
Raccordement gaz par tuyau flexible en caoutchouc Adaptation du plan de cuisson Assurez-vous que le tuyau est bien conforme aux normes applicables dans le pays d’installation. Le tuyau doit avoir un diamètre intérieur de : 8 mm en cas d’alimentation au gaz liquide; 15 mm en cas d’alimentation au gaz naturel. Remplacement des injecteurs des brûleurs du plan de cuisson: 1. enlevez les grilles du plan de cuisson et sortez les brûleurs de leur logement; 2.
FR Tableau Caractéristiques des brûleurs et des injecteurs Tableau 1 Gaz liquide Brűleur Diamčtre Puissance thermique kW (p.c.s.*) Bipasse injecteur 1/100 1/100 Gaz naturel débit* g/h injecteur 1/100 débit* l/h débit* l/h (mm) Nomin. Réd.
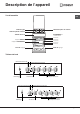
Description de l’appareil Vue d’ensemble FR Brûleur à gaz Grille du plan de cuisson Plateau du plan de cuisson GLISSIERES de coulissement niveau 5 niveau 4 niveau 3 niveau 2 niveau 1 Tableau de bord Support GRILLE Support LECHEFRITE Pied de réglage Pied de réglage Tableau de bord Manette du thermostat Bouton d’allumage Voyant lumineux thermostat Manette de sélection Manette du thermostat Bouton d’allumage Manettes des brûleurs à gaz du plan de cuisson Voyant lumineux thermostat Manette de s
Mise en marche et utilisation FR Utilisation du plan de cuisson Allumage des brûleurs Pour sélectionner les différentes fonctions du four, servez-vous des dispositifs de commande de son tableau de bord. Les manettes de commande des brûleurs à gaz du plan de cuisson Vis à vis de chaque manette, un petit cercle plein indique la position du brûleur à gaz commandé par cette dernière.
sont mis en fonction. Le thermostat, disopsitif du contrôle, permet d’atteindre et de maintenir constante, automatiquement, la température sélectionnée à l’aide du manette thermostat. Cette fonction permet la cuisson d’aliments de tours genres, grâce à l’excellente distribution de la chaleur. Le four pâstisserie (found du four) - Position manette : a choix entre 50°C et Max La lumière du four s’allume et l’élément chauffant inférieur entre en fonction.
FR Pour griller Pour un fonctionnement optimal du gril, nous vous conseillons de placer la manette du thermostat sur la position maximum, le gril dont le fonctionnement se base sur l’irradiation aux rayons infrarouges en sera d’autant plus performant. Ceci n’empêche que vous pouvez, au besoin, régler le thermostat pour la cuisson au gril sur des températures inférieures.
Précautions et conseils ! Cet appareil a été conçu et fabriqué conformément aux normes internationales de sécurité. Ces conseils sont fournis pour des raisons de sécurité et doivent être lus attentivement. Sécurité générale • Cet appareil a été conçu pour un usage familial, de type non professionnel. • Cet appareil ne doit pas être installé en extérieur, même dans un endroit abrité, il est en effet très dangereux de le laisser exposé à la pluie et aux orages.
Nettoyage et entretien FR Mise hors tension vers le haut (voir figure). Avant toute opération de nettoyage ou d’entretien coupez l’alimentation électrique de l’appareil. ! Evitez de refermer le couvercle si les brûleurs sont allumés ou encore chauds. Contrôler les joints du four Nettoyage de l’appareil ! Ne nettojez jamais l’appareil avec des nettoyeurs vapeur ou haute pression. Contrôlez périodiquement l’état du joint autour de la porte du four.
Operating Instructions COOKER GB FR Français, 1 GB English, 13 Contents Warning, 14 Installation, 15-18 Positioning and levelling Electrical connection Gas connection Adapting to different types of gas Technical data Table of burner and nozzle specifications Description of the appliance, 19 Overall view Control panel Start-up and use, 20-22 KN3 G1 S/FR S Using the hob Using the oven Electronic timer Oven cooking advice table Precautions and tips, 23 General safety Disposal Respecting and conserving
WARNING GB WARNING: The appliance and its accessible parts become hot during use. Care should be taken to avoid touching heating elements. Children less than 8 years of age shall be kept away unless continuously supervised.
Installation ! Before operating your new appliance please read this instruction booklet carefully. It contains important information concerning the safe installation and operation of the appliance. ! Please keep these operating instructions for future reference. Make sure that the instructions are kept with the appliance if it is sold, given away or moved.
GB 420 mm. 420 mm. Min. 600 mm. Min. Min. min. 650 mm. with hood min. 700 mm. without hood HOOD • Do not position blinds behind the cooker or less than 200 mm away from its sides. • Any hoods must be installed according to the instructions listed in the relevant operating manual. Levelling ! The cable must not be bent or compressed. ! The cable must be checked regularly and replaced by authorised technicians only.
! If one or more of these conditions is not fulfilled or if the cooker must be installed according to the conditions listed for class 2 - subclass 1 appliances (installed between two cupboards), the flexible steel hose must be used instead (see below). Connecting a flexible jointless stainless steel pipe to a threaded attachment Make sure that the hose and gaskets comply with current national legislation.
Table of burner and nozzle specifications GB Table 1 Burner Diameter (mm) Fast (Large)(R) Semi Fast (Medium)(S) Auxiliary (Small)(A) Liquid Gas Nozzle Flow* 1/100 g/h (mm) *** ** 0.7 41 87 218 214 128 286 75 1.90 0.4 30 70 138 136 104 181 51 1.00 0.4 30 52 73 71 76 95 S S R 28-30 37 20 25 35 45 Butane P.C.S. = 49,47 MJ/Kg Natural P.C.S.
Description of the appliance Overall view GB Control panel THERMOSTAT knob GAS BURNER ignition button SELECTOR knob THERMOSTAT knob GAS BURNER ignition button THERMOSTAT indicator light Hob BURNER control knobs THERMOSTAT indicator light SELECTOR knob Hob BURNER control knobs 19
Start-up and use GB Using the hob Lighting the burners For each BURNER knob there is a complete ring showing the strength of the flame for the relevant burner. To light one of the burners on the hob: 1. Bring a flame or gas lighter close to the burner. 2. Press the BURNER knob and turn it in an anticlockwise direction so that it is pointing to the maximum flame setting . 3. Adjust the intensity of the flame to the desired level by turning the BURNER knob in an anticlockwise direction.
THERMOSTAT indicator light DOUBLE GRILL mode When this is illuminated, the oven is generating heat. It switches off when the inside of the oven reaches the selected temperature. At this point the light illuminates and switches off alternately, indicating that the thermostat is working and is maintaining the temperature at a constant level. The top heating element and the rotisserie spit will be activated.
GB Practical cooking advice PIZZA ! In the GRILL cooking mode, place the dripping pan in position 1 to collect cooking residues (fat and/or grease). • Use a light aluminium pizza pan. Place it on the rack provided. For a crispy crust, do not use the dripping pan as it prevents the crust from forming by extending the total cooking time. GRILL • Insert the rack in position 3 or 4. Place the food in the centre of the rack.
Precautions and tips ! The appliance was designed and manufactured in compliance with international safety standards. The following warnings are provided for safety reasons and must be read carefully. General safety • These instructions are only valid for the countries whose symbols appear in the manual and on the serial number plate. • The appliance was designed for domestic use inside the home and is not intended for commercial or industrial use.
Care and maintenance 05/2012 - 195103721.00 XEROX FABRIANO GB Switching the appliance off The cover If the cooker is fitted with a cover, this cover should be cleaned using lukewarm water. Do not use abrasive products. It is possible to remove the cover in order to make cleaning the area behind the hob easier. Open the cover fully and pull it upwards (see Disconnect your appliance from the electricity supply before carrying out any work on it.