Mode d’emploi CUISINIERE Sommaire FR Français, 1 GB English, 13 NL Nederland, 24 Installation, 2-6 Positionnement et nivellement Raccordement électrique Raccordement gaz Adaptation aux différents types de gaz Caractéristiques techniques Tableau Caractéristiques des brûleurs et des injecteurs Description de l’appareil, 7 Vue d’ensemble Tableau de bord Mise en marche et utilisation, 8-10 K3G2/O K3G2S/O KN3G2S/NL Utilisation du plan de cuisson Utilisation du four Programmateur électronique Tableau de cu
Installation FR ! Conservez ce mode d’emploi pour pouvoir le consulter à tout moment. En cas de vente, de cession ou de déménagement, veillez à ce qu’il suive l’appareil. ! Lisez attentivement les instructions : elles contiennent des conseils importants sur l’installation, l’utilisation et la sécurité de votre appareil.
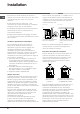
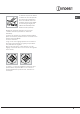
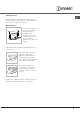
Positionnement et nivellement ! L’appareil peut être installé à côté de meubles dont la hauteur ne dépasse pas celle du plan de cuisson. ! Assurez-vous que le mur en contact avec la paroi arrière de l’appareil est réalisée en matériel ignifuge résistant à la chaleur (T 90°C). 420 mm. Min. min. 650 mm. with hood min. 700 mm. without hood 420 mm. Min.
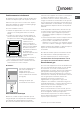
FR Raccordement gaz par tuyau flexible en caoutchouc Adaptation du plan de cuisson Assurez-vous que le tuyau est bien conforme aux normes applicables dans le pays d’installation. Le tuyau doit avoir un diamètre intérieur de : 8 mm en cas d’alimentation au gaz liquide; 13 mm en cas d’alimentation au gaz naturel. Remplacement des injecteurs des brûleurs du plan de cuisson: 1.enlevez les grilles du plan de cuisson et sortez les brûleurs de leur logement; 2.
4. dévisser l’injecteur du brûleur à l’aide de la clé à tube spéciale pour injecteurs (voir figure) ou d’une clé à tube de 7 mm et le remplacer par l’injecteur adapté au nouveau type de gaz (voir tableau Caractéristiques des brûleurs et des injecteurs). FR Réglage du minimum du brûleur du four à gaz : 1. allumer le brûleur (voir Mise en marche et Utilisation); 2. amener la manette sur la position minimum (MIN) après l’avoir laissée pendant environ 10 minutes sur la position maximum (MAX); 3.
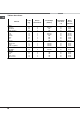
FR Tableau Caractéristiques des brûleurs et des injecteurs Tableau 1 (pour la Hollande) "# $ ! %&' () )* &+ ((& , $ -#. , *' )/ )0 0 & 1 2 1 ' ) )0 *3 5 () ) (& (0( # 6 # "# - - 2 ! ! ! &' & ( A 15°C et 1013 mbar-gaz sec Naturel G25 P.C.S.
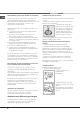
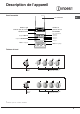
Description de l’appareil Vue d’ensemble FR Le couvercle Brûleur à gaz Grille du plan de cuisson Tableau de bord Support GRILLE Support LECHEFRITE Pied de réglage Plateau du plan de cuisson GLISSIERES de coulissement niveau 5 niveau 4 niveau 3 niveau 2 niveau 1 Pied de réglage Tableau de bord Manette FOUR Manettes BRÛLEURS du plan de cuisson Manette FOUR Manettes BRÛLEURS du plan de cuisson *N’existe que sur certains modèles 7
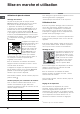
Mise en marche et utilisation FR Utilisation du plan de cuisson Allumage des brûleurs Un petit cercle plein près de chaque manette BRULEUR indique le brûleur associé à ce dernier. Pour allumer un brûleur du plan de cuisson : 1. approchez une flamme ou un allume-gaz ; 2. poussez sur le manette du BRULEUR tout en le tournant dans le sens inverse des aiguilles d’une montre jusqu’au symbole grande flamme . 3.
Eclairage du four FR Pour le brancher, amener le bouton FOUR sur une position autre que la position "0". Il reste allumé tant que le four ou le gril est en marche. Niche inférieure Une niche ménagée audessous du four peut être utilisée pour entreposer des accessoires ou des casseroles. Pour ouvrir le volet, faites-le pivoter vers le bas (voir figure). ! Ne stockez pas de matériel inflammable dans la niche du bas.
FR Tableau de cuisson Poids (Kg) Niveau enfournement Préchauffage (minutes) Température préconisée (°C) Durée cuisson (minutes) Pâtes Lasagnes Cannelloni Gratin de pâtes 2.5 2.5 2.5 2 2 2 200-210 200 200 10 10 10 75-85 50-60 50-60 Viande Veau Poulet Canard Lapin Porc Agneau 1.5 1.5 1.8 2.0 2.1 1.8 3 3 3 3 3 3 200-210 210-220 200 200 200 200 10 10 10 10 10 10 95-100 90-100 100-110 70-80 70-80 100-105 Poisson Maquereaux Denté Truite en papillote 1.1 1.5 1.
Précautions et conseils ! Cet appareil a été conçu et fabriqué conformément aux normes internationales de sécurité. Ces conseils sont fournis pour des raisons de sécurité et doivent être lus attentivement. Sécurité générale • Cet appareil a été conçu pour un usage familial, de type non professionnel. • Cet appareil ne doit pas être installé en extérieur, même dans un endroit abrité, il est en effet très dangereux de le laisser exposé à la pluie et aux orages.
Nettoyage et entretien FR Mise hors tension Avant toute opération de nettoyage ou d’entretien coupez l’alimentation électrique de l’appareil. Nettoyage de l’appareil ! Ne pas utiliser de détergents abrasifs ou corrosifs, tels que détacheurs et dérouilleurs, poudres à récurer et éponges à surface abrasive : ils risquent de rayer irrémédiablement la surface. ! Ne nettojez jamais l’appareil avec des nettoyeurs vapeur ou haute pression.
Operating Instructions COOKER GB FR Français, 1 English, 13 NL Nederland, 24 Contents Installation, 14-17 Positioning and levelling Electrical connections Gas connection Adapting to different types of gas Technical data Table of burner and nozzle specifications Description of the appliance, 18 Overall view Control panel Start-up and use, 19-21 K3G2/O K3G2S/O KN3G2S/NL Using the hob Using the oven Analogue timer Oven cooking advice table Precautions and tips, 22 General safety Disposal Respecting an
Installation GB ! Before operating your new appliance please read this instruction booklet carefully. It contains important information concerning the safe installation and operation of the appliance. ! Please keep these operating instructions for future reference. Make sure that the instructions are kept with the appliance if it is sold, given away or moved.
420 mm. 420 mm. Min. 600 mm. Min. Min. min. 650 mm. with hood min. 700 mm. without hood HOOD • Do not position blinds behind the cooker or less than 200 mm away from its sides. • Any hoods must be installed according to the instructions listed in the relevant operating manual. Levelling If it is necessary to level the appliance, screw the adjustable feet into the places provided on each corner of the base of the cooker (see figure).
GB ! If one or more of these conditions is not fulfilled or if the cooker must be installed according to the conditions listed for class 2 - subclass 1 appliances (installed between two cupboards), the flexible steel hose must be used instead (see below). 3. While the burner is alight, quickly change the position of the knob from minimum to maximum and vice versa several times, checking that the flame is not extinguished. ! The hob burners do not require primary air adjustment.
5. Turn the knob from the MAX position to the MIN position quickly or open and shut the oven door, making sure that the burner is not extinguished. TECHNICAL DATA Oven dimensions (HxWxD) Volume Useful measurements relating to the oven compartment Power supply voltage and frequency WARNING! The glass lid can break in if it is heated up. Turn off all the burners and the electric plates before closing the lid. *Applies to the models with glass cover only.
Description of the appliance GB Overall view Control panel OVEN control knob OVEN control knob * Only available in certain models.
Start-up and use Using the hob Lighting the burners For each BURNER knob there is a complete ring showing the strength of the flame for the relevant burner. To light one of the burners on the hob: 1. Bring a flame or gas lighter close to the burner. 2. Press the BURNER knob and turn it in an anticlockwise direction so that it is pointing to the maximum flame setting . 3. Adjust the intensity of the flame to the desired level by turning the BURNER knob in an anticlockwise direction.
GB Adjusting the temperature To set the desired cooking temperature, turn the OVEN control knob in an anticlockwise direction. Temperatures are displayed on the control panel and may vary between MIN (140°C) and MAX (250°C). Once the set temperature has been reached, the oven will keep it constant by using its thermostat. Oven light This is switched on by turning the OVEN knob to any position other than “0”. It remains lit as long as the oven is operating.
Oven cooking advice table Foods Pasta Lasagne Cannelloni Gratin dishes Meat Veal Chicken Duck Rabbit Pork Lamb Fish Mackerel Dentex Trout baked in foil Pizza Neapolitan-style Pies Biscuits Tart Savoury pies Leavened cakes GB Weight (in kg) Rack position Preheating time (min) Recommended Temperature (°C) Cooking time (minutes) 2.5 2.5 2.5 3 3 3 10 10 10 200-210 200 200 75-85 50-60 50-60 1.7 1.5 1.8 2 2.1 1.
Precautions and tips GB ! This appliance has been designed and manufactured in compliance with international safety standards. The following warnings are provided for safety reasons and must be read carefully. General safety • These instructions are only valid for the countries whose symbols appear in the manual and on the serial number plate. • The appliance was designed for domestic use inside the home and is not intended for commercial or industrial use.
Care and maintenance Switching the appliance off The cover If the cooker is fitted with a glass cover, this cover should be cleaned using lukewarm water. Do not use abrasive products. It is possible to remove the cover in order to make cleaning the area behind the hob easier. Open the cover fully and pull it upwards (see figure). Disconnect your appliance from the electricity supply before carrying out any work on it.
Gebruiksaanwijzing FORNUIS EN OVEN Inhoud FR Français, 1 GB English, 13 Installatie, 25-29 NL Nederland, 24 Plaatsen en waterpas zetten Elektrische aansluitingen Gas aansluitingen Aanpassen aan de verschillende soorten gas Technische gegevens Tabel eigenschappen Beschrijving van het apparaat, 30 Aanzichttekening Bedieningspaneel Starten en gebruik, 31-33 K3G2/O K3G2S/O KN3G2S/NL De kookzones Gebruik van de oven Kooktabel oven Voorzorgsmaatregelen en advies,34 Algemene veiligheid Afvalverwijdering Ene
Installatie ! Bewaar dit instructieboekje zorgvuldig voor eventuele raadpleging in de toekomst. In het geval u het apparaat verkoopt, weggeeft of wanneer u verhuist, moet het boekje bij het apparaat bewaard worden. ! Lees de instructies aandachtig door: u vindt er belangrijke informatie betreffende installatie, gebruik en veiligheid.
NL • als het kookvlak hoger is dan de meubels, moeten zij op minstens 200 mm van het apparaat vandaan worden geplaatst; • als het fornuis onder een keukenkastje wordt geïnstalleerd, moet de afstand tussen de twee minstens 420 mm zijn. Deze afstand moet 700 mm zijn als de keukenkastjes zijn vervaardigd uit ontvlambaar materiaal (zie afbeelding); • de spanning zich bevindt tussen de waarden die staan aangegeven op het typeplaatje; • de contactdoos en de stekker overeenkomen.
• niet in contact komt met scherpe voorwerpen, scherpe randen, beweegbare onderdelen en niet in de knel raakt; • gedurende de hele lengte makkelijk te inspecteren is, zodat u probleemloos kunt controleren of hij in goede staat verkeert; • korter is dan 1500 mm; • aan beide uiteinden nauw sluit. Hij moet worden bevestigd met slangklemmen die voldoen aan de geldende nationale normen.
NL Aanpassingen op de oven Het vervangen van de sproeier van de brander van de oven: 1. verwijder de verwarmingslade; 2. trek de schuifbescherming A A van zijn plaats (zie afbeelding); V 3. verwijder de ovenbrander nadat u de schroef V heeft losgedraaid (zie afbeelding); deze handeling kan makkelijker worden uitgevoerd als u de ovendeur verwijdert. 4.
Kenmerken van de branders en straalpijpen NL Tabel 1 (Voor Hollande) Natuurlijk gas !" #$% # ! &' '( $) &&$ * + 6 7 (% '8 ': : $ *7 ; < % ' ': (> @ &' ' &$ &:& ? 6 7 6 D 7 B B B $% $ & A 15°C en 1013 mbar-droog gas P.C.S.
Beschrijving van het apparaat NL Aanzichttekening Bedieningspaneel OVENKNOPP OVENKNOPP * Slechts op enkele modellen aanwezig.
Starten en gebruik Gebruik van de kookplaat Praktisch advies voor het gebruik van de branders Aansteken van de branders Naast elke BRANDER knop wordt met een vol rondje aangegeven bij welke brander deze knop hoort. Om een brander van de kookplaat aan te steken: 1. houd een vlam of aansteker bij de brander; 2. druk en draai tegelijkertijd de BRANDER knop linksom tot aan het symbool van de grootste vlam E. 3.
NL ! Mocht de vlam per ongeluk uitgaan, doe dan de brander uit en wacht minstens 1 minuut voordat u de oven weer probeert aan te steken. Regelen van de temperatuur Om de gewenste kooktemperatuur te bereiken draait u de knop OVEN tegen de klok in. De temperaturen worden aangegeven op het bedieningspaneel en gaan van MIN (140°C) tot MAX (250°C). Zodra de temperatuur is bereikt zal de oven deze constant houden dankzij de thermostaat.
Kooktabel oven NL Gewicht Positie ovenrekken van beneden af Temperatuur (°C) Voorverwarmen (min.) Kooktijd (min.
Voorzorgsmaatregelen en advies NL ! Dit apparaat is ontworpen en vervaardigd volgens de geldende internationale veiligheidsvoorschriften. Deze aanwijzingen zijn geschreven voor uw veiligheid en u dient ze derhalve goed door te nemen. Algemene veiligheid • Dit apparaat is vervaardigd voor nietprofessioneel gebruik binnenshuis. • Het apparaat dient niet buitenshuis te worden geplaatst, ook niet in overdekte toestand. Het is erg gevaarlijk als het in aanraking komt met regen of onweer.
Onderhoud en verzorging De elektrische stroom afsluiten Sluit altijd eerst de stroom af voordat u tot enige handeling overgaat. Reinigen van het apparaat ! Gebruik nooit stoom- of hogedrukreinigers voor het reinigen van het apparaat. • De buitenkant, dus zowel het email en het roestvrij staal als de rubberen afdichtingen, kunnen met een spons en een sopje worden afgenomen. Als de vlekken moeilijk te verwijderen zijn, kunt u een speciaal reinigingsmiddel gebruiken.
03/2011- 195048031.