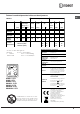
Mode d’emploi CUISINIERE FR FR Français, 1 GB Sommaire Installation, 2-5 English,14 Positionnement et nivellement Raccordement électrique Raccordement gaz Adaptation aux différents types de gaz Caractéristiques techniques Tableau Caractéristiques des brûleurs et des injecteurs Description de l’appareil, 6 Vue d’ensemble Tableau de bord Mise en marche et utilisation,7-11 K3M51 S /FR K3M5 S /FR K3M56 S /FR KN3M51 S /FR KN3M5 S /FR KN3M56 S /FR KN3M522 S /FR Utilisation du plan de cuisson Mise en mar
Installation FR ! Conservez ce mode d’emploi pour pouvoir le consulter à tout moment. En cas de vente, de cession ou de déménagement, veillez à ce qu’il suive l’appareil. ! Lisez attentivement les instructions : elles contiennent des conseils importants sur l’installation, l’utilisation et la sécurité de votre appareil.
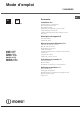
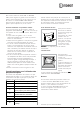
Positionnement et nivellement ! L’appareil peut être installé à côté de meubles dont la hauteur ne dépasse pas celle du plan de cuisson. ! Assurez-vous que le mur en contact avec la paroi arrière de l’appareil est réalisée en matériel ignifuge résistant à la chaleur (T 90°C). 420 mm. Min. min. 650 mm. with hood min. 700 mm. without hood 420 mm. Min.
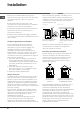
FR Raccordement gaz par tuyau flexible en caoutchouc Adaptation du plan de cuisson Assurez-vous que le tuyau est bien conforme aux normes applicables dans le pays d’installation. Le tuyau doit avoir un diamètre intérieur de : 8 mm en cas d’alimentation au gaz liquide; 15 mm en cas d’alimentation au gaz naturel. Remplacement des injecteurs des brûleurs du plan de cuisson: 1.enlevez les grilles du plan de cuisson et sortez les brûleurs de leur logement; 2.
Tableau Caractéristiques des brûleurs et des injecteurs Tableau 1 FR Gaz liquide Brûleur Diamètre Puissance thermique kW (p.c.s.*) Bipasse injecteur 1/100 1/100 Gaz naturel débit* g/h injecteur 1/100 débit* l/h débit* l/h (mm) Nomin. Réd.
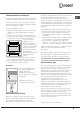
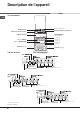
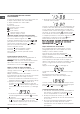
Description de l’appareil FR Vue d’ensemble Plaque électrique Plateau du plan de cuisson Brûleur à gaz Grille du plan de cuisson GLISSIERES de coulissement niveau 5 niveau 4 niveau 3 niveau 2 niveau 1 Tableau de bord Support GRILLE Support LECHEFRITE Pied de réglage Pied de réglage Tableau de bord MINUTEUR* Bougie d’allumage des BRÛLEURS GAZ* Boutons BRULEURS/ plaque électrique du plan de cuisson MINUTEUR ELECTRONIQUE* MINUTEUR* Bougie d’allumage des BRÛLEURS GAZ* Boutons BRULEURS/ plaque él
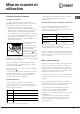
Mise en marche et utilisation Utilisation du plan de cuisson Allumage des brûleurs Un petit cercle plein près de chaque bouton BRULEUR indique le brûleur associé à ce dernier. Pour allumer un brûleur du plan de cuisson : 1. approchez une flamme ou un allume-gaz ; 2. poussez sur le bouton du BRULEUR tout en le tournant dans le sens inverse des aiguilles d’une montre jusqu’au symbole grande flamme E. 3.
FR En cours de cuisson, on peut à tout moment : • modifier le programme de cuisson à l’aide du bouton PROGRAMMES; • modifier la température à l’aide du bouton THERMOSTAT ; • programmer la durée et l’heure de fin de cuisson (voir ci-dessous); • interrompre la cuisson en ramenant le bouton PROGRAMMES sur “0”. ! Il faut toujours placer les plats sur la grille fournie avec l’appareil. Voyant THERMOSTAT Allumé, il signale la montée en chaleur du four.
! En cas de cuisson en mode GRIL ou DOUBLE GRIL, placez la grille au gradin 5 et la lèchefrite au gradin 1 pour récupérer les jus de cuisson. En cas de cuisson en mode DOUBLE GRIL VENTILE, placez la grill au gradin 2 ou 3 et la lèchefrite au gradin 1 pour récupérer les jus de cuisson. Cuisson simultanée sur plusieurs niveaux S’il vous avez besoin de deux grilles, utilisez le programme FOUR VENTILE car c’est le le seul qui vous permet de cuire sur deux niveaux.
FR LE PROGRAMMATEUR DE CUISSON ELECTRONIQUE* Il permet de programmer le four ou le gril comme suit: • départ cuisson différé avec durée établie; • départ immédiat avec durée établie; • minuteur. Fonction des touches : : minuteur heures, minutes : durée cuisson : fin de cuisson : sélection temps à rebours : sélection temps en avant Comment remettre à l'heure l'horloge digitale Après raccordement à la ligne ou après une coupure de courant, l'afficheur clignote sur : 0.
Utiliser le programmateur fin de cuisson* Nettoyage automatique du four par catalyse* 1. Il faut avant tout remonter la sonnerie en faisant faire un tour presque complet au bouton PROGRAMMATEUR FIN DE CUISSON dans le sens des aiguilles d’une montre. 2. Puis en faisant marche arrière, sélectionner le temps désiré en amenant les minutes indiquées sur le bouton PROGRAMMATEUR FIN DE CUISSON en face du repère fixe du tableau de bord. 3. Une fois le temps écoulé, un signal sonore retentit et le four s’éteint.
Précautions et conseils FR ! Cet appareil a été conçu et fabriqué conformément aux normes internationales de sécurité. Ces conseils sont fournis pour des raisons de sécurité et doivent être lus attentivement. Sécurité générale • Cet appareil a été conçu pour un usage familial, de type non professionnel. • Cet appareil ne doit pas être installé en extérieur, même dans un endroit abrité, il est en effet très dangereux de le laisser exposé à la pluie et aux orages.
Nettoyage et entretien Mise hors tension Avant toute opération de nettoyage ou d’entretien coupez l’alimentation électrique de l’appareil. FR ! Evitez de refermer le couvercle si les brûleurs sont allumés ou encore chauds. Contrôler les joints du four Nettoyage de l’appareil ! Ne nettojez jamais l’appareil avec des nettoyeurs vapeur ou haute pression.
Operating Instructions COOKER Contents Installation, 15-18 FR Français, 1 GB English,14 Positioning and levelling Electrical connection Gas connection Adapting to different types of gas Table of burner and nozzle specifications Table of characteristics Description of the appliance, 19 Overall view Control panel Start-up and use, 20-24 K3M51 S /FR K3M5 S /FR K3M56 S /FR KN3M51 S /FR KN3M5 S /FR KN3M56 S /FR KN3M522 S /FR Using the hob Using the oven Cooking modes Electronic timer Practical advice on u
Installation ! Before operating your new appliance please read this instruction booklet carefully. It contains important information concerning the safe installation and operation of the appliance. ! Please keep these operating instructions for future reference. Make sure that the instructions are kept with the appliance if it is sold, given away or moved.
GB 420 mm. 420 mm. Min. 600 mm. Min. Min. min. 650 mm. with hood min. 700 mm. without hood HOOD • Do not position blinds behind the cooker or less than 200 mm away from its sides. • Any hoods must be installed according to the instructions listed in the relevant operating manual. Levelling If it is necessary to level the appliance, screw the adjustable feet into the places provided on each corner of the base of the cooker (see figure).
! If one or more of these conditions is not fulfilled or if the cooker must be installed according to the conditions listed for class 2 - subclass 1 appliances (installed between two cupboards), the flexible steel hose must be used instead (see below). 3. While the burner is alight, quickly change the position of the knob from minimum to maximum and vice versa several times, checking that the flame is not extinguished. ! The hob burners do not require primary air adjustment.
GB Table of burner and nozzle specifications Table 1 Burner Diameter (mm) Rapid (Large) (R) Semi-rapid (Medium) (S) Auxiliary (Small) (A) Natural gas Nozzle Capacity* l/h 1/100 (mm) 100 3.00 0.70 41 87 218 214 128 286 75 1.90 0.40 30 70 138 136 104 181 51 1.00 0.40 30 52 73 71 76 95 28-30 20 35 37 25 45 Nominal (mbar) Minimal (mbar) Maximised (mbar) Supply pressure * ** *** Liquid gas Thermal power Bypass Nozzle Capacity* kW (p.c.s.
Descriptionof the appliance Overall view Glass cover* GB Electric Hotplate Containment surface for spills Gas burner Hob grid GUIDE RAILS for the sliding racks position 5 position 4 position 3 position 2 position 1 Control panel GRILL DRIPPING PAN Adjustable foot Adjustable foot Control panel THERMOSTAT indicator light TIMER knob* ELECTRONIC TIMER* THERMOSTAT knob GAS BURNER ignition button* SELECTOR knob ACTIVE HOTPLATE indicator light Hob BURNER or ELECTRIC HOTPLATE control knobs THERMOS
Start-up and use Using the hob GB Lighting the burners For each BURNER knob there is a complete ring showing the strength of the flame for the relevant burner. To light one of the burners on the hob: 1. Bring a flame or gas lighter close to the burner. 2. Press the BURNER knob and turn it in an anticlockwise direction so that it is pointing to the maximum flame setting E. 3. Adjust the intensity of the flame to the desired level by turning the BURNER knob in an anticlockwise direction.
• Stop cooking by turning the SELECTOR knob to the “0” position. ! Always place cookware on the rack(s) provided. THERMOSTAT indicator light When this is illuminated, the oven is generating heat. It switches off when the inside of the oven reaches the selected temperature. At this point the light illuminates and switches off alternately, indicating that the thermostat is working and is maintaining the temperature at a constant level.
GB Cooking on several shelves simultaneously If it is necessary to use two racks, use the FAN OVEN cooking mode , as this is the only cooking mode suited to this type of cooking. We also recommend that: • Positions 1 and 5 are not used. This is because excessive direct heat can burn temperature sensitive foods. • Positions 2 and 4 are used and that food that requires more heat is placed on the rack in position 2.
Planning cooking with the electronic programmer* Setting the clock After the appliance has been connected to the power supply, or after a powercut, the clock display will automatically reset to 0:00 and begin to blink. To set the time: 1. Press the COOKING TIME button $ and the COOKING END TIME % simultaneously. 2. Within 4 seconds of having pressed these buttons, set the exact time by pressing the * and ) buttons. The *button advances the hours and the ) button decreases the hours.
GB Using the end-cooking cooking timer* 1. To set the buzzer, turn the COOKING TIMER knob clockwise almost one complete revolution. 2. Turn the knob anticlockwise to set the desired time: align the minutes shown on the COOKING TIMER knob with the indicator on the control panel. 3. When the selected time has elapsed, a buzzer sounds and the oven turns off. 4. When the oven is off the cooking timer can be used as a normal timer.
Precautions and tips ! This appliance has been designed and manufactured in compliance with international safety standards. The following warnings are provided for safety reasons and must be read carefully. General safety • These instructions are only valid for the countries whose symbols appear in the manual and on the serial number plate. • The appliance was designed for domestic use inside the home and is not intended for commercial or industrial use.
Care and maintenance GB Switching the appliance off The cover If the cooker is fitted with a glass cover, this cover should be cleaned using lukewarm water. Do not use abrasive products. It is possible to remove the cover in order to make cleaning the area behind the hob easier. Open the cover fully and pull it upwards (see figure). Disconnect your appliance from the electricity supply before carrying out any work on it.
Catalitic Cleaning* GB In some models, the most exposed internal vertical sides of the oven are coated with porous enamel, which is called catalytic enamel. When heated, this enamel destroys fat particles given off by the food. This "oxidation" of the fat particles occurs when the temperature of the sides exceeds 170°C. The porous quality of the catalytic enamel increases the surface area where the exchange vital to the oxidation of the fats takes place.
05/2011 - 195047218.