Mode d’emploi CUISINIERE FR FR Français, 1 GB English,13 NL Nederland, 25 Sommaire Installation, 2-5 Positionnement et nivellement Raccordement électrique Raccordement gaz Adaptation aux différents types de gaz Caractéristiques techniques Tableau Caractéristiques des brûleurs et des injecteurs Description de l’appareil, 6 Vue d’ensemble Tableau de bord Mise en marche et utilisation,7-10 KN3T62SA/NL KN3T65SA/NL Utilisation du plan de cuisson Mise en marche du four Programmes de cuisson Conseils prati
Installation FR ! Conservez ce mode d’emploi pour pouvoir le consulter à tout moment. En cas de vente, de cession ou de déménagement, veillez à ce qu’il suive l’appareil. ! Lisez attentivement les instructions : elles contiennent des conseils importants sur l’installation, l’utilisation et la sécurité de votre appareil.
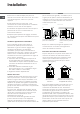
Positionnement et nivellement ! L’appareil peut être installé à côté de meubles dont la hauteur ne dépasse pas celle du plan de cuisson. ! Assurez-vous que le mur en contact avec la paroi arrière de l’appareil est réalisée en matériel ignifuge résistant à la chaleur (T 90°C). 420 mm. Min. min. 650 mm. with hood min. 700 mm. without hood 420 mm. Min.
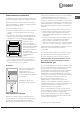
FR Raccordement gaz par tuyau flexible en caoutchouc Adaptation du plan de cuisson Assurez-vous que le tuyau est bien conforme aux normes applicables dans le pays d’installation. Le tuyau doit avoir un diamètre intérieur de : 8 mm en cas d’alimentation au gaz liquide; 15 mm en cas d’alimentation au gaz naturel. Remplacement des injecteurs des brûleurs du plan de cuisson: 1.enlevez les grilles du plan de cuisson et sortez les brûleurs de leur logement; 2.
Tableau Caractéristiques des brûleurs et des injecteurs FR Tableau 1 (pour la Hollande) Gaz naturel "# $ ! %&' $ $ ( ) &* ((& + ,# # +, ( (-&' -' . /' (0 1 $ 2#3 1 )' -4 -. . & 5 6 5 ' - -. )0 "# 2 2 6 # 7 # * ! ! ! A 15°C et 1013 mbar-gaz sec Naturel G25 P.C.S.
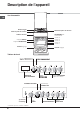
Description de l’appareil Vue d’ensemble Brûleur à gaz Plateau du plan de cuisson Grille du plan de cuisson GLISSIERES de coulissement niveau 5 niveau 4 niveau 3 niveau 2 niveau 1 Tableau de bord Support GRILLE Support LECHEFRITE Pied de réglage Pied de réglage Tableau de bord Boutons BRULEURS du plan de cuisson MINUTEUR ELECTRONIQUE* THERMOSTAATKNOP Controlelampje THERMOSTAAT 60 FR gasbrander ontsteking* * N’existe que sur certains modèles 6 Knop TIMER* Knoppen PROGRAMMAKNOP KOOKPLATEN
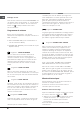
Mise en marche et utilisation Utilisation du plan de cuisson Allumage des brûleurs Un petit cercle plein près de chaque bouton BRULEUR indique le brûleur associé à ce dernier. Pour allumer un brûleur du plan de cuisson : 1. approchez une flamme ou un allume-gaz ; 2. poussez sur le bouton du BRULEUR tout en le tournant dans le sens inverse des aiguilles d’une montre jusqu’au symbole grande flamme E. 3.
FR Eclairage du four Pour l’allumer, amenez le bouton PROGRAMMES sur une position autre que la position “0”. Il reste allumé tant que le four est en marche. Si vous amenez le bouton sur 8, la lampe s’allume sans activer aucune résistance. Programmes de cuisson ! Pour tous les programmes, vous pouvez sélectionner une température comprise entre 50°C et MAX., sauf pour : • GRIL et DOUBLE GRIL (il est conseillé dans ce cas de sélectionner MAX.
Fonction minuterie Conseils de cuisson Pour accéder à cette fonction, appuyez sur la touche ! Pour vos cuissons ventilées n’utilisez pas les gradins 1 et 5 : ils sont directement frappés par l’air chaud qui pourrait brûler vos mets délicats. n, l'écran affiche le symbole n. A chaque pression de la touche + correspond un avancement de 10 secondes jusqu'à 99 minutes 50 secondes. Continuez à appuyer pour obtenir un avancement du temps par augmentation d'une minute jusqu'à 10 heures maximum.
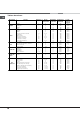
FR Tableau de cuisson Programmes Statique Ventilé Voute Double Gril Double Gril Ventilé Four Pâtisserie 10 Aliments Poids (Kg) Niveau enfournement Préchauffag e (minutes) Température préconisée Canard Roast-beef Rôti de porc Biscuits Tartes Pizza (sur 2 niveaux) Lasagnes Agneau Poulet rôti + pommes de terre Maquereaux Cake aux fruits Choux (sur 2 niveaux) Biscuits (sur 2 niveaux) Génoise (sur 1 niveau) Génoise (sur 2 niveaux) Tartes salées Soles et seiches Brochettes de calmars et crevettes Tr
Précautions et conseils ! Cet appareil a été conçu et fabriqué conformément aux normes internationales de sécurité. Ces conseils sont fournis pour des raisons de sécurité et doivent être lus attentivement. Sécurité générale • Le plan de cuisson vitrocéramique résiste aux sautes de température et aux chocs. N'oubliez toutefois pas que des lames ou des ustensiles de cuisine pointus peuvent casser la surface du plan de cuisson.
Nettoyage et entretien FR Mise hors tension complètement et tirez vers le haut (voir figure). Avant toute opération de nettoyage ou d’entretien coupez l’alimentation électrique de l’appareil. ! Evitez de refermer le couvercle si les brûleurs sont allumés ou encore chauds. Contrôler les joints du four Nettoyage de l’appareil ! Ne nettojez jamais l’appareil avec des nettoyeurs vapeur ou haute pression. Contrôlez périodiquement l’état du joint autour de la porte du four.
Operating Instructions COOKER Contents Installation, 14-17 FR Français, 1 GB English,13 NL Nederland, 25 Positioning and levelling Electrical connection Gas connection Adapting to different types of gas Table of burner and nozzle specifications Table of characteristics Description of the appliance, 18 Overall view Control panel Start-up and use, 19-22 KN3T62SA/NL KN3T65SA/NL Using the hob Using the oven Cooking modes Timer Practical cooking advice Oven cooking advice table Precautions and tips, 23
Installation GB ! Before operating your new appliance please read this instruction booklet carefully. It contains important information concerning the safe installation and operation of the appliance. ! Please keep these operating instructions for future reference. Make sure that the instructions are kept with the appliance if it is sold, given away or moved.
420 mm. 420 mm. Min. 600 mm. Min. Min. min. 650 mm. with hood min. 700 mm. without hood HOOD • Do not position blinds behind the cooker or less than 200 mm away from its sides. • Any hoods must be installed according to the instructions listed in the relevant operating manual. Levelling If it is necessary to level the appliance, screw the adjustable feet into the places provided on each corner of the base of the cooker (see figure).
GB ! If one or more of these conditions is not fulfilled or if the cooker must be installed according to the conditions listed for class 2 - subclass 1 appliances (installed between two cupboards), the flexible steel hose must be used instead (see below). 3. While the burner is alight, quickly change the position of the knob from minimum to maximum and vice versa several times, checking that the flame is not extinguished. ! The hob burners do not require primary air adjustment.
GB Table of burner and nozzle specifications Table1 (for Netherlands) ! " ! ! ) . / " 0 " . 2 3 . 2 . * Gaz naturel ! " " #$% & ' $( &&$ & &*$% *% + ,% &- '% *1 *+ + $ % * *+ '- 4 0 4 0 3 4 $% $ & At 15°C et 1013 mbar-gas sec Natural G25 P.C.S.
Description of the appliance Overall view Glass cover* Gas burner Containment surface for spills Hob grid GUIDE RAILS for the sliding racks position 5 position 4 position 3 position 2 position 1 Control panel GRILL rack DRIPPING PAN Adjustable foot Adjustable foot Control panel THERMOSTAT knob ELECTRONIC TIMER* THERMOSTAT knob THERMOSTAT indicator light SELECTOR knob Hob BURNER control knobs THERMOSTAT indicator light 60 GB GAS BURNER ignition button* * Only available in certain models.
Start-up and use Using the hob Using the oven Lighting the burners For each BURNER knob there is a complete ring showing the strength of the flame for the relevant burner. To light one of the burners on the hob: 1. Bring a flame or gas lighter close to the burner. 2. Press the BURNER knob and turn it in an anticlockwise direction so that it is pointing to the maximum flame setting E. 3. Adjust the intensity of the flame to the desired level by turning the BURNER knob in an anticlockwise direction.
GB Cooking modes ! A temperature value can be set for all cooking modes between 50°C and Max, except for the following modes • GRILL and DOUBLE GRILL (recommended: set only to MAX power level). • FAN-ASSISTED DOUBLE GRILL (recommended: do not exceed 200°C). BAKING mode The rear heating element and the fan come on, guaranteeing the distribution of heat delicately and uniformly throughout the oven.
After the time period has been set, the timer will begin to count down. When the timer reaches zero, the buzzer will sound (this may be stopped by pressing any button). The time may be displayed by pressing the G button, and the n symbol indicates that the timer function has been set. After approximately 7 seconds, the display will automatically revert to the timer. Analogue Timer * 1. To set the buzzer, turn the COOKING TIMER knob clockwise almost one complete revolution. 2.
GB Oven cooking advice table Cooking modes Static Fan-assisted Oven Top Double Grill Fan-assisted Double Grill Baking Mode 22 Foods Duck Roast veal or beef Roast pork Biscuits (shortcrust pastry) Tarts Pizza (on 2 racks) Lasagne Lamb Roast chicken + potatoes Mackerel Sponge cake made with yoghurt Cream puffs (on 2 racks) Biscuits (on 2 racks) Sponge cake (on 1 rack) Sponge cake (on 2 racks) Savoury pies Sole and cuttlefish Squid and prawn kebabs Cod fillet Grilled vegetables Veal steak Cutlets Hamb
Precautions and tips ! This appliance has been designed and manufactured in compliance with international safety standards. The following warnings are provided for safety reasons and must be read carefully. General safety • The glass ceramic hob is resistant to temperature fluctuations and shocks. It is, however, wise to remember that blades or cooking utensils may ruin the surface of the hob.
Care and maintenance GB Switching the appliance off The cover If the cooker is fitted with a glass cover, this cover should be cleaned using lukewarm water. Do not use abrasive products. It is possible to remove the cover in order to make cleaning the area behind the hob easier. Open the cover fully and pull it upwards (see figure). Disconnect your appliance from the electricity supply before carrying out any work on it.
Gebruiksaanwijzing FORNUIS EN OVEN Inhoud GB FR Français, 1 English,13 NL Nederland, 25 Installatie,26-29 Plaatsen en waterpas zetten Elektrische aansluitingen Gas aansluitingen Aanpassen aan de verschillende soorten gas Technische gegevens Tabel eigenschappen Beschrijving van het apparaat, 30 Aanzichttekening Bedieningspaneel Starten en gebruik, 31-34 KN3T62SA/NL KN3T65SA/NL De kookzones Gebruik van de oven Kookprogrammas Timer Kooktabel oven Praktische koktips Voorzorgsmaatregelen en advies, 35 A
Installatie ! Bewaar dit instructieboekje zorgvuldig voor eventuele raadpleging in de toekomst. In het geval u het apparaat verkoopt, weggeeft of wanneer u verhuist, moet het boekje bij het apparaat bewaard worden. ! Lees de instructies aandachtig door: u vindt er belangrijke informatie betreffende installatie, gebruik en veiligheid.
• als het kookvlak hoger is dan de meubels, moeten zij op minstens 200 mm van het apparaat vandaan worden geplaatst; • als het fornuis onder een keukenkastje wordt geïnstalleerd, moet de afstand tussen de twee minstens 420 mm zijn. Deze afstand moet 700 mm zijn als de keukenkastjes zijn vervaardigd uit ontvlambaar materiaal (zie afbeelding); • de spanning zich bevindt tussen de waarden die staan aangegeven op het typeplaatje; • de contactdoos en de stekker overeenkomen.
NL • niet in contact komt met scherpe voorwerpen, scherpe randen, beweegbare onderdelen en niet in de knel raakt; • gedurende de hele lengte makkelijk te inspecteren is, zodat u probleemloos kunt controleren of hij in goede staat verkeert; • korter is dan 1500 mm; • aan beide uiteinden nauw sluit. Hij moet worden bevestigd met slangklemmen die voldoen aan de geldende nationale normen.
Kenmerken van de branders en straalpijpen NL ! !" #$% & ' $( &&$ ) * & &+$% +% 6 7% &8 7 : ; ) '% +< +6 6 $ 7) > ? % + +6 '8 ; ) ; B ) $% $ & @ @ @ A 15°C en 1013 mbar-droog gas P.C.S.
Beschrijving van het apparaat Aanzichttekening Bedieningspaneel THERMOSTAATKNOP Elektronische timer* THERMOSTAATKNOP Controlelampje THERMOSTAAT Knoppen PROGRAMMAKNOP KOOKPLATEN Controlelampje THERMOSTAAT 60 NL gasbrander ontsteking* Knop TIMER* * Slechts op enkele modellen aanwezig.
Starten en gebruik Gebruik van de kookplaat Aansteken van de branders Naast elke BRANDER knop wordt met een vol rondje aangegeven bij welke brander deze knop hoort. Om een brander van de kookplaat aan te steken: 1. houd een vlam of aansteker bij de brander; 2. druk en draai tegelijkertijd de BRANDER knop linksom tot aan het symbool van de grootste vlam E. 3. regel de sterkte van de gewenste vlam, door de BRANDER knop linksom te draaien: op het minimum C, op het maximum E of op een tussenliggende stand.
NL Ovenverlichting De verlichting gaat aan door de PROGRAMMAKNOP in een willekeurige stand (behalve “0”) te zetten. Hij zal aanblijven totdat de oven werkt. Door met de knop te selecteren gaat het licht aan zonder dat de verwarming wordt ingeschakeld. ! Wij raden u aan bij het eerste gebruik de oven minstens een uur leeg te laten functioneren, op maximum temperatuur en met de deur dicht. Nadat u de oven hebt uitgedaan, opent u de ovendeur en lucht u het vertrek.
PIZZA • Voor een optimale pizza dient u het programma MULTIKOKEN te gebruiken. • Gebruik een lichte aluminium ovenschaal en zet hem op het bijgeleverde ovenrooster. Bij gebruik van de bakplaat duurt het langer en krijgt u waarschijnlijk geen krokante pizza. • Bij zeer gevulde pizza’s raden wij aan de mozzarella of andere kaas pas halverwege de kooktijd toe te voegen. De elektronische timer* Hierop ziet u de juiste tijd en de functie van de terugtelelnde timer. N.B.
NL Kooktabel oven Programma's Traditionele oven Multikoken Oven Boven Grill Gratineren Oven Gebak 34 Gerechten Gewicht Roosterstanden (kg) Voorverwarming (minuten) Aangeraden temperatuur Kooktijd (minuten) Eend Braadstuk Varkensrollade Koekjes (kruimeldeeg) Taarten Pizza (op 2 roosters) Lasagne Lamsvlees Kip + gebakken aardappels Makreel Plum-cake Soesjes (op 2 roosters) Koekjes (op 2 roosters) Cake (op 1 rooster) Cake (op 2 roosters) Quiche Tong en inktvis Calamari- en garnalenspiesjes Kabelj
Voorzorgsmaatregelen en advies ! Dit apparaat is ontworpen en vervaardigd volgens de geldende internationale veiligheidsvoorschriften. Deze aanwijzingen zijn geschreven voor uw veiligheid en u dient ze derhalve goed door te nemen. Algemene veiligheid • Dit apparaat is vervaardigd voor nietprofessioneel gebruik binnenshuis. • Het apparaat dient niet buitenshuis te worden geplaatst, ook niet in overdekte toestand. Het is erg gevaarlijk als het in aanraking komt met regen of onweer.
Onderhoud en verzorging NL XEROX FABRIANO 03/2011 - 195087483,00 De elektrische stroom afsluiten Het controleren van de afdichtingen van de oven Sluit altijd eerst de stroom af voordat u tot enige handeling overgaat. Controleer regelmatig de staat van de afdichtingen rondom de ovendeur. In het geval de afdichting beschadigd is, dient u zich tot de dichtstbijzijnde Erkende Servicedienst te wenden. Gebruik de oven niet voordat de reparatie is uitgevoerd.