Mode d’emploi CUISINIERE ET FOUR Sommaire FR Français, 1 GB English, 14 Attention,2 Installation, 3-6 Positionnement et nivellement Raccordement électrique Raccordement gaz Adaptation aux différents types de gaz Caractéristiques techniques Tableau Caractéristiques des brûleurs et des injecteurs Description de l’appareil, 7 Vue d’ensemble Tableau de bord Mise en marche et utilisation,8-11 K6M1S/F S KN6M1SA/FR S K6M1/F S Utilisation du plan de cuisson Mise en marche du four Programmes de cuisson Conseil
ATTENTION FR ATTENTION : cet appareil ainsi que ses parties accessibles deviennent très chauds pendant leur fonctionnement. Il faut faire attention de ne pas toucher les éléments chauffants. Ne laisser s’approcher les enfants de moins de 8 ans à moins qu’ils ne soient sous surveillance constante.
Installation FR ! Conservez ce mode d’emploi pour pouvoir le consulter à tout moment. En cas de vente, de cession ou de déménagement, veillez à ce qu’il suive l’appareil. ! Lisez attentivement les instructions : elles contiennent des conseils importants sur l’installation, l’utilisation et la sécurité de votre appareil.
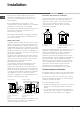
• si la cuisinière est installée sous un élément suspendu, il Min. 600 mm. faut que ce dernier soit placé à au moins 420mm de distance du plan. Il faut prévoir une distance de 700mm si les éléments suspendus sont inflammables (voir figure); • ne placez pas de rideaux derrière la cuisinière ou sur ses côtés à moins de 200 mm de distance; • pour l’installation de hottes, conformez-vous aux instructions de leur notice d’emploi. 420 mm. Min. min. 650 mm. with hood min. 700 mm. without hood 420 mm. Min.
FR • ne risque pas d’entrer en contact avec des corps tranchants, des arêtes vives, des parties mobiles et ne soit pas écrasé; • puisse être facilement contrôlable sur toute sa longueur pour vérifier son état de conservation; • ait moins de 1500mm de long; • soit bien fixé à ses deux extrémités à l’aide de bagues de serrage conformes à la réglementation en vigueur dans le pays.
FR Tableau Caractéristiques des brûleurs et des injecteurs Tableau 1 Brûleur à gaz Diamètre (mm) Rapide (Grand) (R) Semi Rapide (Intermédiaire) (S) Auxiliaire (Petit) (A) By-pass 1/100 Gaz liquide injecteur Charge* 1/100 g/h Gaz naturel injecteur Charge* 1/100 l/h (mm) (mm) *** ** (mm) G20 G25 100 3.00 0.70 41 86 218 214 116 286 332 75 1.90 0.40 30 70 138 136 106 181 210 55 1.00 0.
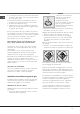
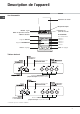
Description de l’appareil FR Vue d’ensemble Couvercle en verre* Plaque électrique Plateau du plan de cuisson Brûleur à gaz Grille du plan de cuisson GLISSIERES de coulissement niveau 5 niveau 4 niveau 3 niveau 2 niveau 1 Tableau de bord Support GRILLE Support LECHEFRITE Pied de réglage Pied de réglage Tableau de bord Bougie d’allumage des BRÛLEURS GAZ* Boutons BRULEURS ou de la plaque électrique du plan de cuisson Bougie d’allumage des BRÛLEURS GAZ* Boutons BRULEURS ou de la plaque électrique
Mise en marche et utilisation Utilisation du plan de cuisson Allumage des brûleurs Un petit cercle plein près de chaque bouton BRULEUR indique le brûleur associé à ce dernier. Pour allumer un brûleur du plan de cuisson : 1. approchez une flamme ou un allume-gaz ; 2. poussez sur le bouton du BRULEUR tout en le tournant dans le sens inverse des aiguilles d’une montre jusqu’au symbole grande flamme E. 3.
FR En cours de cuisson, on peut à tout moment : • modifier le programme de cuisson à l’aide du bouton PROGRAMMES; • modifier la température à l’aide du bouton THERMOSTAT ; • programmer la durée et l’heure de fin de cuisson (voir ci-dessous); • interrompre la cuisson en ramenant le bouton PROGRAMMES sur “0”. ! Il faut toujours placer les plats sur la grille fournie avec l’appareil.
Conseils de cuisson Position Plaque normale ou rapide 0 Eteint 1 Cuisson de légumes verts, poissons 2 Cuisson de pommes de terre (à la vapeur) soupes, pois chiches, haricots 3 Pour continuer la cuisson de grandes quantités d'aliments, minestrone 4 Rôtir (moyen) 5 Rôtir (fort) 6 Rissoler ou rejoindre l'ébullition en peu de temps ! En cas de cuisson en mode GRIL, placer la lèchefrite au gradin 1 pour récupérer les jus de cuisson.
FR Tableau de cuisson au four Poids (Kg) Position gradins en partant du bas Temps de préchauffage (minutes) Position sélecteur de températures Temps de cuisson (minutes) Canard Rôti de veau ou de buf Rôti de porc Biscuits (pâte brisée) Tartes Lasagnes Agneau Maquereau Plum-cake Choux Génoise Quiches 1 1 1 1 1 1 1 1 0.3 0.5 1.
Précautions et conseils ! Cet appareil a été conçu et fabriqué conformément aux normes internationales de sécurité. Ces conseils sont fournis pour des raisons de sécurité et doivent être lus attentivement. Sécurité générale • Les instructions fournies ne sont applicables qu’aux pays dont les symboles sont reportés dans la notice et sur la plaque signalétique. • Cet appareil a été conçu pour un usage familial, de type non professionnel.
Nettoyage et entretien FR Mise hors tension Avant toute opération de nettoyage ou d’entretien couper l’alimentation électrique de l’appareil. Nettoyage de l’appareil ! Ne nettojez jamais l’appareil avec des nettoyeurs vapeur ou haute pression. Remplacement de l’ampoule d’éclairage du four 1. Débrancher le four, enlever le couvercle en verre du logement de la lampe (voir figure). 2. Dévisser l’ampoule et la remplacer par une autre de même type : tension 230 V, puissance 25 W, culot E 14. 3.
Operating Instructions COOKER AND OVEN Contents GB FR Français, 1 GB English,14 Warning, 15 Installation, 16-18 Positioning and levelling Electrical connection Gas connection Adapting to different types of gas Table of burner and nozzle specifications Table of characteristics Description of the appliance, 20 Overall view Control panel Start-up and use, 21-24 K6M1S/F S KN6M1SA/FR S K6M1/F S Using the hob Using the oven Cooking modes Practical advice on using the electric hotplates Practical cooking ad
WARNING GB WARNING: The appliance and its accessible parts become hot during use. Care should be taken to avoid touching heating elements. Children less than 8 years of age shall be kept away unless continuously supervised.
Installation GB ! Before operating your new appliance please read this instruction booklet carefully. It contains important information concerning the safe installation and operation of the appliance. ! Please keep these operating instructions for future reference. Make sure that the instructions are kept with the appliance if it is sold, given away or moved.
• If the cooker is installed underneath a wall cabinet, there must Min. 600 mm. be a minimum distance of 420 mm between this cabinet and the top of the hob. This distance should be increased to 700 mm if the wall cabinets are flammable (see figure). 420 mm. Min. min. 650 mm. with hood min. 700 mm. without hood 420 mm. Min. HOOD • Do not position blinds behind the cooker or less than 200 mm away from its sides.
GB • Does not come into contact with blades, sharp corners or moving parts and that it is not compressed. • Is easy to inspect along its whole length so that its condition may be checked. • Is shorter than 1500 mm. • Fits firmly into place at both ends, where it will be fixed using clamps that comply with current regulations.
Table of burner and nozzle specifications Table 1 Burner Diameter (mm) Rapid (Large) (R) Semi-rapid (Medium) (S) Auxiliary (Small) (A) Liquid gas Bypass Nozzle Thermal power Capacity* 1/100 kW (p.c.s.*) g/h 1/100 (mm) Nominal Reduced (mm) *** ** 3.00 0.70 41 86 218 214 116 286 75 1.90 0.40 30 70 138 136 106 181 55 1.00 0.40 30 50 73 71 79 95 28-30 20 35 37 25 45 Nominal (mbar) Minimal (mbar) Maximised (mbar) At 15°C and 1013 mbar - dry gas Propane P.C.S. = 50.
Description of the appliance GB Overall view Glass cover* ELECTRIC HOTPLATE Gas burner Hob grid Containment surface for spills GUIDE RAILS for the sliding racks position 5 position 4 position 3 position 2 position 1 Control panel GRILL rack DRIPPING PAN rack Adjustable foot Adjustable foot Control panel THERMOSTAT knob THERMOSTAT indicator light GAS BURNER ignition button* ACTIVE HOTPLATE indicator light Hob BURNER or ELECTRIC HOTPLATE control knobs SELECTOR knob THERMOSTAT knob THERMOSTAT ind
Start-up and use Using the hob Practical advice on using the burners Lighting the burners For each BURNER knob there is a complete ring showing the strength of the flame for the relevant burner. To light one of the burners on the hob: 1. Bring a flame or gas lighter close to the burner. 2. Press the BURNER knob and turn it in an anticlockwise direction so that it is pointing to the maximum flame setting E. 3.
GB • Stop cooking by turning the SELECTOR knob to the “0” position. ! Always place cookware on the rack(s) provided. THERMOSTAT indicator light When this is illuminated, the oven is generating heat. It switches off when the inside of the oven reaches the selected temperature. At this point the light illuminates and switches off alternately, indicating that the thermostat is working and is maintaining the temperature at a constant level.
Timer* To activate the Timer proceed as follows: 1. Turn the TIMER knob in a clockwise direction 4 for almost one complete revolution to set the buzzer. 2. Turn the TIMER knob in an anticlockwise direction 5 to set the desired length of time. GB Practical cooking advice ! In the GRILL cooking mode, place the dripping pan in position 1 to collect cooking residues (fat and/or grease). GRILL • Insert the rack in position 3 or 4. Place the food in the centre of the rack.
GB Oven cooking advice table Selector knob Food to be cooked setting 1 Convection Duck Roast veal or beef Pork roast Biscuits (short pastry) Tarts Lasagne Lamb Mackerel Plum-cake Cream puffs Sponge-cake Savoury pies 2 Pastry Mode Raised Cakes Tarts Fruit cakes Brioches Weight Cooking rack (in kg) position from bottom Preheating time (minutes) Thermostat knob setting Cooking time (minutes) 1 1 1 1 1 1 1 1 0.3 0.5 1.
Precautions and tips ! This appliance has been designed and manufactured in compliance with international safety standards. The following warnings are provided for safety reasons and must be read carefully. General safety • The appliance was designed for domestic use inside the home and is not intended for commercial or industrial use. • The appliance must not be installed outdoors, even in covered areas. It is extremely dangerous to leave the appliance exposed to rain and storms.
Care and maintenance GB Switching the appliance off Disconnect your appliance from the electricity supply before carrying out any work on it. Cleaning the appliance ! Never use steam cleaners or pressure cleaners on the appliance. • The stainless steel or enamel-coated external parts and the rubber seals may be cleaned using a sponge that has been soaked in lukewarm water and neutral soap. Use specialised products for the removal of stubborn stains. After cleaning, rinse well and dry thoroughly.
GB 27
05/2012 - 195103732.