Istruzioni per l’uso LAVASTOVIGLIE IT Italiano, 1 NL Nederlands, 46 EN English,16 PL Polski, 61 FR Français, 31 Sommario Scheda prodotto, 2 Precauzioni e consigli, 3 Sicurezza generale Smaltimento Risparmiare e rispettare l’ambiente Installazione e Assistenza, 4-5-6 Posizionamento e livellamento Collegamenti idraulici ed elettrici Avvertenze per il primo lavaggio Dati tecnici Trasporto Assistenza Descrizione dell’apparecchio, 7 Vista d’insieme Pannello comandi LTF 11M113 7 Caricare i cesti, 8-9
Scheda prodotto IT Scheda prodotto Marchio HOTPOINT ARISTON Modello LTF 11M113 7 Capacità nominale in numero di coperti standard (1) 14 Classe di efficienza energetica su una scala da A+++ (bassi consumi) a D (alti consumi) A+ Consumo energetico annuo in kWh (2) 293.0 Consumo energetico del ciclo di lavaggio standard in kWh 1.03 Consumo di potenza nel modo spento in W 0.5 Consumo di potenza nel modo lasciato acceso in W 5.0 Consumo di acqua annuo in litri (3) 1960.
Precauzioni e consigli L’apparecchio è stato progettato e costruito in conformità alle norme internazionali di sicurezza. Queste avvertenze sono fornite per ragioni di sicurezza e devono essere lette attentamente. È importante conservare questo libretto per poterlo consultare in ogni momento. In caso di vendita, di cessione o di trasloco, assicurarsi che resti insieme all’apparecchio. Leggere attentamente le istruzioni: ci sono importanti informazioni sull’installazione, sull’uso e sulla sicurezza.
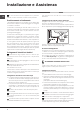
Installazione e Assistenza IT In caso di trasloco tenere l’apparecchio in posizione verticale; se fosse necessario, inclinarlo sul lato posteriore. Posizionamento e livellamento 1. Disimballare l’apparecchio e controllare che non abbia subìto danni durante il trasporto. Se fosse danneggiato non collegarlo e contattare il rivenditore. 2. Sistemare la lavastoviglie facendo aderire i fianchi o lo schienale ai mobili adiacenti o alla parete.
Striscia anticondensa* Dopo aver incassato la lavastoviglie aprire la porta e incollare la striscia adesiva trasparente sotto al ripiano in legno per proteggerlo dalla eventuale condensa. Avvertenze per il primo lavaggio Dopo l’installazione, rimuovere i tamponi posizionati sui cesti e gli elastici di trattenimento sul cesto superiore (dove presenti).
IT Assistenza Prima di contattare l’Assistenza: • Verificare se l’anomalia può essere risolta da soli (vedi Anomalie e Rimedi). • Riavviare il programma per controllare se l’inconveniente è stato ovviato. • In caso negativo, contattare il Servizio Assistenza Tecnica Autorizzato. Non ricorrere mai a tecnici non autorizzati. Comunicare: • il tipo di anomalia; • il modello della macchina (Mod.); • il numero di serie (S/N).
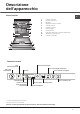
Descrizione dell’apparecchio Vista d’insieme IT 1. 2. 3. 4. 5. 6. 7. 8. 9. 10. 11.
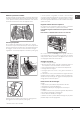
Caricare i cesti IT Suggerimenti Prima di caricare i cesti, eliminare dalle stoviglie i residui di cibo e vuotare bicchieri e i contenitori dei liquidi rimasti. Non è necessario un risciacquo preventivo sotto acqua corrente. Sistemare le stoviglie in modo che siano ben ferme e non si ribaltino, i contenitori siano disposti con l’apertura rivolta in basso e le parti concave o convesse in posizione obliqua, per permettere all’acqua di raggiungere tutte le superfici e di defluire.
Ribaltine a posizione variabile Le ribaltine laterali sono posizionabili su tre altezze differenti per ottimizzare la disposizione delle stoviglie nello spazio del cesto. I calici possono essere posizionati stabilmente sulle ribaltine inserendo lo stelo del bicchiere nelle apposite asole.
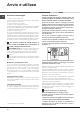
Avvio e utilizzo IT Avviare la lavastoviglie 1. Aprire il rubinetto dell’acqua. 2. Aprire la porta e premere il tasto ON-OFF: le spie ON/OFF, opzioni e il display si illuminano. 3. Dosare il detersivo. (vedi a lato). 4. Caricare i cesti (vedi Caricare i cesti). 5. Selezionare il programma in base alle stoviglie e al loro grado di sporco (vedi tabella dei programmi) premendo il tasto P. 6. Selezionare le opzioni di lavaggio*. 7. Avviare chiudendo la porta. 8.
Programmi I dati dei programmi sono misurati in condizioni di laboratorio secondo Norma europea EN 50242. A seconda delle diverse condizioni di utilizzo, la durata e i dati dei programmi possono variare. IT Il numero e il tipo di programmi ed opzioni variano in base al modello di lavastoviglie.
Programmi speciali ed Opzioni IT Note: le migliori prestazioni dei programmi “Fast e Express 30’”, si ottengono preferibilmente rispettando il numero di coperti specificati. Per consumare di meno usa la lavastoviglie a pieno carico. Nota per i laboratori di Prove: per informazioni sulle condizioni della prova comparativa EN, farne richiesta all’indirizzo: ASSISTENZA_EN_LVS@indesitcompany.
Brillantante e sale rigenerante Usare solo prodotti specifici per lavastoviglie. Non usare sale alimentare o industriale nè detersivi per il lavaggio a mano. Seguire le indicazioni riportate sulla confezione. Accendere e spegnere la lavastoviglie con il tasto ON/OFF. Tenere premuto il tasto P per alcuni secondi fino al segnale acustico.
Manutenzione e cura IT Escludere acqua e corrente elettrica • Chiudere il rubinetto dell’acqua dopo ogni lavaggio per eliminare il pericolo di perdite. • Staccare la spina dalla presa di corrente quando si pulisce la macchina e durante i lavori di manutenzione. Pulire la lavastoviglie • La superficie esterna e il pannello di controllo possono essere puliti con un panno inumidito con acqua non abrasivo. Non usare solventi o abrasivi.
Anomalie e rimedi Qualora l’apparecchio presenti delle anomalie di funzionamento, controllare i seguenti punti prima di rivolgersi all’Assistenza. Anomalie: Possibili cause / Soluzione: La lavastoviglie non parte o non risponde ai comandi • Spegnere la macchina con il tasto ON/OFF, riaccendere dopo un minuto circa e reimpostare il programma. • La spina non è ben inserita nella presa di corrente. • La porta della lavastoviglie non è ben chiusa.
Operating instructions DISHWASHER EN EN English,16 Contents Product Fiche, 17 Precautions, advice and Assistance, 18-19 General safety Disposal Saving energy and respecting the environment Assistance Installation, 20-21 Positioning and levelling Connecting the water and electricity supplies Advice regarding the first wash cycle Technical data Transportation Description of the appliance, 22 LTF 11M113 7 Overall view Control panel Loading the racks, 23-24 Lower rack Cutlery basket Upper rack Cutlery
Product Fiche Product Fiche EN Brand HOTPOINT ARISTON Model LTF 11M113 7 Rated capacity in standard place settings (1) 14 Energy efficiency class on a scale from A+++ (low consumption) to D (high consumption) A+ Energy consumption per year in kWh (2) 293.0 Energy consumption of the standard cleaning cycle in kWh 1.03 Power consumption of the off-mode in W 0.5 Power consumption of the left-on mode in W 5.0 Water consumption per year in litres (3) 1960.
Precautions, advice and Assistance EN This appliance was designed and manufactured in compliance with international safety standards The following information has been provided for safety reasons and should therefore be read carefully. Keep this instruction manual in a safe place for future reference. If the appliance is sold, given away or moved, please ensure the manual is kept with the machine. Please read these instructions carefully: they contain important information on installation, use and safety.
Phosphate-free and chlorine-free detergents containing enzymes • We strongly recommend that you use detergents that do not contain phosphates or chlorine, as these products are harmful to the environment. • Enzymes provide a particularly effective action at temperatures around 50°C. As a result detergents containing enzymes can be used in conjunction with low-temperature wash cycles in order to achieve the same results as a normal 65°C wash cycle.
Installation EN If the appliance must be moved at any time, keep it in an upright position; if absolutely necessary, it may be tilted onto its back. Positioning and levelling Connecting the water outlet hose Connect the outlet hose (without bending it) to a drain duct with a minimum diameter of 4 cm. The outlet hose must be at a height ranging from 40 to 80 cm from the floor / surface where the dishwasher rests (A). 1.
Anti-condensation strip* After installing the dishwasher, open the door and stick the adhesive transparent strip under the wooden shelf in order to protect it from any condensation which may form. Advice regarding the first wash cycle After the installation, remove the stoppers from the racks and the retaining elastic elements from the upper rack, if any.
Description of the appliance EN Overall view 1. 2. 3. 4. 5. 6. 7. 8. 9. 10. 11.
Loading the racks Tips Before loading the racks, remove all food residues from the crockery and empty liquids from glasses and containers. No preventive rinsing is needed under running water. Arrange the crockery so that it is held in place firmly and does not tip over; and arrange the containers with the openings facing downwards and the concave/convex parts placed obliquely, thus allowing the water to reach every surface and flow freely.
EN Tip-up compartments with adjustable position The side tip-up compartments can be positioned at three different heights to optimize the arrangement of crockery inside the rack. Wine glasses can be placed safely in the tip-up compartments by inserting the stem of each glass into the corresponding slots.
Start-up and use Starting the dishwasher 1. Turn the water tap on. 2. Open the door and press ON-OFF button: the ON/OFF indicator lights, options and the display come on. 3. Measure out the detergent. (see adjacent information). 4. Load the racks (see Loading the racks). 5. Select the wash cycle in accordance with the type of crockery and its soil level (see table of wash cycles) by pressing the P button. 6. Select the wash options*. (see Special wash cycles and options). 7.
Wash cycles EN Wash-cycle data is measured under laboratory conditions according to European Standard EN 50242. Based on the different conditions of use, the wash-cycle duration and data can change. The number and type of wash cycles and options may vary depending on the dishwasher model. Wash cycle which include drying Options Approximate duration of wash cycles Water consumption (l/cycle) Energy consumption (KWh/cycle) 1. Eco* Yes Delayed start – Tabs – Extra Dry 03:10’ 7 1,03 2.
Special wash cycles and Options Notes: Optimum performance levels when using the “Fast" and "Express 30’” cycles can be achieved by respecting the specified number of place settings. To reduce consumption even further, only run the dishwasher when it is full. Note for Test Laboratories: for information on comparative EN testing conditions, please send an email to the following address: ASSISTENZA_EN_LVS@indesitcompany.com Multi-functional tablets* (Tabs) This option optimises washing and drying results.
Rinse aid and refined salt EN Only use products which have been specifically designed for dishwashers. Do not use table/industrial salt or washing-up liquid. Follow the instructions given on the packaging. If using a multi-functional product it is not necessary to add any rinse aid. However, we recommend that you add salt, especially if you live in an area where the water is hard or very hard. (Follow the instructions given on the packaging).
Care and maintenance Shutting off the water and electricity supplies • Turn off the water tap after every wash cycle to avoid leaks. • Always unplug the appliance when cleaning it and when performing maintenance work. Cleaning the dishwasher • The external surfaces of the machine and the control panel can be cleaned using a non-abrasive cloth which has been dampened with water. Do not use solvents or abrasive products.
Troubleshooting EN Whenever the appliance fails to work, check for a solution from the following list before calling for Assistance. Problem: Possible causes / Solutions: The dishwasher does not start or cannot be controlled. • Switch off the appliance by pressing the ON/OFF button, switch it back on after approximately one minute and reset the program. • The appliance has not been plugged in properly. • The dishwasher door has not been shut properly. The door won’t close. • The lock was released.
Mode d’emploi FR LAVE-VAISSELLE Sommaire FR Fiche de produit, 32 Français, 31 Précautions et conseils, 33-34 Sécurité générale Mise au rebut Economies et respect de l’environnement Service Installation, 35-36 Mise en place et mise à niveau Raccordements eau et électricité Conseils pour le premier lavage Caractéristiques techniques Transport Description de l’appareil, 37 LTF 11M113 7 Vue d’ensemble Tableau de bord Charger les paniers, 38-39 Panier inférieur Panier à couverts Panier supérieur Clay
Fiche de produit FR Fiche de produit Marque HOTPOINT ARISTON Modèle LTF 11M113 7 Capacité nominale dans un environnement standard (1) 14 Classe énergétique sur une échelle de A+++ (faible consommation) à D (consommation élevée) A+ Consommation d''énergie par année en kWh (2) 293.0 Consommation d''énergie du cycle de lavage standard en kWh 1.03 Consommation d''energie en mode "off" en W 0.5 Consommation d''energie en mode "on" en W 5.0 Consommation d''eau par an en litres (3) 1960.
Précautions et conseils Cet appareil a été conçu et fabriqué conformément aux normes internationales de sécurité. Ces consignes sont fournies pour des raisons de sécurité, il faut les lire attentivement. Conserver ce mode d’emploi pour pouvoir le consulter à tout moment. En cas de vente, de cession ou de déménagement, s’assurer qu’il accompagne bien l’appareil. Lire attentivement les instructions : elles fournissent des conseils importants sur l’installation, l’utilisation et la sécurité de l’appareil.
FR Produits de lavage sans phosphates, sans chlore et aux enzymes • Il est vivement conseillé d’utiliser des produits de lavage sans phosphates et sans chlore, plus indiqués pour la protection de l’environnement. • Les enzymes développent une action particulièrement efficace à des températures avoisinant 50°C, les produits de lavage aux enzymes permettent donc de sélectionner des lavages à de basses températures et d’obtenir les mêmes résultats qu’à une température de 65°C.
Installation En cas de déménagement, transporter l’appareil verticalement; si besoin est, l’incliner sur le dos. Mise en place et mise à niveau 1. Déballer l’appareil et s’assurer qu’il n’a pas été endommagé pendant le transport. S’il est abîmé, ne pas le raccorder et contacter le revendeur. Raccordement du tuyau d’évacuation de l’eau Raccorder le tuyau d’évacuation, sans le plier, à une conduite d’évacuation ayant au moins 4 cm de diamètre.
FR Ruban anti-condensation* Après avoir encastré le lave-vaisselle, ouvrir la porte et coller le ruban adhésif transparent sous le plan en bois pour le protéger contre la formation de condensation. Conseils pour le premier lavage Après l’installation, enlever les chevilles placées sur les paniers et les élastiques de blocage sur le panier supérieur (le cas échéant).
Description de l’appareil Vue d’ensemble FR 1. 2. 3. 4. 5. 6. 7. 8. 9. 10. 11.
Charger les paniers FR Conseils Avant de charger les paniers, débarrasser la vaisselle des déchets plus importants et vider les verres et autres récipients. Pas besoin de rincer préalablement à l'eau courante.
Clayettes rabattables à inclinaison variable Les clayettes latérales peuvent être placées à trois hauteurs différentes afin d’optimiser la disposition de la vaisselle dans le panier. Les verres à pied peuvent être placés en position stable sur les clayettes rabattables en insérant la tige de leurs pieds dans les fentes prévues à cet effet.
Mise en marche et utilisation FR Mettre en marche le lave-vaisselle 1. Ouvrir l’arrivée d’eau. 2. Ouvrir la porte et appuyer sur la touche ON-OFF : les voyants ON/OFF, options et l’afficheur s’allument. 3. Doser le produit de lavage. (voir ci-contre). 4. Charger les paniers (voir Charger les paniers). 5. Sélectionner le programme selon le type de vaisselle et son degré de salissure (voir tableau des programmes) appuyer sur la touche P. 6. Sélectionner les options de lavage*. (voir Progr.
Programmes Les données des programmes sont mesurées dans des conditions de laboratoire selon la norme européenne EN 50242. Selon les différentes conditions d’utilisation, la durée et les données des programmes peuvent être différentes. FR Le nombre ainsi que les types de programmes et d’options varient selon le modèle de lave-vaisselle. Séchage Options Durée du programme Consommation d’eau (litre/ cycle) Consomation d’énergie (KWh/ cycle) 1.
Programmes spéciaux et Options FR Remarque : pour obtenir des performances optimales avec les programmes « Fast et Express 30' » il est conseillé de respecter le nombre de couverts indiqué. Pour consommer moins, utiliser le lave-vaisselle pleine charge. Note pour les laboratoires d’essai : pour toutes informations sur les conditions d’essai comparatif EN, s’adresser à : ASSISTENZA_EN_LVS@indesitcompany.
Produit de rinçage et sel régénérant N’utiliser que des produits de lavage spéciaux lavevaisselle. Ne pas utiliser de sel alimentaire ou industriel ni de produits vaisselle pour lavage à la main. Se conformer aux instructions reportées sur l’emballage. En cas d’utilisation d’un produit multifonction, pas besoin d’ajouter de produit de rinçage mais nous conseillons par contre d’ajouter du sel, surtout en cas d’eau dure ou très dure. (Se conformer aux instructions reportées sur l’emballage).
Entretien et soin FR Coupure de l’arrivée d’eau et du courant • Fermer le robinet de l'eau après chaque lavage pour éviter tout risque de fuites. • Débrancher la fiche de la prise de courant lors du nettoyage de l’appareil et pendant tous travaux d’entretien. Nettoyer le lave-vaisselle • Pour nettoyer l’extérieur et le bandeau de commande, utiliser un chiffon humide non abrasif. N’utiliser ni solvants ni détergents abrasifs.
Anomalies et remèdes Si l’appareil présente des anomalies de fonctionnement, procéder aux contrôles suivants avant de prendre contact avec le service d’assistance technique. Anomalies : Causes / Solutions possibles : Le lave-vaisselle ne démarre pas ou n’obéit pas aux commandes • Eteindre l’appareil à l'aide de la touche ON-OFF, rallumer au bout d’une minute environ et sélectionner à nouveau le programme. • La fiche n’est pas bien branchée dans la prise de courant.
Gebruiksaanwijzing AFWASAUTOMAAT NL NL Nederlands, 46 Inhoud Productkaart, 47 Voorzorgsmaatregelen en advies, 48 Algemene veiligheid Afvalverwijdering Energiebesparing en respect voor het milieu Installatie, Service 49-50-51 Plaatsing en waterpas zetten Hydraulische en elektrische aansluitingen Aanwijzingen voor de eerste afwascyclus Technische gegevens Transport Service LTF 11M113 7 Beschrijving van het apparaat, 52 Aanzichttekening Bedieningspaneel Het laden van de rekken, 53-54 Onderrek Bovenre
Productkaart NL Productkaart Merk HOTPOINT ARISTON Model LTF 11M113 7 Beladingscapaciteit in standaard couverts (1) 14 Energie-efficiëntieklasse op een schaal van A+++ (laag gebruik) tot D (hoog gebruik) A+ Jaarlijks energieverbruik in kWh (2) 293.0 Energieverbruik van de standaard wascyclus in kWh 1.03 Energieverbruik in de off-modus in W 0.5 Energieverbruik in de aan-modus in W 5.0 Jaarlijks waterverbruik in liters (3) 1960.
Voorzorgsmaatregelen en advies NL Hetapparaat is ontworpen en gebouwd overeenkomstig de internationale veiligheidsnormen. Deze aanwijzingen zijn geschreven om veiligheidsredenen en moeten zorgvuldig worden doorgenomen. Bewaar dit boekje zorgvuldig voor eventuele toekomstige raadpleging. Wanneer u het product weggeeft, verkoopt of wanneer u verhuist, dient u dit boekje bij het apparaat te bewaren.
Installatie - Service Als u het apparaat verplaatst moet u het verticaal houden; als dit niet mogelijk is moet u het naar achteren kantelen. Plaatsing en waterpas zetten 1. Haal het apparaat uit de verpakking en controleer dat het geen schade heeft opgelopen tijdens het transport. Als het apparaat beschadigd is, moet u het niet aansluiten maar de dealer inschakelen.
NL Anticondensstrip* Nadat u de afwasautomaat heeft ingebouwd opent u de deur en plakt u de doorzichtige plakstrip onder het houten werkvlak, zodat u het beschermt tegen eventuele condens. Aanwijzingen voor de eerste afwascyclus Na de installatie moet u de beschermelementen op de rekken verwijderen zoals ook de elastieken op het bovenrek (waar aanwezig).
Service NL Voordat u de Servicedienst inschakelt: • Dient u te controleren of u de storing zelf kunt oplossen (zie Storingen en Oplossingen). • Start het programma opnieuw om te controleren of het probleem is opgelost. • Als dit niet het geval is dient u de erkende Technische Servicedienst in te schakelen. Wendt u nooit tot niet erkende technici. U dient door te geven: • het type storing; • het model van het apparaat (Mod.); • het serienummer (S/N).
Beschrijving van het apparaat NL Aanzichttekening 1. 2. 3. 4. 5. 6. 7. 8. 9. 10. 11.
Het laden van de rekken Advies Voordat u de vaat inlaadt moet u overtollige etensresten verwijderen en glazen en bekers legen. Het is niet noodzakelijk de vaat met water af te spoelen voor u hem in de vaatwasser laadt. Plaats de vaat dusdanig zodat hij stevig vaststaat en niet om kan vallen. Pannen, bakken en glazen moeten met de opening naar onder worden geplaatst en holle of bolle elementen moeten schuin worden geplaatst zodat het water alle oppervlakken kan bereiken en daarna vrijuit kan wegspoelen.
NL Opklaprekjes met verschillende standen De opklaprekjes aan de zijkant kunnen op drie verschillende hoogten worden gezet om de plaatsing van de vaat in het rek te optimaliseren. Wijnglazen kunnen op een stabiele wijze op de opklaprekjes worden geplaatst door de voet van het glas in de speciale gaten te steken.
Starten en gebruik Start de vaatwasser 1. Open de waterkraan. 2. Open de deur en druk op de ON-OFF toets: de controlelampjes ON/OFF, de opties en het display gaan aan. 3. Doseer het vaatwasmiddel. (zie hiernaast). 4. Laad de rekken in (zie De rekken laden). 5. Selecteer het programma aan de hand van het soort vaat en het type vuil (zie de programmatabel) door op de toets P te drukken. 6. Selecteer de wasopties*. (zie Speciale programma's en Opties). 7. Start het programma door de deur te sluiten. 8.
Programma’s NL De gegevens van de programma’s zijn gemeten in laboratoriumomstandigheden volgens de Europese vorm EN 50242. Aan de hand van de verschillende gebruiksmogelijkheden kunnen de duur en de programmagegevens verschillen. Het aantal en het soort programma’s en opties verschilt aan de hand van het model afwasautomaat. Programma’s met droogfunctie Opties Duur van het programma Waterverbruik (l/cyclus) Energieverbruik (KWh/cyclus) 1.
Speciale programma's en Opties N.B.: de beste prestaties van de programma's "Snel en Express 30'" worden bereikt als u het aantal aangegeven couverts niet overschrijdt. Voor een zuiniger verbruik de afwasmachine volgeladen laten draaien. Aanwijzing voor de Proeflaboratoria: voor gedetailleerde informatie over de omstandigheden van de EN-vergelijkingsproef kunt u contact opnemen met: ASSISTENZA_EN_LVS@indesitcompany.com Extra Drogen Voor het beter drogen van de vaat drukt u op de toets EXTRA DROOG.
Glansmiddel en zout NL Gebruik uitsluitend producten die speciaal voor vaatwasmachines bestemd zijn. Gebruik geen keukenzout of industrieel zout en ook geen wasmiddelen voor handwas. Volg de aanwijzingen op de verpakking. Als u een multifunctioneel product gebruikt, is het niet nodig een glansmiddel toe te voegen. Wij raden u echter wel aan onthardingszout toe te voegen, als het water hard of zeer hard is. (Volg de aanwijzingen op de verpakking).
Onderhoud en verzorging Water en elektrische stroom afsluiten • Sluit na elke afwasbeurt de waterkraan af om lekkage te voorkomen. • Haal de stekker uit het stopcontact tijdens reiniging en onderhoud. Reinigen van de afwasautomaat • De buitenkant en het bedieningspaneel kunnen worden gereinigd met een natte, niet schurende doek. Gebruik geen oplosmiddelen of schuurmiddelen. • De vlekken aan de binnenkant van de afwasautomaat kunnen worden verwijderd met een natte doek en wat azijn.
Storingen en oplossingen NL Als er storingen zijn in de werking van het apparaat dient u eerst de volgende punten na te gaan voor u zich tot de Servicedienst wendt. Storingen: De vaatwasser start niet of volgt de opdrachten niet op De deur gaat niet dicht De vaatwasser pompt het water niet af. De vaatwasser maakt lawaai. Er blijven op vaat en glazen kalkafzettingen of een witte aanslag achter. Er blijven op vaat en glazen strepen of blauwe kringen achter. De vaat is niet droog genoeg.
Instrukcja obsługi PL Polski, 61 ZMYWARKA Spis treści PL Karta produktu, 62 Zalecenia i środki ostrożności, 63 Bezpieczeństwo ogólne Utylizacja Oszczędność i ochrona środowiska Instalacja i serwis, 64-65-66 Ustawienie i wypoziomowanie Połączenie hydrauliczne i elektryczne Dane techniczne Przed pierwszym użyciem Transport Serwis Opis urządzenia, 67 Widok ogólny Panel sterowania LTF 11M113 7 Napełnianie koszy, 68-69 Kosz dolny Koszyk na sztućce Kosz górny Taca na sztućce Regulacja górnego kosza Uruc
Karta produktu PL Karta produktu Marka HOTPOINT ARISTON Nazwa modelu LTF 11M113 7 Pojemność znamionowa, wyrażona liczbą standardowych kompletów naczyń (1) 14 Klasa efektywności energetycznej, skla od A+++ (niskie zużycie) do D (wysokie zużycie) A+ Zużycie energii w kWh rocznie (2) 293.0 Zużycie energii w standardowym cyklu zmywania w kWh 1.03 Zużycie energii w trybie wyłączenia i trybie czuwania w W 0.5 Zużycie energii w trybie włączenia i trybie czuwania w W 5.
Zalecenia i środki ostrożności Niniejsze urządzenie zostało zaprojektowane i wyprodukowane zgodnie z międzynarodowymi normami bezpieczeństwa. Poniższe ostrzeżenia podane zostały ze względów bezpieczeństwa i należy je uważnie przeczytać. Należy zachować niniejszą książeczkę instrukcji dla przyszłych konsultacji. W przypadku sprzedaży, odstąpienia lub przeprowadzki należy dopilnować, aby została przekazana wraz z urządzeniem nowemu właścicielowi.
Instalacja Serwis Techniczny W przypadku przenoszenia należy trzymać urządzenie w pozycji pionowej; w razie konieczności przechylić je do tyłu. PL Ustawienie i wypoziomowanie 1. Rozpakować urządzenie i sprawdzić, czy nie zostało uszkodzone podczas transportu. Jeśli okazałoby się uszkodzone, nie podłączać go, lecz skontaktować się ze sprzedawcą. Podłączenie węża odprowadzającego wodę Podłączyć przewód odprowadzający, nie zginając go, do przewodu kanalizacyjnego o średnicy minimum 4 cm.
Pasek antykondensacyjny* Po zabudowaniu zmywarki otworzyć drzwi i przykleić przezroczysty pasek samoprzylepny pod drewnianym blatem, aby zabezpieczyć go przed ewentualnymi skroplinami. Ostrzeżenia dotyczące pierwszego mycia Po zainstalowaniu, należy zdjąć elementy ochronne z koszy oraz gumki przytrzymujące kosz górny (jeśli je zastosowano).
Serwis Techniczny PL Przed zwróceniem się do Serwisu Technicznego: • Sprawdzić, czy problemu nie można rozwiązać samodzielnie (patrz Nieprawidłowości w działaniu i sposoby ich usuwania). • Ponownie uruchomić program, aby przekonać się, czy usterka nie ustąpiła. • W przeciwnym wypadku skontaktować się z autoryzowanym Serwisem Technicznym. Zwracać się wyłącznie do autoryzowanych techników. Podać: • rodzaj nieprawidłowości; • model urządzenia (Mod.); • numer seryjny (S/N).
Opis urządzenia Widok ogólny 1. 2. 3. 4. 5. 6. 7. 8. 9. 10. 11.
Ładowanie koszy Zalecenia PL Przed napełnieniem koszy, usunąć z naczyń resztki żywności i opróżnić szklanki oraz kieliszki z pozostałych w nich płynów. Nie jest konieczne płukanie naczyń pod bieżącą wodą. Umieścić naczynia w sposób taki, by były one unieruchomione i się nie przewracały; pojemniki powinny być ułożone w sposób taki, by otwór znalazł się na dole, a części wklęsłe lub wypukłe w pozycji pochylonej, umożliwiając dopływ wody do wszystkich powierzchni oraz jej swobodny odpływ.
Półeczki o różnym stopniu nachylenia W celu jak najlepszego rozmieszczenia naczyń w koszyku możliwe jest ustawienie półeczek na trzech różnych wysokościach Kieliszki można ustawiać w bezpieczny sposób dzięki półeczkom, wsuwając nóżkę kieliszka w odpowiednie otwory.
Uruchomienie i użytkowanie Uruchomienie zmywarki PL 1. Otworzyć zawór wody. 2. Otworzyć drzwi i nacisnąć przycisk ON-OFF: zapalą się kontrolki ON/OFF, opcje i wyświetlacz. 3. Wprowadzić detergent. (zob. z boku). 4. Włożyć naczynia do koszy (zob. Napełnianie koszy). 5. Wybrać program w zależności od rodzaju naczyń i od stopnia ich zabrudzenia (zob. tabela programów) naciskając przycisk P. 6. Wybrać opcje zmywania*. (zob. Progr. specjalne i Opcje). 7. Uruchomić cykl zamykając drzwi. 8.
Programy Dane programów są mierzone w warunkach laboratoryjnych zgodnie z europejską normą EN 50242. PL W zależności od poszczególnych warunków użytkowania, czas trwania oraz dane programów mogą się zmieniać. Liczba i rodzaj programów i opcji zmieniają się w zależności od modelu zmywarki. Suszenie Opcje Czas trwania programu Zużycie wody (l/cykl) Zużycie energii (KWh/cykl) 1. Eco* Tak Opóźnienie startu – Tabs – Suszenie dodatkowe 03:10’ 7 1,03 2.
Programy specjalne i opcje Uwagi: najlepszą skuteczność działania programów “Fast i Express 30’” uzyskuje się przestrzegając zaleceń dotyczących ilości wkładanych naczyń. PL Aby zmniejszyć zużycie wody i energii, staraj się uruchamiać zmywarkę, gdy jest całkowicie wypełniona. Uwaga dla laboratoriów testowych: szczegółowe informacje dotyczące warunków testów porównawczych EN można uzyskać pod adresem: ASSISTENZA_EN_LVS@indesitcompany.
Płyn nabłyszczający i sól ochronna Stosować wyłącznie produkty przeznaczone do zmywarek. Nie używać soli kuchennej i przemysłowej ani detergentów do zmywania ręcznego. Stosować zgodnie z zaleceniami podanymi na opakowaniu. W przypadku użycia produktu wielofunkcyjnego nie ma konieczności stosowania płynu nabłyszczającego, zaleca się natomiast dodanie soli, zwłaszcza gdy woda jest twarda lub bardzo twarda. (Stosować zgodnie z zaleceniami podanymi na opakowaniu).
Konserwacja i utrzymanie Wyłączanie wody i prądu elektrycznego PL • Zakręcać zawór wody po każdym zmywaniu, aby uniknąć niebezpieczeństwa wycieków. • Wyjmować wtyczkę z kontaktu przed przystąpieniem do czyszczenia urządzenia oraz podczas czynności konserwacyjnych. Czyszczenie zmywarki • Obudowa zewnętrzna i panel sterowania mogą być czyszczone miękką ściereczką zwilżoną wodą. Nie należy stosować rozpuszczalników ani środków ściernych.
Anomalie i środki zaradcze Jeśli w pracy urządzenia pojawiają się anomalie w pracy, należy skontrolować następujące punkty przed zwróceniem się do Obsługi technicznej (patrz Obsługa techniczna). Niektóre z usterek są sygnalizowane za pomocą lampek zapalających się na panelu sterowania. Przed wezwaniem pomocy technicznej należy zanotować, które z lampek świecą.
195111948.