
Instruction for Use


8
GB
Start-up and use
! The position of the corresponding gas burner or electric hotplate* is shown
on every knob.
Gas burners
Each burner can be adjusted to one of the following settings using the
corresponding control knob:
● O
Maximum
Minimum
To light one of the burners, hold a lit match or lighter near the burner and, at
the same time, press down and turn the corresponding knob anti-clockwise
to the maximum setting.
Since the burner is tted with a safety device, the knob should be pressed
for approximately 2-3 seconds to allow the automatic device keeping the
ame alight to heat up.
When using models with an ignition button, light the desired burner pressing
down the corresponding knob as far as possible and turning it anticlockwise
towards the maximum setting.
! If a ame is accidentally extinguished, turn o the control knob and wait for
at least 1 minute before trying to relight it.
To switch o the burner, turn the knob in a clockwise direction until it stops
(when reaches the “●” position).
Practical advice on using the burners
To ensure the burners operate eciently:
• Use appropriate cookware for each burner (see table) so that the ames
do not extend beyond the bottom of the cookware.
• Always use cookware with a at base and a cover.
• When the contents of the pan reach boiling point, turn the knob to minimum.
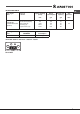
Reduced Rapid (RR)
Semi Rapid (S)
Auxiliary (A)
Triple Crown (TC)
Ø Cookware diameter (cm)
24 - 26
16 - 20
10 - 14
24 - 26
Burner
To identify the type of burner, refer to the designs in the section entitled, “Burner
and Nozzle Specications”.
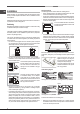
Ceramic Glass Module*
This cooktop is tted with dual-ring radiant heating elements located beneath
the glass. It is possible to turn on only the circular part of the elemement
(identied by the letter “A”) or the cooking surface can be enlarged by turning
on both “A” and “B”. To turn only the circular “A” element, simply turn the
knob in the clockwise direction to any one of the 12 available settings. To add
the “B” section, turn the knob to setting 12 and then click it into the
setting. Then proceed by turning the knob in the counter-clockwise direction
to one of the 12 settings.
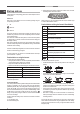
The gure shows the heating zones, which become red when the element
is turned on.
A. Circular heating zone;
B. Extended heating zone;
C. Indicator light to show when the cooking zone is above 60°C, even after
the heating element has been turned o.
A
C
B
When the knob is on any of the settings other than “O”, the Indicator Light
for Ceramic Glass Module comes on.
Practical Advise on Using the Ceramic Glass Module*
Set.
0
1
2
3
4
5
6
7
8
9
10
11
12
Radiant Burner
Off.
To melt butter and chocolate.
To heat liquids.
For creams and sauces.
For cooking at the boiling point.
For Roasts.
For boiling large pieces of meat.
For frying.
For utilising both cooking areas.
To obtain the best results from your hob:
• Use at-bottomed pans to ensure that they adhere to the cooking zone
perfectly.
• Always use pans with a diameter that is large enough to cover the hotplate
fully, in order to use all the available heat.
• Make sure that the bottom of the cookware is always dry and clean to
guarantee correct adherence and long life, not only for the cooking zones
but also for the cookware itself.
• Avoid using the same cookware that is used on gas burners: the heat
concentration on gas burners may deform the base of the pan, causing it
not to adhere correctly.
• Never leave a cooking zone on without cookware on it because as it
heats up and rapidly reaches the maximum level, which could damage
the heating elements.
! There might be traces of grease left by the glue used to seal the glass
which should be removed before using the appliance with a mild cleaning
product. During the rst few hours of use you might smell rubber but this will
disappear quickly.