
Instruction for Use

28
GB
Start-up and use
! The position of the corresponding gas burner or electric
hotplate* is shown on every knob.
Gas cooker hobs are equipped with discrete power
adjustment that allows for accurately adjusting the ame to 5
different power levels. Thanks to this system, gas hobs are
also capable of guaranteeing the same cooking results for
each recipe, as the optimal power level for the desired type
of cooking can be identied in an easier, more accurate way.
Gas burners
Each burner can be adjusted to one of the following settings
using the corresponding control knob:
● Off
Maximum
Minimum
To light one of the burners, hold a lit match or lighter near
the burner and, at the same time, press down and turn the
corresponding knob anti-clockwise to the maximum setting.
Since the burner is tted with a safety device, the knob
should be pressed for approximately 2-3 seconds to allow
the automatic device keeping the ame alight to heat up.
When using models with an ignition button, light the desired
burner pressing down the corresponding knob as far as possible
and turning it anticlockwise towards the maximum setting.
! If a ame is accidentally extinguished, turn off the control
knob and wait for at least 1 minute before trying to relight it.
To switch off the burner, turn the knob in a clockwise
direction until it stops (when reaches the “●” position).
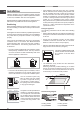
Discrete ame adjustment
The selected burner can be adjusted - by means of the knob
- to 5 different power levels. To shift between levels, simply
turn the knob towards the desired power level.
A click signals the passage from one power level to the other.
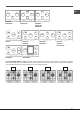
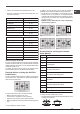
The selected power level is
indicated by the corresponding
symbol (symbols ) and,
on hobs equipped with a display,
by the LEDs that turn on (5 =
max. power; 1 = min. power). The
system guarantees accurate ame
adjustment and uniform cooking
results by facilitating selection of the desired power level.
The “double-ame” burner
This gas burner consists of two concentric ame rings that can
operate jointly or independently (in case of dual-control only).
As the burner is tted with a safety device, the knob
should be pressed down for approximately 2-3 seconds until
the device keeping the ame automatically alight heats up.
Dual control:
Each ring comprising the burner has its own control knob:
The knob marked with the symbol controls the outer ring.
The knob marked with the symbol controls the inner ring.
To activate any one of the two rings, press the corresponding
knob and turn it anti-clockwise to the maximum power
setting .
In order to use the double-flame burner to its full
potential, avoid simultaneously setting the inner ring to
minimum power and the outer ring to maximum power.
Single control:
The rings comprising the burner are activated through a
single control knob.
To simultaneously turn on both rings, position the knob on
the symbol (max) - (min) then press and turn the
knob anti-clockwise.
To turn on the inner ring only, position the knob on the symbol
(max ) - (min) then press and turn the knob clockwise.
(to switch modes, it is necessary to switch off the burner).
To switch off the burner, press and turn the knob clockwise
until it stops (when it reaches the “●” position).
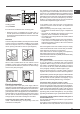
Ceramic Glass Module*
This cooktop is tted with dual-ring radiant heating elements
located beneath the glass. It is possible to turn on only the
circular part of the elemement (identied by the letter “A”) or
the cooking surface can be enlarged by turning on both “A”
and “B”. To turn only the circular “A” element, simply turn the
knob in the clockwise direction to any one of the 12 available
settings. To add the “B” section, turn the knob to setting 12 and
then click it into the setting. Then proceed by turning the knob
in the counter-clockwise direction to one of the 12 settings.
The gure shows the heating zones, which become red
when the element is turned on.
A. Circular heating zone;
B. Extended heating zone;
C. Indicator light to show when
the cooking zone is above
60°C, even after the heating
element has been turned off.
When the knob is on any of
the settings other than “Off”,
the Indicator Light for Ceramic
Glass Module comes on.
Practical advice on using the burners
To ensure the burners operate efciently:
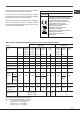
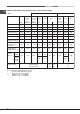
• Use appropriate cookware for each burner (see table)
so that the ames do not extend beyond the bottom of
the cookware.
A
C
B
* Only available on certain models.