
Instruction for Use


8
GB
Start-up and use
! The position of the corresponding gas burner is shown on every knob.
Gas cooker hobs are equipped with discrete power adjustment that allows
for accurately adjusting the ame to 5 different power levels. Thanks to this
system, gas hobs are also capable of guaranteeing the same cooking results
for each recipe, as the optimal power level for the desired type of cooking can
be identied in an easier, more accurate way.
Gas burners
Each burner can be adjusted to one of the following settings using the
corresponding control knob:
● Off
Maximum
Minimum
To light one of the burners, hold a lit match or lighter near the burner and, at
the same time, press down and turn the corresponding knob anti-clockwise
to the maximum setting.
Since the burner is tted with a safety device, the knob should be pressed
for approximately 2-3 seconds to allow the automatic device keeping the
ame alight to heat up.
When using models with an ignition button, light the desired burner pressing
down the corresponding knob as far as possible and turning it anticlockwise
towards the maximum setting.
! If a ame is accidentally extinguished, turn off the control knob and wait for
at least 1 minute before trying to relight it.
To switch off the burner, turn the knob in a clockwise direction until it stops
(when reaches the “●” position).
Discrete ame adjustment
The selected burner can be adjusted - by means of the knob - to 5 different
power levels.
To shift between levels, simply turn the knob
towards the desired power level.
A click signals the passage from one power
level to the other.The selected power level
is indicated by the corresponding symbol
(symbols ) and, on hobs equipped with
a display, by the LEDs that turn on (5 = max.
power; 1 = min. power). The system guarantees accurate ame adjustment
and uniform cooking results by facilitating selection of the desired power level.
The “double-ame” burner
This gas burner consists of two concentric ame rings that can operate jointly
or independently (in case of dual-control only).
As the burner is tted with a safety device, the knob should be pressed
down for approximately 2-3 seconds until the device keeping the ame
automatically alight heats up.
Single control:
The rings comprising the burner are activated through a single control knob.
To simultaneously turn on both rings, position the knob on the symbol
(max) - (min) then press and turn the knob anti-clockwise.
To turn on the inner ring only, position the knob on the symbol (max ) -
(min) then press and turn the knob clockwise.
To switch modes, it is necessary to switch off the burner.
To switch off the burner, press and turn the knob clockwise until it stops (when
it reaches the “●” position).
Practical advice on using the burners
To ensure the burners operate efciently:
• Use appropriate cookware for each burner (see table) so that the ames
do not extend beyond the bottom of the cookware.
• Always use cookware with a at base and a cover.
• When the contents of the pan reach boiling point, turn the knob to minimum.
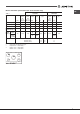
Reduced Rapid (RR)
Semi Rapid (S)
Auxiliary (A)
Double Flame (DCDR internal)
Double Flame (DCDR external)
Pans to be used on 75 cm hobs
24 - 26
16 - 20
10 - 14
10 - 14
26 - 28
Burner
Ø Cookware Diameter (cm)
! On the models supplied with a reducer shelf, remember that this should be
used only for the Double ame internal (DCDR internal) burner when you use
casserole dishes with a diameter under 12 cm.
To identify the type of burner, refer to the designs in the section entitled, “Burner
and Nozzle Specications”.
• For maximum stability, always make sure that the pan supports are
correctly tted and that each pan is placed centrally over the burner.
• Pan handles should be positioned in line with one of the support bars on
the pan support grid.
• Pan handle should be positioned so not to protrude beyond the front edge
of the hob.
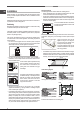
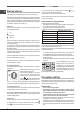
The more variable aspect in terms of pan
stability can often be the pan itself, (or
the positioning of that pan during use).
Well balanced pans, with at bases that
are placed centrally over the burner, with
the pan handles aligned with one of the
support ngers obviously offer the greatest stability.
Precautions and tips
! This appliance has been designed and manufactured in compliance with
international safety standards. The following warnings are provided for safety
reasons and must be read carefully.
General safety
• This is a class 3 built-in appliance.
• Gas appliances require regular air exchange to maintain efcient
operation. When installing the hob, follow the instructions provided
in the paragraph on “Positioning” the appliance.
• These instructions are only valid for the countries whose symbols
appear in the manual and on the serial number plate.
• The appliance was designed for domestic use inside the home and is
not intended for commercial or industrial use.
• The appliance must not be installed outdoors, even in covered areas. It is
extremely dangerous to leave the appliance exposed to rain and storms.
• Do not touch the appliance with bare feet or with wet or damp hands and
feet.