
Instruction for Use


14
GB
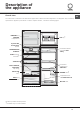
Accessories
SHELVES: with or without grill.
Due to the special guides the
shelves are removable and the
height is adjustable (see
diagram), allowing easy storage
of large containers and food.
Height can be adjusted without
complete removal of the shelf.
BOTTLE RACK/ CAN RACK
flap door: to store a bottle or
several cans horizontally (
see
diagram
). When not in use,
close the flap door to increase
the space in the refrigerator
compartment.
PYREX storage container: refer to the enclosed leaflet
for details on the various ways to use this container.
MULTI-USE bin: to store food
(such as cold meats) for a long
time and also prevent odours
from lingering in the refrigerator.
It can be removed for use and it
may be shifted sideways to
optimise space (see diagram).
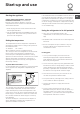
TEMPERATURE Indicator light: to identify the coldest
area in the refrigerator.
1. Check that OK appears clearly on the indicator light
(see diagram).
2. If the word OK does not appear it means that the
temperature is too high: adjust the REFRIGERATOR
OPERATION knob to a higher position (colder) and
wait approximately 10 hours until the temperature has
been stabilised.
1
2
3. Check the indicator light again: if necessary, readjust
it following the initial process. If large quantities of
food have been added or if the refrigerator door has
been opened frequently, it is normal for the indicator
not to show OK. Wait at least 10 hours before
adjusting the REFRIGERATOR OPERATION knob to a
higher setting.
ICE tray
The Easy Ice trays are set into the freezer door to
maximise the space within the freezer. The trays are
drip-free and sealed to prevent food from tainting the
ice cubes.
1. Pull out the tray by pushing it
up and then outwards (see
diagram).
Check that the tray is ompletely
empty and fill it with water
through the opening provided.
2. Take care not to exceed the
level indicated (MAX WATER
LEVEL). Excess water prevents
the ice cubes from dispensing (if
this happens, wait for the ice to
melt and empty the tray).
3. Turn the tray 90°: due to the
connected compartments each
mould fills with water (see
diagram).
4. Close the opening with the lid provided and put the
tray back, placing the top part in the corresponding
housing and allowing it to drop in again.
5. When the ice has formed (minimum time
approximately 8 hours) knock the tray against a hard
surface and wet the outside so that the ice cubes
come loose and take them out through the opening.
MAX
WATER LEVEL
MAX
WATER LEVEL