Instruction booklet TUMBLE DRYER GB F English, 1 Français, 18 E Español, 35 Contents GB Important information, 2-3 Installation, 4 P GR Português, 52 EÏÏËÓÈο, 69 Where to put your dryer Ventilation Electrical connection Before you start using your dryer Dryer description, 5 To open the door The features Control panel The Display, 6-8 Start and programmes, 8-11 TCD751 First time you turn on your dryer you must select your preferred language see page 6 Choosing a programme Special programmes
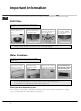
Important Information GB For your Condenser dryer to operate efficiently, you must follow the regular maintenance schedule shown below: Fluff Filter... ! You MUST clean the fluff filter after EVERY drying cycle. STEP 1. Open the door of your dryer. STEP 2. Pull out the filter (using the two finger grips). STEP 3. Clean any fluff deposits from the filter mesh. STEP 4. Refit the filter - NEVER run the dryer without the filter in position.
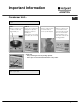
Important Information Condenser Unit... GB ! You MUST clean the fluff from the condenser EVERY month. STEP 1. Open the condenser cover - hold the handle and pull towards you. STEP 2. Remove the condenser by rotating the 3 clips then pulling the condenser towards you. (There may be some water in the tubes, this is normal). ● STEP 3. Flush the condenser, from the rear with water, to remove any fluff deposits. STEP 4.
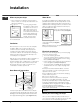
Installation GB Where to put your dryer Water drain Place your dryer at a distance from gas ranges, stoves, heaters, or cook tops because flames can damage the appliance. ● Minimum gap 10mm If you are going to install the appliance under a work counter, be sure to leave a 10mm space between the Minimum gaps top and any other objects 15mm on or above the machine and a 15mm space between the sides and lateral furnishings or walls. This is to ensure proper air circulation.
Dryer Description To open the door The features GB Water container Press and release the front panel in position shown Rating plate Model & Serial numbers Condenser Unit (cover open) Air intake grille Condenser cover Condenser cover handle (Pull to open) Filter Control panel PROGRAMME Selection Buttons ON/OFF Button The ON/OFF button/light : If the dryer is running and this button is pressed, the dryer is turned off. Press again, the dryer restarts.
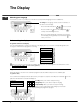
The Display GB Selecting your language The first time you turn on your dryer you should select your preferred language from the available list. To change: the language current selection must flash, on the first line of the display. - Press and hold all 3 buttons: for 5 seconds. - Press the Child Lock or the Timed Dry button scroll up or down through the list. to - When your required language is flashing on the top line of the display, pressing the Dryness Level button will select your choice.
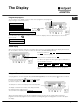
The Display Programme progress GB The second line of the display shows the status of the programme as it progresses: (long messages scroll across the line) PRE CARE DRY COOL TUMBLE END OF CYCLE, POST CARE PHASE (if option available and selected).
The Display GB Warnings The second line of the display also gives warnings and reminders: (reminders occur at the end of the programme) END OF CYCLE, EMPTY THE WATER BOTTLE Reminder that the water container should be emptied every time you use the dryer (see Maintenance). ● EMPTY WATER BOTTLE ● Indicates that the water container is full. The message will take a few seconds to go out after replacing the empty water container; the dryer must be running for this to happen (see The Controls).
Start and Programmes Special Programmes GB Easy Iron Programme ‘Easy Iron’ is a short 10 minute programme (8 minutes of heat followed by a 2 minute cool tumble period) which fluffs the fibres of clothing that have been left in the same position/location for an extended period of time. The cycle relaxes the fibres and makes them easier to iron and fold. ! ‘Easy Iron’ is not a drying programme and should not be used for wet articles of clothing. For best results: 1.
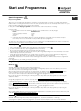
Start and Programmes GB Programmes Table ! If the Display is not lit; Press the ON/OFF button and then select programme. Programme What it does... How to set it... Note: Cottons High Heat 1. Press the Cottons - High Heat button. 2. Choose Timed or Automatic option. - If Timed Drying , see next page, or... - To change from default dryness setting press and release Dryness Levels button until the required level is displayed. 3. Select any Options if required. 4. Press the Start/Pause button .
Start and Programmes Timed programmes table: First select a programme (see Programmes Table). Options available: Timed Drying Always use Timed Drying 1. Press and release the Timed button for loads less than 1kg, or until the display shows the required Alarm , Time Delay , if you prefer a different selection. Each press advances , Pre Care , Post Care . dryness result. (0:20, 0:40, , , , , , then and 1:00, 1:20, 1:40, then repeats. The heat setting depends ● 2:00 or 2:20 Delicates have maximum time of .
Laundry GB Sorting your laundry Wash Care Labels Check symbols on clothing labels to make sure that the articles can be tumble dried. ● Sort laundry by fabric type. ● Empty pockets and check buttons. ● Close zippers and hooks and tie loose belts and strings. ● Wring out each item in order to eliminate as much excess water as possible. ! Do not load dripping wet clothes into the dryer. Look at the labels on your garments, especially when tumble drying for the first time.
Laundry Special clothing items ● Blankets and Bedspreads: acrylic items (Acilan, Courtelle, Orion, Dralon) must be dried with special care on LOW heat setting. Avoid drying for a long period of time. Pleated or creased garments: read the manufacturer’s drying instructions on the garment. Starched articles: do not dry these with non-starched items. Make sure that as much of the starch solution is removed from the load as possible before placing it in the dryer.
Warnings and Suggestions GB ! The appliance has been designed and built according to international safety standards. These warnings are given for safety reasons and must be followed carefully.
Maintenance and Care Switching off the electricity Cleaning the drum ! Unplug your dryer when not using it, when cleaning it and during all maintenance operations. ! Do not use abrasives, steel wool or stainless steel cleaning agents to clean the drum. Clean the filter after each cycle The filter is an important part of your dryer: it accumulates lint and fluff that is formed while drying. When finished drying, clean the filter by rinsing it under running water or with your vacuum cleaner.
Troubleshooting GB One day your dryer seems not to be working. Before you call your Service Centre (see Service), go through the following troubleshooting suggestions: Problem: Possible causes / Solution: The tumble dryer won’t start. ● ● ● ● ● ● ● Drying cycle will not begin. ● Its taking a long time to dry. ● ● ● ● ● ● ● ● Empty water message is displayed but the dryer has only been running for a short period. Empty water message is displayed and the water container is not full.
Service Before calling the Service Centre: ● ● Use the troubleshooting guide to see if you can solve the problem yourself (see Troubleshooting). If not, turn off the dryer and call the Service Centre closest to you. What to tell the Service Centre: name, address and post code. ● telephone number. ● the type of problem. ● the date of purchase. ● the appliance model (Mod.). ● the serial number (S/N). This information can be found on the data label inside the door of the machine.
Notice d’utilisation et installation SÈCHE-LINGE F GB F English, 1 Français, 18 E Español, 35 Table des Matières Informations importantes, 19-20 Installation, 21 P GR Português, 52 EÏÏËÓÈο, 69 Où installer votre sèche-linge Ventilation Connexions électrique Avant de commencer à utiliser votre sèche-linge Description du sèche-linge, 22 Pour ouvrir la porte Caractéristiques Panneau de commandes L’affichage, 23-25 Démarrage et programmes, 26-28 TCD751 La première fois que vous allumez votre sèch
Informations Importantes Pour que votre sèche-linge à condenseur fonctionne efficacement, vous devez suivre le programme d’entretien courant décrit ci-dessous: F Filtre... ! Vous devez IMPERATIVEMENT nettoyer le filtre à peluches A CHAQUE cycle de séchage. ETAPE 1. Ouvrez la porte du sèche-linge. ETAPE 2. Sortez le filtre (à l'aide des deux encoches passe-doigts) ETAPE 3. Enlevez les dépôts de peluches des mailles du filtre. ETAPE 4.
Informations Importantes F Groupe condenseur... ! Vous devez IMPERATIVEMENT enlever les peluches du condenseur TOUS LES MOIS. ETAPE 1. Ouvrez le couvercle du condenseur - tenez la poignée et tirez vers vous. ETAPE 2. Retirez le condenseur en tournant les 3 agrafes et en le tirant vers vous. (Les tubes peuvent contenir un peu d’eau ; ceci est normal). ● ETAPE 4.
Installation Où installer votre sèche-linge Vidange de l’eau Placez votre sèche-linge à une certaine distance des cuisinières, fourneaux, radiateurs, ou plaques de cuisson à gaz, car les flammes peuvent endommager cet appareil.
Description du sèche-linge F Pour ouvrir la porte Caractéristiques Appuyez et relâchez le panneau avant dans la position indiquée Réservoir d’eau Plaque signalétique Numéro du Modèle et Numéro de Série Groupe condenseur (couvercle ouvrir) Grille d’entrée d’air Couvercle de condenseur Poignée de couvercle de condenseur (Tirer ou ouvrir) Filtre Panneau de commandes Boutons de Sélection de PROGRAMME Bouton MARCHE/ARRÊT Le bouton MARCHE/ARRÊT : si le sèche-linge fonctionne et qu’on appuie sur ce bou
Affichage Choix de la langue F À la première mise en route de votre sèche-linge, vous allez devoir choisir la langue préférée dans la liste proposée. Pour changer : la langue actuellement sélectionnée doit clignoter sur la première ligne de l’affichage. - Appuyez sur les trois boutons : et maintenez-les enfoncés pendant 5 secondes. - Appuyez sur Sécurité enfants ou sur le bouton de durée de séchage pour faire défiler la liste vers le haut ou vers le bas.
Affichage F Avancement du programme La deuxième ligne de l’affichage indique l’état du programme au fur et à mesure qu’il avance : (les messages longs défilent sur la ligne.) DEFROISSAGE SECHAGE REFROIDISSEMENT FIN DE CYCLE, DEFROISSAGE (si l’option est disponible et sélectionnée).
Affichage Recommandations La deuxième ligne de l’affichage fournit également des recommandations et des rappels : (les rappels interviennent en fin de programme) F FIN DE CYCLE, BAC PLEIN Rappel : vous devez vider le réservoir d’eau chaque fois que vous utilisez le sèche-linge (voir Entretien). ● BAC PLEIN ● Indique que le réservoir d’eau est plein.
Démarrage et Programmes F Programmes spéciaux Programme de Repassage Facile Le ‘Repassage Facile’ est un programme court de 10 minutes (8 minutes de chauffage suivies d’une période de refroidissement de 2 minutes) qui ‘ébouriffe’ les fibres de vêtements qui ont été laissés dans la même position/le même endroit pendant une durée de temps prolongée. Ce cycle relâche les fibres et les rend plus faciles à repasser et à plier.
Démarrage et Programmes Tableau des Programmes F ! Si l’affichage n’est pas allumé ; appuyez sur le bouton MARCHE/ARRÊT Programme Ce qu’il fait... Comment le régler... Cotons Resistant 1. Appuyez sur le bouton Coton - Resistant Sèche vos vêtements en coton sur Température Élevée et sélectionnez ensuite le programme. Remarque: 2.
Démarrage et Programmes Tableau des programmes minutés F Sélectionnez d’abord un programme (voir le Tableau des Programmes). Séchage Minuté Utilisez toujours le Séchage Temporisé pour les charges inférieures à 1 kg, ou si vous préférez un (0:20, 0:40, résultat de séchage différent. 1:00, 1:20, 1:40, 2:00 ou 2:20 Heures: Minutes) Le réglage de température dépend de l’option de tissus sélectionnée. 1. Appuyez et relâchez le bouton Temporisé jusqu’à ce que l’affichage indique la sélection requise.
Linge Trier votre linge Étiquettes d’Entretien Vérifiez les symboles sur les étiquettes des vêtements pour vous assurer que les articles peuvent être passés au sèche-linge. ● Triez votre linge par type de textile. ● Videz les poches et vérifiez les boutons. ● Fermez les fermetures Éclair et les crochets et attachez les ceintures et les cordons. ● Essorez chaque article de manière à éliminer autant d’eau que possible. ! Ne chargez pas de vêtements mouillés qui dégouttent dans le sèche-linge.
Linge F Vêtements spéciaux • La sécheresse : Si vous avez l’intention de repasser certains de vos vêtements, vous pouvez les sortir de la machine alors qu’ils sont encore un peu humides. Les autres vêtements peuvent y rester plus longtemps si vous voulez qu’ils en sortent entièrement secs. Les Couvertures et Dessus de lits : articles en acrylique (Acilan, Courtelle, Orion, Dralon) doivent être séchés avec des précautions particulières, à BASSE température.
Avertissements et Suggestions ! Cet appareil a été conçu et construit conformément à des normes de sécurité internationales. Ces avertissements sont donnés pour des raisons de sécurité et doivent être suivis attentivement.
Entretien et Nettoyage F Éteignez l’électricité Nettoyage du tambour ! Débranchez votre sèche-linge lorsque vous ne l’utilisez pas, lorsque vous le nettoyez et durant toutes les opérations d’entretien. ! Pour nettoyer le tambour, ne pas utiliser d’abrasifs, de laine d’acier ni de produits de nettoyage pour acier inoxydable. Nettoyez le filtre après chaque cycle Un film coloré peut parfois apparaître à la surface du tambour en acier inoxydable.
Que faire en cas de panne Votre sèche-linge semble ne pas fonctionner. Avant d’appeler votre Centre de Service d’Entretien (voir Service d’Entretien), passez en revue les suggestions de dépannage suivantes : Problème : Le sèche-linge ne démarre pas. Causes possibles / Solution : ● ● ● ● ● ● ● Le cycle de séchage ne démarre pas. L’appareil met longtemps à sécher. ● ● ● ● ● ● ● ● ● Le message ‘vider l’eau’ est affiché mais le séchoir n’a fonctionné que pendant une courte période.
Service Après-Vente F Avant d’appeler le Centre de Service Après-Vente : Utilisez le guide de dépannage pour voir si vous pouvez résoudre le problème vous-même (voir Que faire en cas de panne). Si non, éteignez le sèche-linge et appelez le Centre de Service Après-Vente le plus proche. ● ● Quelles informations donner au Centre de Service Après-Vente : ● Vos nom, adresse et code postal. ● Votre numéro de téléphone. ● Le type de problème. ● La date d’achat. ● Le modèle de l’appareil (Mod.).
Folleto de instrucciones SECADORA GB F English, 1 Français, 18 E Español, 35 Índice de materias E Información importante, 36-37 Instalación, 38 P GR Português, 52 EÏÏËÓÈο, 69 Dónde instalar la secadora Ventilación Conexiones eléctrica Antes de empezar a utilizar la secadora Descripción de la secadora, 39 Para abrir la puerta Características El panel de control La pantalla, 40-42 Comienzo y programas, 43-45 TCD751 Seleccionar un programa Programas especiales Modificadores de las opciones del
Información Importante E Para que la secadora por condensación funcione de forma eficaz, debe seguirse el plan de mantenimiento regular siguiente: Filtro ! DEBE limpiar el filtro de pelusas después de CADA ciclo de secado. PASO 1. Abra la puerta de la secadora. PASO 2. Tire del filtro para sacarlo (usando las sujeciones para los dedos). PASO 3. Limpie toda acumulación de pelusas de la rejilla del filtro. PASO 4. Vuelva a colocar el filtro.
Información Importante Unidad del condensador... E ! DEBE limpiar la acumulación de pelusas del condensador CADA MES. PASO 1. Abra la cubierta del condensador - Tire del mango hacia usted. PASO 2. Saque el condensador girando los tres pestillos y tirando del condensador. (Es probable que haya algo de agua en las tuberías; esto es normal). ● PASO 3. Limpie el condensador con agua desde la parte trasera para eliminar las pelusas acumuladas. PASO 4. Vuelva a colocar la unidad del condensador.
Instalación E Dónde instalar la secadora Evacuación del agua Instale la secadora lejos de estufas, calentadores o cocinas, ya que las llamas pueden dañar el electrodoméstico. ● Si va a instalar el espacio mínima 10 mm electrodoméstico debajo de una encimera, asegúrese de dejar un espacio de 10 mm entre la parte superior y espacio mínima 15 mm cualquier otro objeto que vaya encima o sobre la máquina y un espacio de 15 mm entre los costados y el mobiliario lateral o paredes.
Descripción de la secadora Para abrir la puerta Características E Recipiente de agua Pulse y suelte el panel delantero en la posición indicada Matrícula Modelo y número de serie Unidad del condensador (cubierta abra) Cubierta del condensador Mango de la cubierta del condensador (Tirar para abrir) Respiradero de entrada de aire Filtro Panel de control Botones de SELECCIÓN de PROGRAMAS Pantalla de visualización Botón de ENCENDIDO/APAGADO El botón de ENCENDIDO/APAGADO : Si la secadora está funcionan
La pantalla E Selección de idioma Cuando encienda por primera vez la secadora, elija el idioma que prefiere en la lista disponible. Para cambiar el idioma: la selección del idioma actual debe estar parpadeando en la primera línea de la pantalla. - Pulse y mantenga pulsados los 3 botones: durante 5 segundos. - Pulse el botón Bloqueo o Secado temporizado para desplazarse arriba o abajo por la lista.
La pantalla Progreso del programa E La segunda línea de la pantalla muestra el estado del programa: (los mensajes más largos se desplazan por la línea de texto) ANTIARRUGAS SECADO ENFRIAMIENTO FIN DEL CICLO, TRATAMIENTO ANTIARRUGAS (si la opción está disponible y seleccionada).
La pantalla E Advertencias La segunda línea de la pantalla también sirve para mostrar advertencias y recordatorios: (Los recordatorios se muestran al final del programa). FIN DEL CICLO, VACIAR EL RECIPIENTE DEL AGUA ● Recordatorio de que hay que vaciar el contenedor de agua cada vez que se use la secadora (véase Mantenimiento). RECIPIENTE DE AGUA VACÍO ● Indica que el contenedor de agua está lleno. El mensaje tardará algunos segundos en desaparecer, después de que se haya vaciado el contenedor de agua.
Comienzo y Programas Programas especiales E Programa de planchado fácil “Planchado fácil” es un programa corto de 10 minutos (8 minutos de calor seguido de 2 minutos de secado en frío) que ahueca las fibras de la ropa que se ha dejado en la misma posición/lugar durante un largo periodo de tiempo. El ciclo relaja las fibras y facilita el planchado y el doblado de la ropa. ¡ “Planchado fácil” no es un programa de secado y no debe utilizarse para prendas mojadas. Para obtener los mejores resultados: 1.
Comienzo y Programas E La tabla Programas ! Si la pantalla no está encendida; pulse el botón de ENCENDIDO/APAGADO programa. Programa Algodón Resistente Qué hace... Seca las prendas de algodón con mucho calor. y, a continuación, seleccione el Qué programa... Nota: 1. Pulse el botón Algodón - Resistente 2.
Comienzo y Programas Tabla de programas temporizados: Seleccione primero un programa (véase La tabla Programas). Utilice siempre la opción de Secado temporizado para cargas de menos de 1 kg, o bien si prefiere un resultado de secado diferente. 1.Pulse y suelte el botón Temporizado hasta que en la pantalla aparezca la opción de su preferencia. Cada vez que pulse avanza , , , , , , y a continuación, vuelve a repetirse. (0:20, 0:40, ● La opción Delicadas tiene una duración 1:00, 1:20, 1:40, máxima de .
La colada E Etiquetas de recomendaciones durante el lavado de la ropa Clasificar la colada • Compruebe los símbolos en las etiquetas de la ropa a fin de asegurar que los artículos pueden secarse con calor. • Clasificar la colada por tipo de tejido. • Vaciar los bolsillos y comprobar los botones. • Cerrar las cremalleras y los corchetes y atar los cinturones y cordones sueltos. • Escurra las prendas a fin de eliminar la mayor cantidad agua como sea posible. ¡ No meter ropas muy mojadas en la secadora.
La colada Prendas especiales • Mantas y sobrecamas: Los artículos acrílicos (Acilan, Courtelle, Orion, Dralón) deben secarse teniendo especial cuidado y en ajuste POCO calor. Evite secarlos durante mucho tiempo. Sequedad: Si va a planchar algunas de las prendas, puede sacarlas mientras están un poco húmedas. Otras pueden dejarse más tiempo si necesita que se sequen completamente. • Ajuste de calor.
Advertencias y recomendaciones E ¡ El electrodoméstico ha sido diseñado y fabricado según las normas internacionales de seguridad. Por razones de seguridad le comunicamos las siguientes advertencias. Por favor, léalas con atención. Seguridad general ● ● ● ● ● ● ● ● ● ● ● ● ● ● ● ● ● ● ● ● 48 Esta secadora ha sido diseñada para uso doméstico y no profesional. No tocar el electrodoméstico con los pies descalzos o con las manos o pies mojados.
Mantenimiento y cuidados Desconectar la electricidad Limpieza del tambor ¡ Desenchufe la secadora mientras no la esté utilizando, cuando la limpie y durante los trabajos de mantenimiento. ¡ No utilice productos de limpieza abrasivos, lana de acero o acero inoxidable para limpiar el tambor. Limpiar el filtro después de cada ciclo El filtro es una pieza importante de la secadora: acumula las pelusas y los hilos que se forman mientras se seca la ropa.
Resolución de problemas E Si un día la secadora deja de funcionar. Antes de llamar al Centro de Servicio Técnico (véase Servicio), realice las siguientes comprobaciones: Problema: La secadora no se pone en marcha. Posibles causas / Solución: ● ● ● ● ● ● ● No comienza el ciclo de secado. ● Tarda mucho tiempo en secar. ● ● ● ● ● ● ● ● Se muestra el mensaje ‘Vaciar depósito de agua’ pero la secadora sólo ha estado funcionando durante un breve periodo de tiempo.
Servicio Antes de llamar al centro de servicio técnico: ● ● Utilice la guía de resolución de problemas para ver si puede resolver el problema usted mismo (véase Resolución de problemas). Si no es así, desconecte la secadora y llame al Centro de servicio técnico más cercano. Piezas de repuesto E Esta secadora es una máquina compleja. Si intenta repararla usted mismo o una persona no autorizada puede ocasionar daños a la secadora, además de invalidar la garantía de piezas de repuesto.
Folheto de instruções MÁQUINA DE SECAR ROUPA P GB F English, 1 Français, 18 E Español, 35 Índice Informações importantes, 53-54 Instalação, 55 P GR Português, 52 EÏÏËÓÈο, 69 Onde colocar a sua máquina de secar roupa Ventilação Ligação eléctrica Antes de iniciar a utilização da sua máquina de secar roupa Descrição da máquina, 56 Para abrir a porta Características Painel de controlo O visor, 57-59 Arranque e programas, 60-62 TCD751 Quando utilizar o secador pela primeira vez deverá seleccionar
Informações Importantes Para que a sua secadora de condensador funcione de forma eficaz, deve seguir o plano de manutenção regular apresentado em baixo: P Filtro... ! TEM limpar o filtro de cotão a CADA ciclo de secagem. PASSO 1. Abra a porta da secadora. PASSO 2. Puxe o filtro para fora (utilizando as reentrâncias para os dedos). PASSO 3. Limpe os depósitos de cotão da quadrícula do filtro. PASSO 4. Instale novamente o filtro – NUNCA utilize a secadora sem o filtro instalado.
Informações Importantes P Unidade do condensador... ! É NECESSÁRIO limpar o cotão TODOS os meses. PASSO 1. Abra a tampa do condensador - segure na pega e puxe na sua direcção. PASSO 2. Retire o condensador, rodando os 3 grampos e puxando o condensador na sua direcção. (Pode existir alguma água nos tubos, o que é normal). ● PASSO 4.
Instalação Onde colocar a sua máquina Instale a sua máquina a alguma distância de ligações de gás, fogões, aquecedores e placas de cozinha, uma vez que as chamas podem danificar o aparelho. ● mínima espaço 10 mm Se pretende instalar o aparelho por baixo de uma bancada ou de um balcão, não se esqueça de deixar um espaço de 10 mm entre a mínima espaço 15 mm bancada e quaisquer objectos ou acima do tampo da máquina e um espaço de 15 mm entre as partes laterais da máquina e mobiliário ou paredes.
Descrição da máquina de secar P Para abrir a porta Características Recipiente de água Pressione e liberte o painel frontal na posição apresentada Chapa de classificação Números de modelo e de série Unidade do condensador (tampa abra) Entrada de ar Tampa do condensador Pega da tampa do condensador (Puxar para abrir) Filtro Painel de controlo Botões de Selecção de PROGRAMA Botão LIGAR/DESLIGAR O botão LIGAR/DESLIGAR : Se a secador estiver a funcionar e se premir este botão, a secador pára.
O Visor Seleccionar o idioma P Da primeira vez que liga a sea secadora, deverá seleccionar o seu idioma favorito a partir da lista de idiomas disponíveis. Para mudar: a selecção do idioma actual deve estar intermitente na primeira linha do visor. - Prima e mantenha sob pressão os três botões: durante 5 segundos.
O Visor P Progresso do programa A segunda linha do visor mostra o estado do programa e o seu progresso: (mensagens longas ao longo da linha) ANTI-RIUGAS SECAGEM ARREFECIMENTO FIM DO CICLO, TRATAMENTO ANTI-RIUGAS (se a opção estiver disponível e seleccionada).
O Visor Avisos P A segunda linha do visor também mostra avisos e lembretes: (os lembretes ocorrem no fim de um programa) FIM DO CICLO, VAZAR O RECIPIENTE DA ÁGUA Lembrete de que o recipiente de água deve ser esvaziado sempre que se utilize a máquina de secar (ver Manutenção). ● VAZAR O RECIPIENTE DA ÁGUA ● Indica que o recipiente de água está cheio.
Arranque e Programas P Programas especiais Programa Engoma fácil O ‘Engoma fácil’ é um programa breve de 10 minutos (8 minutos de calor, seguidos de 2 minutos de um período de rotação a frio), que ventila as fibras das roupas que foram deixadas na mesma posição/Local durante um período de tempo prolongado. O ciclo relaxa as fibras e facilita a passagem a ferro. ! O ‘Engoma fácil’ não é um programa de secagem e não deve ser utilizado com peças de roupa molhadas. Para obter os melhores resultados: 1.
Arranque e Programas Tabela Programas P ! Se o Visor não estiver aceso; Prima o botão LIGAR/DESLIGADO Programa O que faz... Algodão Seca a roupa de Algodão em Calor Alto Resistente e, em seguida, seleccione o programa. Como defini-lo... Nota: 1. Prima o botão Algodão – Resistente 2. Seleccione a opção Temporizado ou Automático . - Se optar por Secagem Temporizada , consulte a página seguinte, ou...
Arranque e Programas Tabela de programas temporizados: P Secagem temporizada (0:20, 0:40, Primeiro, seleccione um programa (consulte a Tabela de Programas). 1. Prima e solte o botão Temporizado até o Utilize sempre a Timed visor apresentar a selecção requerida. Drying (Secagem Cada vez que premir avança , Temporizada) para cargas com peso inferior a 1kg , , , , em seguida e ou, se preferir, um resultado em seguida repete. de secagem diferente.
Roupa Escolher a sua roupa Etiquetas de cuidado na lavagem • Consulte os símbolos nas etiquetas das roupas, de modo a certificar-se de que os artigos podem ser utilizados na secadora. • Escolha a roupa por tipo de tecido. • Esvazie os bolsos e verifique os botões. • Feche os fechos de correr e desaperte cintos e correias. • Torça cada peça de modo a eliminar o máximo de água possível. Observe as etiquetas nas suas peças de roupa, especialmente se está a utilizar a secadora pela primeira vez.
Roupa P Peças delicadas • Secagem: Se pretender engomar algumas das suas roupas, podem ser retiradas da máquina ainda um pouco húmidas. As restantes poderão ficar mais tempo, se precisar delas completamente secas. Cobertores e cobertas de cama: artigos em acrílico (Acilan, Courtelle, Orion, Dralon) devem ser secos com especial cuidado com um TEMPERATURA BAIXA. Evite secar por um longo período de tempo. • Definição de temperatura.
Avisos e Sugestões ! O equipamento foi concebido e construído de acordo com normas de segurança internacionais. Estes avisos são apresentados por razões de segurança e devem ser seguidos minuciosamente.
Manutenção e Cuidado P Desligar a electricidade Limpar o tambor ! Desligue a secadora quando não estiver em utilização, durante tarefas de limpeza e durante todas as operações de manutenção. ! Não utilize agentes de limpeza de aço inoxidável ou palha de aço, abrasivos, para limpar o tambor. Limpar o filtro depois de cada ciclo O filtro é uma parte importante da sua secadora: acumula restos de fibras e resíduos que se formam durante a secagem. Pequenos objectos também podem ficar presos no filtro.
Resolução de problemas Um dia a sua máquina parece não querer funcionar. Antes de contactar o seu Centro de Serviços (ver Reparação), analise as seguintes sugestões de resolução de problemas: Problema: Causas possíveis / Solução: A secadora não inicia. ● ● ● ● ● ● ● O ciclo de secagem não inicia. ● Demora muito tempo a secar. ● ● ● ● ● ● ● ● A mensagem de esvaziar a água é apresentada, mas o secador está a funcionar há pouco tempo.
Reparação P Antes de contactar o Centro de Serviços: Utilize o guia de resolução de problemas para ver se consegue resolver o problema (ver Resolução de problemas). Caso contrário, desligue a secadora e contacte o Centro de Serviço mais próximo. ● ● Peças sobressalentes Esta secadora é uma máquina complexa. Repará-la sozinha ou através de um técnico não autorizado pode provocar danos a uma ou mais pessoas, pode danificar a máquina e pode invalidar a garantia das peças sobressalentes.
√‰ËÁ›Â˜ ¯Ú‹Û˘ ™∆∂°¡ø∆∏ƒπ√ GB F English, 1 Français, 18 E Español, 35 ¶ÂÚȯfiÌÂÓ· GR ™ËÌ·ÓÙÈΤ˜ ÏËÚÔÊÔڛ˜, 70-71 ∂ÁηٿÛÙ·ÛË, 72 P GR Português, 52 EÏÏËÓÈο, 69 ¶Ô˘ Ó· ÙÔÔıÂÙ‹ÛÂÙ ÙÔ ÛÙÂÁÓˆÙ‹ÚÈfi Û·˜ ∂Í·ÂÚÈÛÌfi˜ ∏ÏÂÎÙÚÈ΋ Û‡Ó‰ÂÛË ¶ÚÈÓ ·Ú¯›ÛÂÙ ӷ ¯ÚËÛÈÌÔÔț٠ÙÔ ÛÙÂÁÓˆÙ‹ÚÈfi Û·˜ ¶ÂÚÈÁÚ·Ê‹ ™ÙÂÁÓˆÙËÚ›Ô˘, 73 °È· Ó· ·ÓÔ›ÍÂÙ ÙËÓ fiÚÙ· ÷ڷÎÙËÚÈÛÙÈο √ ›Ó·Î·˜ ¯ÂÈÚÈÛÌÔ‡ ∏ √ıfiÓË, 74-76 ∂ÎΛÓËÛË Î·È ÚÔÁÚ¿ÌÌ·Ù·, 77-79 TCD751 ∆ËÓ ÚÒÙË ÊÔÚ¿ Ô˘ ı· ÂÓÂÚÁÔÔÈ‹ÛÂÙ ÙÔ ÛÙÂÁÓˆÙ‹ÚÈfi Û·˜ Ú¤ÂÈ Ó· ÂÈϤÍÂ
™ËÌ·ÓÙÈΤ˜ ÏËÚÔÊÔڛ˜ GR °È· ÙËÓ ·ÔÙÂÏÂÛÌ·ÙÈ΋ ÏÂÈÙÔ˘ÚÁ›· ÙÔ˘ ÛÙÂÁÓˆÙËÚ›Ô˘ Ì ۇÛÙËÌ· Û˘Ì‡ÎÓˆÛ˘ ˘‰Ú·ÙÌÒÓ (Condenser dryer) Ô˘ ‰È·ı¤ÙÂÙÂ, Ú¤ÂÈ Ó· ·ÎÔÏÔ˘ı›Ù ÙÔ ·Ú·Î¿Ùˆ ¯ÚÔÓԉȿÁÚ·ÌÌ· Ù·ÎÙÈ΋˜ Û˘ÓÙ‹ÚËÛ˘: º›ÏÙÚÔ... ! ¶ƒ∂¶∂π Ó· ηı·Ú›˙ÂÙ ÙÔ Ê›ÏÙÚÔ ¯ÓÔ˘‰ÈÔ‡ ÌÂÙ¿ ·fi ∫∞£∂ ·ÎÏÔ ÛÙÂÁÓÒÌ·ÙÔ˜. µ∏ª∞ 1 ∞ÓÔ›ÍÙ ÙËÓ fiÚÙ· ÙÔ˘ ÛÙÂÁÓˆÙËÚ›Ô˘ Û·˜. µ∏ª∞ 2 ∆Ú·‚‹ÍÙÂ Î·È ·Ê·ÈÚ¤ÛÙ ÙÔ Ê›ÏÙÚÔ (·fi ÙȘ ‰‡Ô ˘Ô‰Ô¯¤˜). µ∏ª∞ 3 ∫·ı·Ú›ÛÙ ÙȘ ÂÓ·Ôı¤ÛÂȘ ¯ÓÔ˘‰ÈÔ‡ ·fi ÙÔ Ï¤ÁÌ· ÙÔ˘ Ê›ÏÙÚÔ˘.
™ËÌ·ÓÙÈΤ˜ ÏËÚÔÊÔڛ˜ ªÔÓ¿‰· Û˘Ì˘ÎÓˆÙ‹... GR ! ¶ƒ∂¶∂π Ó· ·ÔÌ·ÎÚ‡ÓÂÙ ÙÔ ¯ÓÔ‡‰È ·fi ÙÔÓ Û˘Ì˘ÎÓˆÙ‹ ∫∞£∂ Ì‹Ó·. µ∏ª∞ 1 ∞ÓÔ›ÍÙ ÙÔ Î¿Ï˘ÌÌ· ÙÔ˘ Û˘Ì˘ÎÓˆÙ‹ - ÎÚ·Ù‹ÛÙ ÙË Ï·‚‹ Î·È ÙÚ·‚‹ÍÙ ÚÔ˜ ÙÔ Ì¤ÚÔ˜ Û·˜. µ∏ª∞ 2 ∞Ê·ÈÚ¤ÛÙ ÙÔÓ Û˘Ì˘ÎÓˆÙ‹ ÂÚÈÛÙÚ¤ÊÔÓÙ·˜ Ù· 3 ÎÏÈ Î·È ÙÚ·‚ÒÓÙ·˜ ÙÔÓ ÚÔ˜ ÙÔ Ì¤ÚÔ˜ Û·˜. (ÿÛˆ˜ ˘¿Ú¯ÂÈ Ï›ÁÔ ÓÂÚfi ÛÙÔ˘˜ ۈϋÓ˜, Ê·ÈÓfiÌÂÓÔ Ô˘ Â›Ó·È Ê˘ÛÈÔÏÔÁÈÎfi).
∂ÁηٿÛÙ·ÛË GR ¶Ô‡ Ó· ÙÔÔıÂÙ‹ÛÂÙ ÙÔ ÛÙÂÁÓˆÙ‹ÚÈfi Û·˜ ∆ÔÔıÂÙ‹ÛÙ ÙÔ ÛÙÂÁÓˆÙ‹ÚÈfi Û·˜ Û ·fiÛÙ·ÛË ·fi ۈϋÓ˜ Áη˙ÈÔ‡, ÊÔ‡ÚÓÔ˘˜, ıÂÚÌ·ÓÙÈο ÛÒÌ·Ù· ‹ Ì·ÁÂÈÚÈΤ˜ ÂÛٛ˜, ÁÈ·Ù› ÔÈ ÊÏfiÁ˜ ÌÔÚ› Ó· ÚÔηϤÛÔ˘Ó ‚Ï¿‚˜ ÛÙË Û˘Û΢‹.
¶ÂÚÈÁÚ·Ê‹ ™ÙÂÁÓˆÙËÚ›Ô˘ °È· Ó· ·ÓÔ›ÍÂÙ ÙËÓ fiÚÙ· ÷ڷÎÙËÚÈÛÙÈο ¶ÂÚȤÎÙ˘ ÓÂÚÔ‡ ¶È¤ÛÙÂ Î·È ·Ê‹ÛÙ ÙÔ ÌÚÔÛÙÈÓfi Ï·›ÛÈÔ ÛÙÔ ÛËÌÂ›Ô Ô˘ ˘Ô‰ÂÈÎÓ‡ÂÙ·È.
∏ √ıfiÓË GR ∂ÈÏÔÁ‹ ÁÏÒÛÛ·˜ ∆ËÓ ÚÒÙË ÊÔÚ¿ Ô˘ ı· ÂÓÂÚÁÔÔÈ‹ÛÂÙ ÙÔ ÛÙÂÁÓˆÙ‹ÚÈfi Û·˜ Ú¤ÂÈ Ó· ÂÈϤÍÂÙ ÙËÓ ÂÈı˘ÌËÙ‹ ÁÏÒÛÛ· ·fi ÙË ‰È·ı¤ÛÈÌË Ï›ÛÙ·. °È· ·ÏÏ·Á‹: Ë ÙÚ¤¯Ô˘Û· ÂÈÏÔÁ‹ ÁÏÒÛÛ·˜ Ú¤ÂÈ Ó· ·Ó·‚ÔÛ‚‹ÓÂÈ ÛÙËÓ ÚÒÙË ÁÚ·ÌÌ‹ Ù˘ ÔıfiÓ˘. - ¶·Ù‹ÛÙÂ Î·È ÎÚ·Ù‹ÛÙ ·ÙË̤ӷ Î·È Ù· 3 ÎÔ˘ÌÈ¿: ÁÈ· 5 ‰Â˘ÙÂÚfiÏÂÙ·. - ¶·Ù‹ÛÙ ÙÔ ÎÔ˘Ì› ¶·È‰È΋˜ ·ÛÊ¿ÏÂÈ·˜ ‹ ÙÔ ÎÔ˘Ì› ™ÙÂÁÓÒÌ·ÙÔ˜ Û˘ÁÎÂÎÚÈ̤Ó˘ ¯ÚÔÓÈ΋˜ ‰È¿ÚÎÂÈ·˜ ÁÈ· Ó· ·Ó‚›Ù ‹ Ó· ηÙ‚›Ù ÛÙË Ï›ÛÙ·.
∏ √ıfiÓË ¶ÚfiÔ‰Ô˜ ÙÔ˘ ÚÔÁÚ¿ÌÌ·ÙÔ˜ GR ∏ ‰Â‡ÙÂÚË ÁÚ·ÌÌ‹ Ù˘ ÔıfiÓ˘ ÂÌÊ·Ó›˙ÂÈ ÙËÓ Î·Ù¿ÛÙ·ÛË ÙÔ˘ ÚÔÁÚ¿ÌÌ·ÙÔ˜ ÂÓÒ ·˘Ùfi ÚÔ¯ˆÚ›: (ηٿ Ì‹ÎÔ˜ Ù˘ ÁÚ·ÌÌ‹˜ ÂÌÊ·Ó›˙ÔÓÙ·È Ì·ÎÚ¿ ΢ÏÈfiÌÂÓ· ÌËӇ̷ٷ) ¶ƒ√™T∞™π∞ T™∞§∞Køª∞T√™ ™T∂°Nøª∞ KƒÀ√ ™T∂°Nøª∞ T∂§√™ KÀK§√À, ¶ƒ√™T∞™π∞ (·Ó Ë ÏÂÈÙÔ˘ÚÁ›· Â›Ó·È ‰È·ı¤ÛÈÌË Î·È ÂÈÏÂÁ̤ÓË).
∏ √ıfiÓË ¶ÚÔÂȉÔÔÈ‹ÛÂȘ GR ™ÙË ‰Â‡ÙÂÚË ÁÚ·ÌÌ‹ Ù˘ ÔıfiÓ˘ ÂÌÊ·Ó›˙ÔÓÙ·È Â›Û˘ ÚÔÂȉÔÔÈ‹ÛÂȘ Î·È ˘ÂÓı˘Ì›ÛÂȘ: (ÔÈ ˘ÂÓı˘Ì›ÛÂȘ ÂÌÊ·Ó›˙ÔÓÙ·È ÛÙÔ Ù¤ÏÔ˜ ÙÔ˘ ÚÔÁÚ¿ÌÌ·ÙÔ˜) T∂§√™ KÀK§√À, ∞¢∂π∞™T∂ T√ ¢√Ã∂π√ N∂ƒ√À ● ÀÂÓı‡ÌÈÛË fiÙÈ Ô ÂÚȤÎÙ˘ ÓÂÚÔ‡ Ú¤ÂÈ Ó· ÂÎÎÂÓÒÓÂÙ·È Î¿ı ÊÔÚ¿ Ô˘ ¯ÚËÛÈÌÔÔț٠ÙÔ ÛÙÂÁÓˆÙ‹ÚÈÔ (‚Ï. ™˘ÓÙ‹ÚËÛË). ∞¢∂π∞™T∂ T√ ¢√Ã∂π√ N∂ƒ√À ● ∞ÔÙÂÏ› ¤Ó‰ÂÈÍË fiÙÈ Ô ÂÚȤÎÙ˘ ÓÂÚÔ‡ Â›Ó·È ÁÂÌ¿ÙÔ˜.
∂ÎΛÓËÛË Î·È ÚÔÁÚ¿ÌÌ·Ù· ∂ȉÈο ÚÔÁÚ¿ÌÌ·Ù· GR ¶ÚfiÁÚ·ÌÌ· ∂‡ÎÔÏÔ˘ ™È‰ÂÚÒÌ·ÙÔ˜ ∆Ô ‘∂‡ÎÔÏÔ ™È‰¤ÚˆÌ·’ Â›Ó·È ¤Ó· Û‡ÓÙÔÌÔ 10ÏÂÙÔ ÚfiÁÚ·ÌÌ· (8 ÏÂÙ¿ ıÂÚÌÔ‡ Î·È 2 ÏÂÙ¿ ÎÚ‡Ô˘ ·¤Ú·) Ô˘ Ì·Ï·ÎÒÓÂÈ ÙȘ ›Ó˜ ÚÔ‡¯ˆÓ Ô˘ ¤¯Ô˘Ó Ì›ÓÂÈ ÁÈ· ÌÂÁ¿ÏÔ ‰È¿ÛÙËÌ· ÛÙËÓ ›‰È· ı¤ÛË ‹ ÛÙÔ ›‰ÈÔ ÛËÌ›Ô. ∏ ΢ÎÏÈ΋ ÂÚÈÊÔÚ¿ ¯·Ï·ÚÒÓÂÈ ÙȘ ›Ó˜ Î·È ÙȘ οÓÂÈ ÈÔ Â‡ÎÔϘ ÛÙÔ Ûȉ¤ÚˆÌ· Î·È ÙÔ ‰›ÏˆÌ·. ! ∆Ô ‘∂‡ÎÔÏÔ ™È‰¤ÚˆÌ·’ ‰ÂÓ Â›Ó·È ÚfiÁÚ·ÌÌ· ÛÙÂÁÓÒÌ·ÙÔ˜ Î·È ‰ÂÓ Ú¤ÂÈ Ó· ¯ÚËÛÈÌÔÔÈÂ›Ù·È ÁÈ· ‚ÚÂÁ̤ӷ ÚÔ‡¯·. °È· ηχÙÂÚ· ·ÔÙÂϤÛÌ·Ù·: 1.
∂ÎΛÓËÛË Î·È ÚÔÁÚ¿ÌÌ·Ù· ¶›Ó·Î·˜ ÚÔÁÚ·ÌÌ¿ÙˆÓ GR ! ∞Ó Ë √ıfiÓË ‰ÂÓ Â›Ó·È ·Ó·Ì̤ÓË; ·Ù‹ÛÙ ÙÔ ÎÔ˘Ì› ∂¡∂ƒ°√¶√π∏™∏™/∞¶∂¡∂ƒ°√¶√π∏™∏™ Î·È ÛÙË Û˘Ó¤¯ÂÈ· ÂÈϤÍÙ ¤Ó· ÚfiÁÚ·ÌÌ·. ¶ÚfiÁÚ·ÌÌ· ∆È Î¿ÓÂÈ... µ·Ì‚·ÎÂÚ¿ ™ÙÂÁÓÒÓÂÈ Ù· À„ËÏ‹ £ÂÚÌÔÎÚ·Û›· ¶Ò˜ Ó· ÙÔ Ú˘ıÌ›ÛÂÙÂ… 1. ¶·Ù‹ÛÙ ÙÔ ÎÔ˘Ì› µ·Ì‚·ÎÂÚ¿ – À„ËÏ‹ £ÂÚÌÔÎÚ·Û›·. µ·Ì‚·ÎÂÚ¿ Û·˜ Û 2. ∂ÈϤÍÙ ÙË ÏÂÈÙÔ˘ÚÁ›· ¶ÚÔÁÚ¿ÌÌ·ÙÔ˜ Û˘ÁÎÂÎÚÈ̤Ó˘ ¯ÚÔÓÈ΋˜ ‰È¿ÚÎÂÈ·˜ ‹ ∞˘ÙfiÌ·ÙÔ˘ ÚÔÁÚ¿ÌÌ·ÙÔ˜ À„ËÏ‹ £ÂÚÌÔÎÚ·Û›·. - ∞Ó ÂÈϤÍÂÙ ÙÔ ™Ù¤Áӈ̷ Û˘ÁÎÂÎÚÈ̤Ó˘ ¯ÚÔÓÈ΋˜ ‰È¿ÚÎÂÈ·˜ , ‚Ï.
∂ÎΛÓËÛË Î·È ÚÔÁÚ¿ÌÌ·Ù· ¶›Ó·Î·˜ ÚÔÁÚ·ÌÌ¿ÙˆÓ ÌÂ Û˘ÁÎÂÎÚÈ̤ÓË ¯ÚÔÓÈ΋ ‰È¿ÚÎÂÈ·: ¶ÚÒÙ· ÂÈϤÍÙ ¤Ó· ÚfiÁÚ·ÌÌ· (‚Ï. ¶›Ó·Î· ÚÔÁÚ·ÌÌ¿ÙˆÓ). ™Ù¤Áӈ̷ Ì ÃÚËÛÈÌÔÔț٠¿ÓÙ· ÙÔ 1. ¶·Ù‹ÛÙÂ Î·È ·Ê‹ÛÙ ÙÔ ÎÔ˘Ì› ¶ÚÔÁÚ¿ÌÌ·ÙÔ˜ Û˘ÁÎÂÎÚÈ̤Ó˘ ¯ÚÔÓÈ΋˜ ‰È¿ÚÎÂÈ·˜ ̤¯ÚÈ Ó· ¯ÚÔÓÔ̤ÙÚËÛË ™Ù¤Áӈ̷ ÂÌÊ·ÓÈÛÙ› Ë ÂÈı˘ÌËÙ‹ ÂÈÏÔÁ‹ ÛÙËÓ ÔıfiÓË. (0:20, 0:40, 1:00, 1:20, 1:40, 2:00 ‹ 2:20 flÚ˜ : ÏÂÙ¿) Û˘ÁÎÂÎÚÈ̤Ó˘ ¯ÚÔÓÈ΋˜ ‰È¿ÚÎÂÈ·˜ ÁÈ· ÊÔÚÙ›· ÌÈÎÚfiÙÂÚ· ·fi 1kg ‹ ·Ó ÚÔÙÈÌ¿Ù ¤Ó· ‰È·ÊÔÚÂÙÈÎfi ·ÔÙ¤ÏÂÛÌ· ÛÙÂÁÓÒÌ·ÙÔ˜.
¶Ï‡ÛÈÌÔ ÚÔ‡¯ˆÓ GR ¢È·¯ˆÚÈÛÌfi˜ ÚÔ‡¯ˆÓ √‰ËÁ›Â˜ ÛÙÂÁÓÒÌ·ÙÔ˜ ÛÙȘ ÂÙÈΤÙ˜ ∂ϤÁÍÙ ٷ ۇ̂ÔÏ· ÛÙȘ ÂÙÈΤÙ˜ ÙˆÓ ÚÔ‡¯ˆÓ ÁÈ· Ó· ‚‚·Èˆı›Ù fiÙÈ ÂÈÙÚ¤ÂÙ·È Ó· ÌÔ˘Ó ÛÙÔ ÛÙÂÁÓˆÙ‹ÚÈÔ. ● •Â¯ˆÚ›ÛÙ ٷ ÚÔ‡¯· ·Ó¿ Ù‡Ô ˘Ê¿ÛÌ·ÙÔ˜. ● ∞‰ÂÈ¿ÛÙ ÙȘ Ùۤ˜ Î·È ÂϤÁÍÙ ٷ ÎÔ˘ÌÈ¿. ● ∫Ï›ÛÙ ÊÂÚÌÔ˘¿Ú Î·È ÎfiÈÙÛ˜ Î·È ‰¤ÛÙÂ Ï˘Ù¤˜ ˙ÒÓ˜ Î·È ÎÔÚ‰fiÓÈ·. ● ™Ù‡„Ù ηϿ οı ÚÔ‡¯Ô ÁÈ· Ó· ·ÔÌ·ÎÚ‡ÓÂÙ fiÛÔ ÂÚÈÛÛfiÙÂÚÔ ÓÂÚfi Á›ÓÂÙ·È. ! ªËÓ ‚¿˙ÂÙ ‚ÚÂÁ̤ӷ ÚÔ‡¯· Ô˘ ·ÎfiÌË ÛÙ¿˙Ô˘Ó Ì¤Û· ÛÙÔ ÛÙÂÁÓˆÙ‹ÚÈÔ.
¶Ï‡ÛÈÌÔ ÚÔ‡¯ˆÓ ƒÔ‡¯· ÂȉÈ΋˜ ÊÚÔÓÙ›‰·˜ ● ∫Ô˘‚¤ÚÙ˜ Î·È Î·Ï‡ÌÌ·Ù·: Ù· ·ÎÚ˘ÏÈο ›‰Ë (Acilan, Courtelle, Orion, Dralon) Ú¤ÂÈ Ó· ÛÙÂÁÓÒÓÔÓÙ·È Ì ÂȉÈ΋ ÊÚÔÓÙ›‰· ‹ Û Ã∞ª∏§∏ ıÂÚÌÔÎÚ·Û›·. ∞ÔʇÁÂÙ ÌÂÁ¿ÏÔ ¯ÚfiÓÔ ÛÙÂÁÓÒÌ·ÙÔ˜ . ● ƒÔ‡¯· Ì ȤÙ˜ ‹ Ù۷ΛÛÂȘ: ‰È·‚¿ÛÙ ÙȘ Ô‰ËÁ›Â˜ ÛÙÂÁÓÒÌ·ÙÔ˜ ÙÔ˘ ηٷÛ΢·ÛÙ‹ ¿ӈ ÛÙ· ÚÔ‡¯·. ● ∫ÔÏÏ·ÚÈṲ̂ӷ ›‰Ë: ÌËÓ Ù· ÛÙÂÁÓÒÓÂÙ ̷˙› Ì ›‰Ë Ô˘ ‰ÂÓ Â›Ó·È ÎÔÏÏ·ÚÈṲ̂ӷ.
¶ÚÔÂȉÔÔÈ‹ÛÂȘ Î·È ˘Ô‰Â›ÍÂȘ GR ! ∏ Û˘Û΢‹ ¤¯ÂÈ Û¯Â‰È·ÛÙ› Î·È Î·Ù·Û΢·ÛÙ› Û‡Ìʈӷ Ì ٷ ‰ÈÂıÓ‹ ÚfiÙ˘· ·ÛÊ·Ï›·˜. √È ÚÔÂȉÔÔÈ‹ÛÂȘ ·˘Ù¤˜ ·Ú¤¯ÔÓÙ·È ÁÈ· ÏfiÁÔ˘˜ ·ÛÊ·Ï›·˜ Î·È Ú¤ÂÈ Ó· ÙËÚÔ‡ÓÙ·È Ì ÚÔÛÔ¯‹.
™˘ÓÙ‹ÚËÛË Î·È ÊÚÔÓÙ›‰· ∞ÔÛ‡Ó‰ÂÛË ·fi ÙÔ ËÏÂÎÙÚÈÎfi ‰›ÎÙ˘Ô ∫·ı·ÚÈÛÌfi˜ ÙÔ˘ ο‰Ô˘ ! ∞ÔÛ˘Ó‰¤ÂÙ ÙÔ ÛÙÂÁÓˆÙ‹ÚÈfi Û·˜ ·fi ÙËÓ Ú›˙· fiÙ·Ó ‰ÂÓ ÙÔ ¯ÚËÛÈÌÔÔÈ›ÙÂ, fiÙ·Ó ÙÔ Î·ı·Ú›˙ÂÙÂ Î·È ÛÙË ‰È¿ÚÎÂÈ· fiÏˆÓ ÙˆÓ ÂÚÁ·ÛÈÒÓ Û˘ÓÙ‹ÚËÛ˘. ∫·ı·Ú›˙ÂÙ ÙÔ Ê›ÏÙÚÔ ÌÂÙ¿ ·fi οı ÛÙ¤Áӈ̷ ∆Ô Ê›ÏÙÚÔ Â›Ó·È ¤Ó· ÛËÌ·ÓÙÈÎfi ̤ÚÔ˜ ÙÔ˘ ÛÙÂÁÓˆÙËÚ›Ô˘ Û·˜: Û˘ÁÎÂÓÙÚÒÓÂÈ ÙÔ ¯ÓÔ‡‰È Ô˘ ‰ËÌÈÔ˘ÚÁÂ›Ù·È ÛÙË ‰È¿ÚÎÂÈ· ÙÔ˘ ÛÙÂÁÓÒÌ·ÙÔ˜.
∞ÓÙÈÌÂÙÒÈÛË ÚÔ‚ÏËÌ¿ÙˆÓ GR ∫¿ÔÈ· ÛÙÈÁÌ‹ ÌÔÚ› Ó· ‰È·ÈÛÙÒÛÂÙ fiÙÈ ÙÔ ÛÙÂÁÓˆÙ‹ÚÈfi Û·˜ ‰ÂÓ ÏÂÈÙÔ˘ÚÁ›. ¶ÚÈÓ Î·Ï¤ÛÂÙ ÙÔ ∫¤ÓÙÚÔ ∆¯ÓÈ΋˜ Â͢ËÚ¤ÙËÛ˘ ˜ (‚Ï.
∆¯ÓÈ΋ ˘ÔÛÙ‹ÚÈÍË ¶ÚÈÓ Î·Ï¤ÛÂÙ ÙÔ ∫¤ÓÙÚÔ Ù¯ÓÈ΋˜ Â͢ËÚ¤ÙËÛ˘ : ● ● ÃÚËÛÈÌÔÔÈ›ÛÙ ÙÔÓ Ô‰ËÁfi ·ÓÙÈÌÂÙÒÈÛ˘ ÚÔ‚ÏËÌ¿ÙˆÓ ÁÈ· Ó· ‰Â›Ù ·Ó ÌÔÚ›Ù ӷ χÛÂÙ ÙÔ Úfi‚ÏËÌ· ÌfiÓÔÈ Û·˜ (µÏ. ∞ÓÙÈÌÂÙÒÈÛË ÚÔ‚ÏËÌ¿ÙˆÓ). ∞Ó ‰ÂÓ ÌÔÚ›Ù , ·ÂÓÂÚÁÔÔÈ‹ÛÙ ÙÔ ÛÙÂÁÓˆÙ‹ÚÈÔ Î·È Î·Ï¤ÛÙ ÙÔ ÏËÛȤÛÙÂÚÔ ∫¤ÓÙÚÔ Ù¯ÓÈ΋˜ ˘ÔÛÙ‹ÚÈ͢. ∞ÓÙ·ÏÏ·ÎÙÈο GR ∆Ô Û˘ÁÎÂÎÚÈ̤ÓÔ ÛÙÂÁÓˆÙ‹ÚÈÔ Â›Ó·È ¤Ó· ÔχÏÔÎÔ Ì˯¿ÓËÌ·.
195062335.02 W 12/2009 - SIMLEX .