Notice d’utilisation et installation SÈCHE-LINGE F Français, 1 GB Table des Matières English, 15 Informations Importantes, 2 F Installation, 3-4 Où installer votre sèche-linge Ventilation Connexions électrique Avant de commencer à utiliser votre sèche-linge Description du sèche-linge, 5 Vue de face Vue de l’arrière Panneau de commandes Démarrage et programmes, 6-7 TVM631X Choisir un programme Tableau des programmes Linge, 8-9 Trier votre linge Étiquettes d’entretien Vêtements spéciaux Temps de s
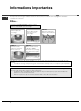
Informations Importantes F Pour que votre sèche-linge à ventilation fonctionne efficacement, vous devez suivre le programme d’entretien courant décrit ci-dessous : Filtre... ! Vous devez IMPERATIVEMENT nettoyer le filtre à peluches A CHAQUE cycle de séchage. ETAPE 1. Ouvrez la porte du sèche-linge. ETAPE 2. Sortez le filtre (à l'aide des deux encoches passe-doigts) ETAPE 4. Remontez le filtre. - Veillez à orienter les flèches vers vous. ETAPE 5. Enforce le filtre à fond.
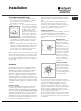
Installation Où installer votre sèche-linge Placez votre sèche-linge à une certaine distance des cuisinières, fourneaux, radiateurs, ou plaques de cuisson à gaz, car les flammes peuvent endommager cet appareil.
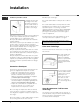
Installation F Ventilation par fenêtre ouverte L’extrémité du tuyau doit être dirigée vers le bas, de manière à éviter que de l’air chaud humide se condense dans la pièce ou dans le sèche-linge. ! N’utilisez pas de rallonges. ! Le cordon d’alimentation ne doit pas être courbé ou écrasé. ! Le cordon d’alimentation électrique doit être vérifié périodiquement et remplacé par un cordon préparé spécialement pour ce sèche-linge, et installé uniquement par des électriciens agréés (voir Service Après-vente).
Description du sèche-linge Vue de face Vue de l’arrière Plaque signalétique Tambour Panneau de commande F Orifice d’entrée d’air Numéro du Modèle et Numéro de Série Tuyau de ventilation fixé ici Filtre Attention: Chaud! Panneau de commandes bouton de MINUTERIE Guide de Séchage bouton d’ALARME Indicateur bouton TEMPÉRATURE bouton des PROGRAMMES voyant lumineux ACTIVITÉ bouton DÉPART Le bouton DÉPART commence le séchage selon un programme sélectionné (voir Démarrage et Programmes).
Démarrage et Programmes F Choisir un programme 1. Branchez la fiche du sèche-linge dans la prise électrique. 2. Triez votre linge en fonction du type de textiles (voir Linge). 3. Ouvrez la porte et en assurant-vous que le filtre soit propre et en place (voir Entretien). 4. Chargez la machine et assurez-vous que des articles ne bloquent pas le joint de la porte. Fermez la porte. 5.
Démarrage et Programmes Programmes Programme Ce qu’il fait... Comment le régler... Remarque: Séchage Automatique (charges moyennes) Sèche entièrement : vos vêtements sont prêts à être portés. Pour les charges moyennes (entre 1 et 3 kg) de coton , polyester-coton ou synthétiques . 1. Sélectionnez TEMPÉRATURE ÉLEVÉE (Intensif) en appuyant sur le bouton d’indication de la TEMPÉRATURE. 2. Positionnez le bouton des PROGRAMMES sur . 3. Appuyez sur le bouton de DÉPART .
Linge F Trier votre linge Étiquettes d’Entretien Vérifiez les symboles sur les étiquettes des vêtements pour vous assurer que les articles peuvent être passés au sèche-linge. ● Triez votre linge par type de textile. ● Videz les poches et vérifiez les boutons. ● Fermez les fermetures Éclair et les crochets et attachez les ceintures et les cordons. ● Essorez chaque article de manière à éliminer autant d’eau que possible. ! Ne chargez pas de vêtements mouillés qui dégouttent dans le sèche-linge.
Linge Vêtements spéciaux Ces temps sont approximatifs et peuvent varier en fonction des paramètres suivants : Les Couvertures et Dessus de lits : articles en acrylique (Acilan, Courtelle, Orion, Dralon) doivent être séchés avec des précautions particulières, à BASSE température. Évitez de les sécher pendant une durée prolongée. Vêtements plissés ou froissés : lisez les instructions de séchage du fabricant figurant sur le vêtement.
Avertissements et Suggestions F ! Cet appareil a été conçu et construit conformément à des normes de sécurité internationales. Ces avertissements sont donnés pour des raisons de sécurité et doivent être suivis attentivement.
Entretien et Nettoyage Éteignez l’électricité Nettoyage du tambour Débranchez votre sèche-linge lorsque vous ne l’utilisez pas, lorsque vous le nettoyez et durant toutes les opérations d’entretien. ! Pour nettoyer le tambour, ne pas utiliser d’abrasifs, de laine d’acier ni de produits de nettoyage pour acier inoxydable. Nettoyez le filtre après chaque cycle Un film coloré peut parfois apparaître à la surface du tambour en acier inoxydable.
Que faire en cas de panne F Votre sèche-linge semble ne pas fonctionner. Avant d’appeler votre Centre de Service d’Entretien (voir Service d’Entretien), passez en revue les suggestions de dépannage suivantes : Problème : Le sèche-linge ne démarre pas. Causes possibles / Solution : ● ● ● ● ● ● ● Le cycle de séchage ne démarre pas. L’appareil met longtemps à sécher. ● ● ● ● ● ● ● ● ● ● 12 La fiche n’est pas branchée dans la prise de courant, ou ne fait pas contact.
Service Après-Vente Avant d’appeler le Centre de Service Après-Vente : ● ● Utilisez le guide de dépannage pour voir si vous pouvez résoudre le problème vous-même (voir Que faire en cas de panne). Si non, éteignez le sèche-linge et appelez le Centre de Service Après-Vente le plus proche. Quelles informations donner au Centre de Service Après-Vente : ● Vos nom, adresse et code postal. ● Votre numéro de téléphone. ● Le type de problème. ● La date d’achat. ● Le modèle de l’appareil (Mod.).
Instruction booklet TUMBLE DRYER F Français, 1 GB Contents English, 15 Important information, 16 GB Installation, 17-18 Where to put your dryer Ventilation Electrical connection Before you start using your dryer Dryer description, 19 The front The back Control panel Start and programmes, 20-21 Choosing a programme Table of programmes TVM631X Laundry, 22-23 Sorting your laundry Wash care labels Special clothing items Drying times Warnings and Suggestions, 24 General safety Disposal Saving energy
Important Information GB For your Venting dryer to operate efficiently, you must follow the regular maintenance schedule shown below: Fluff Filter... ! You MUST clean the fluff filter after EVERY drying cycle. STEP 1. Open the door of your dryer. STEP 2. Pull out the filter (using the two finger grips). STEP 4. Refit the filter. - Make sure the arrows are facing you. STEP 5. Make sure the filter is pushed fully home. - NEVER run the dryer without the filter in position. STEP 3.
Installation Where to put your dryer Permanent venting Place your dryer at a distance from gas ranges, stoves, heaters, or cook tops because flames can damage the appliance. ● If you are going to install the Minimum gap 10mm appliance under a work counter, be sure to leave a 10mm space between the top and any other objects on or above the machine and a 15mm space between the Minimum gaps 15mm sides and lateral furnishings or walls. This is to ensure proper air circulation.
Installation GB Open window venting ! Do not use extension cords. The end of the tube should be directed downwards, to prevent warm moist air from condensing in the room or in the dryer. ! The power cord must not be bent or squashed. ! The power supply cord should be checked periodically and replaced by a cord specially prepared for this dryer and fitted only by authorised technicians (see Service). New or longer power cords are supplied at an extra charge by authorised dealers..
Dryer Description The front The back Control Panel GB Drum Air Intake Vent Rating plate Model & Serial numbers Vent Tube fitted here Filter Caution: Hot! Control panel TIMER Knob Indicator PROGRAMMES Knob ACTIVE Light Drying Guide ALARM Button HEAT Button START Button The START button (Départ) begins drying a selected programme (see Start and Programmes). The Drying Guide allows you to consult a user friendly table of fabric types and load capacities.
Start and Programmes GB Choosing a programme 7. If you wish to eliminate the buzzer sound, press the ALARM button. 1. Plug the dryer into the electrical socket. 2. Sort your laundry according to fabric type (see Laundry). 3. Open the door and make sure the filter is clean and in place (see Maintenance). 4. Load the machine and make sure items are not in the way of the door seal. Close the door. 5.
Start and Programmes Programmes Programme What it does... Automatic Dries completely: Drying your clothes are ready to be (average loads) worn. For average loads (from 1 to 3kg) of Cotton , polycotton or synthetics . How to set it... Note: 1. Select HIGH HEAT (Intensif) by pressing the HEAT button. 2. Position the PROGRAMMES knob on . 3. Press the START button (Départ) The ACTIVE light (Marche) wil turn on. ! If you select LOW HEAT (Délicat), this programme will not dry your clothes.
Laundry GB Sorting your laundry Wash Care Labels Check symbols on clothing labels to make sure that the articles can be tumble dried. ● Sort laundry by fabric type. ● Empty pockets and check buttons. ● Close zippers and hooks and tie loose belts and strings. ● Wring out each item in order to eliminate as much excess water as possible. ! Do not load dripping wet clothes into the dryer. Look at the labels on your garments, especially when tumble drying for the first time.
Laundry Special clothing items Times are approximate and can vary depending upon: Blankets and Bedspreads: acrylic items (Acilan, Courtelle, Orion, Dralon) must be dried with special care on LOW heat setting. Avoid drying for a long period of time. ● ● Pleated or creased garments: read the manufacturer’s drying instructions on the garment. Starched articles: do not dry these with non-starched items.
Warnings and Suggestions GB ! The appliance has been designed and built according to international safety standards. These warnings are given for safety reasons and must be followed carefully.
Maintenance and Care Switching off the electricity Check the drum after each cycle Unplug your dryer when not using it, when cleaning it and during all maintenance operations. Turn the drum manually in order to remove small items (handkerchiefs) that could have been left behind. GB Cleaning the drum Clean the filter after each cycle The filter is an important part of your dryer: it accumulates lint and fluff that is formed while drying. Small items could also become trapped in the filter.
Troubleshooting GB One day your dryer seems not to be working. Before you call your Service Centre (see Service), go through the following troubleshooting suggestions: Problem: Possible causes / Solution: The tumble dryer won’t start. ● ● ● ● ● ● ● Drying cycle will not begin. ● Its taking a long time to dry. ● ● ● ● ● ● ● ● ● 26 The plug is not plugged into the socket, or not making contact. There has been a power failure. The fuse has blown. Try to plug another appliance into the socket.
Service Before calling the Service Centre: ● ● Use the troubleshooting guide to see if you can solve the problem yourself (see Troubleshooting). If not, turn off the dryer and call the Service Centre closest to you. What to tell the Service Centre: name, address and post code. ● telephone number. ● the type of problem. ● the date of purchase. ● the appliance model (Mod.). ● the serial number (S/N). This information can be found on the data label inside the door of the machine.
195067285.00 W 02/2008 - SIMLEX .